Embedded Linux Completely from Scratch
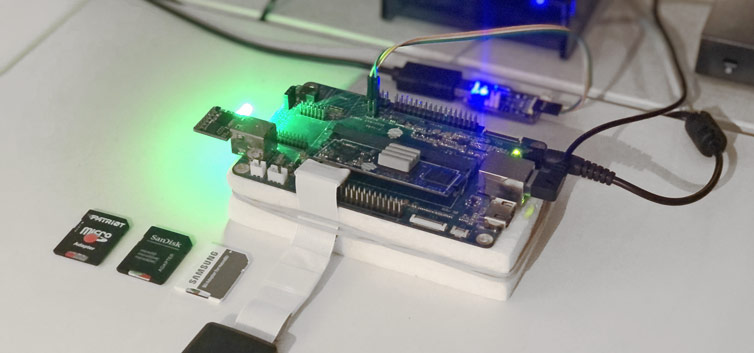
Each node of my cluster computer has 2GiB of memory. RAM is at a premium. Each node is nameless and stateless like an AWS Lambda (or Rancher cattle, or Saltstack Minion), so the entire OS must reside in scarce memory along with the user space for jobs like map-reduce operations.
Having explored minimal Debian, Alpine Linux, and even RancherOS1 the most rewarding conclusion is to put in the time to learn to compile Linux from scratch for ARM64 (also called ARMv8 and AArch64).
Here are the talking points:
- Kernel, Initramfs, DTBs
- Deep-Learning Settings
- U-Boot and iPXE Bootloaders
- User Processes and Daemons
- Network Bootloading on Real Hardware
- Gotchas and More Tips
- Conclusion
Creating an Embedded Linux Distro
Here is a checklist of items needed to build and network-boot a Linux distro into RAM:
- Bootloader stage 1 (U-Boot in SPI flash)
- Bootloader stage 2 (iPXE for HTTP transport)
- Linux kernel and drivers
- Device hardware tree (DTB)
- Initramfs – RAM filesystem
- User-space daemons
- PXE server
The plan is first to compile the Linux kernel and initramfs and run them directly in a virtual environment (QEMU). Next, compile U-Boot and iPXE bootloaders. Then, we’ll see if I can bootload the distro in QEMU. I’ll then add a daemon that makes a light blink to show boot was successful. Penultimately, I’ll set up Dnsmasq and a TFTP server to boot some real hardware. Finally, I’ll try to optimize the kernel image size.
Part 1 – Kernel, Initramfs, DTBs
The first milestone is to compile the kernel, the RAM filesystem, and device trees (DTBs) from Git source.
Cross-Compiled Linux From Scratch (CLFS)
Has anyone done this before? Using the work of CLFS and Cortex A53 hackers, I first attempt to reproduce their written steps in a Dockerfile.
Most of this work is going to take place in a Dockerfile because one’d prefer not to wget large archives each time the compilation fails while learning. Docker can cache previous steps, including previous downloads and build stages. The first six chapters of the CLFS guide can be scripted (with my updates added, like using arm64 instead of 32-bit arm, and using armv8-a instead of… nothing), so here is my initial Dockerfile (remember, please do not use this) following the old CLFS guide to getting to the interactive Linux kernel compilation:
1 2 3 4 5 6 7 8 9 10 11 12 13 14 15 16 17 18 19 20 21 22 23 24 25 26 27 28 29 30 31 32 33 34 35 36 37 38 39 40 41 42 43 44 45 46 47 48 49 50 51 52 53 54 55 56 57 58 59 60 61 62 63 64 65 66 67 68 69 70 71 72 73 74 75 76 77 78 79 80 81 82 83 84 85 86 87 88 89 90 91 92 93 94 95 96 97 98 99 100 101 102 103 104 105 106 107 108 109 110 111 112 113 114 115 116 117 118 119 120 121 122 123 124 125 126 127 128 129 130 131 132 133 134 135 136 137 138 139 140 141 142 143 144 145 146 147 148 149 150 151 152 153 154 155 156 157 158 159 160 161 162 163 164 165 166 167 168 169 170 171 172 173 174 175 176 177 178 179 180 181 182 183 184 185 186 187 188 189 190 191 192 193 194 195 196 197 198 199 200 201 202 203 204 205 206 207 208 209 210 211 212 213 214 215 216 217 218 219 220 221 222 223 224 225 226 227 228 229 230 231 232 233 234 235 236 237 238 239 240 241 242 243 244 245 246 247 248 249 250 251 252 253 254 255 256 257 258 259 260 261 262 263 264 265 266 267 268 269 270 271 272 273 274 275 276 277 278 279 280 281 282 283 284 285 286 287 288 289 290 291 292 293 294 295 296 297 298 299 300 301 302 303 304 305 306 307 308 309 310 311 312 313 314 315 316 317 318 319 320 321 322 323 324 325 326 327 328 329 330 331 332 333 334 335 336 337 338 339 340 341 342 | # This is just Debian with a lot of build tools FROM ericdraken/aarch64-tools:debian # Use Bash over default Bourne shell SHELL ["/bin/bash", "-c"] WORKDIR /clfs RUN apt-get update &&\ apt-get install -yq \ gawk \ ncurses-dev \ sudo \ texinfo \ wget \ rsync \ autogen # Ch 2.2 ENV CLFS=/clfs RUN mkdir -p "${CLFS}" && chmod 777 "${CLFS}" RUN mkdir -v "${CLFS}/sources" ENV LC_ALL=POSIX ENV PATH="${CLFS}/cross-tools/bin:/bin:/usr/bin" # Ch 2.3 # BusyBox (1.24.2) - 2019 KB: RUN wget -P "${CLFS}/sources/" https://busybox.net/downloads/busybox-1.32.0.tar.bz2 # GCC (6.2.0) - 97441 KB: RUN wget -P "${CLFS}/sources/" https://gcc.gnu.org/pub/gcc/releases/gcc-10.2.0/gcc-10.2.0.tar.xz # CLFS-Bootscripts (git master HEAD) - 3 KB RUN wget -P "${CLFS}/sources/" https://github.com/cross-lfs/bootscripts-embedded/archive/master.tar.gz # Binutils (2.27) - 25488 KB RUN wget -P "${CLFS}/sources/" https://ftp.gnu.org/gnu/binutils/binutils-2.35.tar.xz # GMP (6.1.1) - 2330 KB: RUN wget -P "${CLFS}/sources/" https://ftp.gnu.org/gnu/gmp/gmp-6.2.1.tar.xz # iana-etc (2.30) - 200 KB RUN wget -P "${CLFS}/sources/" http://sethwklein.net/iana-etc-2.30.tar.bz2 # Linux (4.9.248) - 91034 KB RUN wget -P "${CLFS}/sources/" https://cdn.kernel.org/pub/linux/kernel/v5.x/linux-5.10.3.tar.xz # MPC (1.0.3) - 655 KB: RUN wget -P "${CLFS}/sources/" https://ftp.gnu.org/gnu/mpc/mpc-1.2.1.tar.gz # MPFR (3.1.4) - 1250 KB: RUN wget -P "${CLFS}/sources/" https://ftp.gnu.org/gnu/mpfr/mpfr-4.1.0.tar.xz # musl (1.1.16) - 906 KB: RUN wget -P "${CLFS}/sources/" http://www.musl-libc.org/releases/musl-1.2.1.tar.gz # Ch 2.4 # Iana-Etc Update Patch - 4 KB RUN wget -P "${CLFS}/sources/" http://patches.clfs.org/embedded-dev/iana-etc-2.30-update-2.patch # Ch 4.3 # Cortex A53 uses hardware floats ENV CLFS_FLOAT=hard # Cortex A53 uses vfpv4 and neon, but neon is more advanced ENV CLFS_FPU=neon # $(echo ${MACHTYPE} | sed "s/-[^-]*/-cross/") ENV CLFS_HOST=x86_64-cross-linux-gnu ENV CLFS_TARGET=aarch64-alpine-linux-musl ENV CLFS_ARCH=arm64 ENV CLFS_ARM_ARCH=armv8-a # Ch 4.4 RUN mkdir -p "${CLFS}/cross-tools/${CLFS_TARGET}" &&\ ln -sfv . "${CLFS}/cross-tools/${CLFS_TARGET}/usr" # Make Linux headers RUN mkdir -pv "${CLFS}/headers" &&\ tar -xf ${CLFS}/sources/linux-*.tar.xz -C "${CLFS}/headers" --strip-components=1 &&\ cd "${CLFS}/headers" &&\ make -j8 mrproper &&\ make -j8 ARCH=${CLFS_ARCH} headers_check &&\ make -j8 ARCH=${CLFS_ARCH} INSTALL_HDR_PATH=${CLFS}/cross-tools/${CLFS_TARGET} headers_install # Make Binutils RUN mkdir -pv "${CLFS}/binutils" &&\ tar -xf ${CLFS}/sources/binutils-*.tar.xz -C "${CLFS}/binutils" --strip-components=1 &&\ cd "${CLFS}/binutils" &&\ pwd &&\ ls -al &&\ ./configure \ --prefix=${CLFS}/cross-tools \ --target=${CLFS_TARGET} \ --with-sysroot=${CLFS}/cross-tools/${CLFS_TARGET} \ --disable-nls \ --disable-multilib &&\ make -j8 configure-host &&\ make -j8 &&\ make -j8 install # Ch. 4.7 # Build GCC required libs RUN mkdir -pv "${CLFS}/gmp" &&\ tar -xf ${CLFS}/sources/gmp-*.tar.xz -C "${CLFS}/gmp" --strip-components=1 &&\ cd "${CLFS}/gmp" &&\ ./configure \ --disable-shared \ --enable-static \ --prefix=${CLFS}/gmp &&\ make -j8 &&\ make -j8 check &&\ make -j8 install RUN mkdir -pv "${CLFS}/mpfr" &&\ tar -xf ${CLFS}/sources/mpfr-*.tar.xz -C "${CLFS}/mpfr" --strip-components=1 &&\ cd "${CLFS}/mpfr" &&\ ./configure \ --disable-shared \ --enable-static \ --with-gmp=${CLFS}/gmp \ --prefix=${CLFS}/mpfr &&\ make -j8 &&\ make -j8 check &&\ make -j8 install RUN mkdir -pv "${CLFS}/mpc" &&\ tar -xf ${CLFS}/sources/mpc-*.tar.gz -C "${CLFS}/mpc" --strip-components=1 &&\ cd "${CLFS}/mpc" &&\ ./configure \ --disable-shared \ --enable-static \ --with-gmp=${CLFS}/gmp \ --with-mpfr=${CLFS}/mpfr \ --prefix=${CLFS}/mpc &&\ make -j8 &&\ make -j8 check &&\ make -j8 install # Configure GCC RUN mkdir -pv "${CLFS}/gcc/src" &&\ tar -xf ${CLFS}/sources/gcc-*.tar.xz -C "${CLFS}/gcc/src" --strip-components=1 &&\ cd "${CLFS}/gcc" &&\ ./src/configure \ --prefix=${CLFS}/cross-tools \ --build=${CLFS_HOST} \ --host=${CLFS_HOST} \ --target=${CLFS_TARGET} \ --with-sysroot=${CLFS}/cross-tools/${CLFS_TARGET} \ --disable-nls \ --disable-shared \ --without-headers \ --with-newlib \ --disable-decimal-float \ --disable-libgomp \ --disable-libmudflap \ --disable-libssp \ --disable-libatomic \ --disable-libquadmath \ --disable-threads \ --enable-languages=c \ --disable-multilib \ --with-gmp=${CLFS}/gmp \ --with-mpc=${CLFS}/mpc \ --with-mpfr=${CLFS}/mpfr \ --with-arch=${CLFS_ARM_ARCH} \ --with-float=${CLFS_FLOAT} \ --with-fpu=${CLFS_FPU} RUN cd "${CLFS}/gcc" &&\ make -j8 all-gcc all-target-libgcc &&\ make -j8 install-gcc install-target-libgcc # Ch. 4.8.1. Installation of musl RUN mkdir -pv "${CLFS}/musl" &&\ tar -xf ${CLFS}/sources/musl-*.tar.gz -C "${CLFS}/musl" --strip-components=1 &&\ cd "${CLFS}/musl" &&\ ./configure \ CROSS_COMPILE=${CLFS_TARGET}- \ --prefix=/ \ --target=${CLFS_TARGET} &&\ DESTDIR=${CLFS}/cross-tools/${CLFS_TARGET} make install # Ch. 4.9. GCC-6.2.0 - Final RUN mkdir -pv "${CLFS}/gcc-final/src" &&\ tar -xf ${CLFS}/sources/gcc-*.tar.xz -C "${CLFS}/gcc-final/src" --strip-components=1 &&\ cd "${CLFS}/gcc-final" &&\ ./src/configure \ --prefix=${CLFS}/cross-tools \ --build=${CLFS_HOST} \ --host=${CLFS_HOST} \ --target=${CLFS_TARGET} \ --with-sysroot=${CLFS}/cross-tools/${CLFS_TARGET} \ --disable-nls \ --enable-languages=c \ --enable-c99 \ --enable-long-long \ --disable-libmudflap \ --disable-multilib \ --with-gmp=${CLFS}/gmp \ --with-mpc=${CLFS}/mpc \ --with-mpfr=${CLFS}/mpfr \ --with-arch=${CLFS_ARM_ARCH} \ --with-float=${CLFS_FLOAT} \ --with-fpu=${CLFS_FPU} RUN cd "${CLFS}/gcc-final" &&\ make -j8 &&\ make -j8 -k check &&\ make -j8 install # A warning after the previous step RUN ${CLFS}/gcc-final/arm-linux-musleabihf/libatomic/libtool --finish ${CLFS}/cross-tools/arm-linux-musleabihf/lib # Ch. 4.10 RUN mkdir -pv ${CLFS}/targetfs ENV CC=\""${CLFS_TARGET}-gcc --sysroot=${CLFS}/targetfs\"" ENV CXX=\""${CLFS_TARGET}-g++ --sysroot=${CLFS}/targetfs\"" ENV AR=\""${CLFS_TARGET}-ar\"" ENV AS=\""${CLFS_TARGET}-as\"" ENV LD=\""${CLFS_TARGET}-ld --sysroot=${CLFS}/targetfs\"" ENV RANLIB=\""${CLFS_TARGET}-ranlib\"" ENV READELF=\""${CLFS_TARGET}-readelf\"" ENV STRIP=\""${CLFS_TARGET}-strip\"" RUN printenv # Ch. 5 Folders RUN mkdir -pv ${CLFS}/targetfs/{bin,boot,dev,etc,home,lib/{firmware,modules}} &&\ mkdir -pv ${CLFS}/targetfs/{mnt,opt,proc,sbin,srv,sys} &&\ mkdir -pv ${CLFS}/targetfs/var/{cache,lib,local,lock,log,opt,run,spool} &&\ install -dv -m 0750 ${CLFS}/targetfs/root &&\ install -dv -m 1777 ${CLFS}/targetfs/{var/,}tmp &&\ mkdir -pv ${CLFS}/targetfs/usr/{,local/}{bin,include,lib,sbin,share,src} # Root user RUN mkdir -p ${CLFS}/targetfs/etc &&\ echo '\ root::0:0:root:/root:/bin/ash'\ > ${CLFS}/targetfs/etc/passwd &&\ cat ${CLFS}/targetfs/etc/passwd # Create users and groups RUN echo '\ root:x:0:\n\ bin:x:1:\n\ sys:x:2:\n\ kmem:x:3:\n\ tty:x:4:\n\ tape:x:5:\n\ daemon:x:6:\n\ floppy:x:7:\n\ disk:x:8:\n\ lp:x:9:\n\ dialout:x:10:\n\ audio:x:11:\n\ video:x:12:\n\ utmp:x:13:\n\ usb:x:14:\n\ cdrom:x:15:\n\ adm:x:16:root,adm,daemon\n\ console:x:17:\n\ cdrw:x:18:\n\ mail:x:30:mail\n\ news:x:31:news\n\ uucp:x:32:uucp\n\ users:x:100:\n\ nogroup:x:65533:\n\ nobody:x:65534:' \ > ${CLFS}/targetfs/etc/group &&\ cat ${CLFS}/targetfs/etc/group # Create lastlog RUN mkdir -p ${CLFS}/targetfs/var/log &&\ touch ${CLFS}/targetfs/var/log/lastlog &&\ chmod -v 664 ${CLFS}/targetfs/var/log/lastlog # Ch. 5.4.1 # Copy libgcc and make it smaller RUN mkdir -p ${CLFS}/targetfs/lib &&\ cp -v ${CLFS}/cross-tools/${CLFS_TARGET}/lib/libgcc_s.so.1 ${CLFS}/targetfs/lib/ &&\ ${CLFS_TARGET}-strip ${CLFS}/targetfs/lib/libgcc_s.so.1 # Install musl, only build the shared object version RUN mkdir -pv "${CLFS}/musl-shared" &&\ tar -xf ${CLFS}/sources/musl-*.tar.gz -C "${CLFS}/musl-shared" --strip-components=1 &&\ cd "${CLFS}/musl-shared" &&\ ./configure \ CC=${CLFS_TARGET}-gcc \ CROSS_COMPILE=${CLFS_TARGET}- \ --prefix=/ \ --disable-static \ --target=${CLFS_TARGET} &&\ DESTDIR=${CLFS}/cross-tools/${CLFS_TARGET} make install # Ch. 5.6.1. Installation of BusyBox RUN mkdir -pv "${CLFS}/busybox" &&\ tar -xf ${CLFS}/sources/busybox-*.tar.bz2 -C "${CLFS}/busybox" --strip-components=1 &&\ cd "${CLFS}/busybox" &&\ make -j8 distclean &&\ make -j8 ARCH="${CLFS_ARCH}" defconfig \ # Disable building both ifplugd and inetd as they both have issues building against musl sed -i 's/\(CONFIG_\)\(.*\)\(INETD\)\(.*\)=y/# \1\2\3\4 is not set/g' .config &&\ sed -i 's/\(CONFIG_IFPLUGD\)=y/# \1 is not set/' .config &&\ # Disable the use of utmp/wtmp as musl does not support them sed -i 's/\(CONFIG_FEATURE_WTMP\)=y/# \1 is not set/' .config &&\ sed -i 's/\(CONFIG_FEATURE_UTMP\)=y/# \1 is not set/' .config &&\ # Disable the use of ipsvd for both TCP and UDP as it has issues building against musl (similar to inetd's issues) sed -i 's/\(CONFIG_UDPSVD\)=y/# \1 is not set/' .config &&\ sed -i 's/\(CONFIG_TCPSVD\)=y/# \1 is not set/' .config &&\ make -j8 ARCH="${CLFS_ARCH}" CROSS_COMPILE="${CLFS_TARGET}-" &&\ make -j8 ARCH="${CLFS_ARCH}" CROSS_COMPILE="${CLFS_TARGET}-" CONFIG_PREFIX="${CLFS}/targetfs" install # Ch. 5.7.1. Installation of Iana-Etc RUN mkdir -pv "${CLFS}/iana-etc" &&\ tar -xf ${CLFS}/sources/iana-etc-*.tar.bz2 -C "${CLFS}/iana-etc" --strip-components=1 &&\ cd "${CLFS}/iana-etc" &&\ # Apply a patch - Iana-etc comes with outdated data and IANA has changed the download location used to obtain up-to-date data patch -Np1 -i ${CLFS}/sources/iana-etc-*.patch &&\ make -j8 get &&\ make -j8 STRIP=yes &&\ make -j8 DESTDIR=${CLFS}/targetfs install # Ch. 6.2. Creating the /etc/fstab File RUN echo '# file-system mount-point type options dump fsck'\ > ${CLFS}/targetfs/etc/fstab &&\ cat ${CLFS}/targetfs/etc/fstab # Make the Linux kernel RUN mkdir -p "${CLFS}/kernel" &&\ tar -xf ${CLFS}/sources/linux-*.tar.xz -C "${CLFS}/kernel" --strip-components=1 &&\ cd "${CLFS}/kernel" &&\ make -j8 mrproper # Start the kernel configuration menu CMD bash -c "cd ${CLFS}/kernel/ && make ARCH=${CLFS_ARCH} CROSS_COMPILE=${CLFS_TARGET}- menuconfig" |
At first blush, this appears to be succeeding because next, we’ll configure the Linux kernel.
Linux Kernel Configuration
When the Linux kernel configuration menu appeared for the first time after a day of writing the above Dockerfile, I had no idea what I was doing. Do I need ARM Accelerated Cryptographic Algorithms? What is “Accelerated scalar and SIMD Poly1305 hash implementations”? What is the Kernel Hacking sub-menu? Should I debug “Oops, Lockups, and Hangs”? Do I need the new Google Firmware Drivers? What is all this?
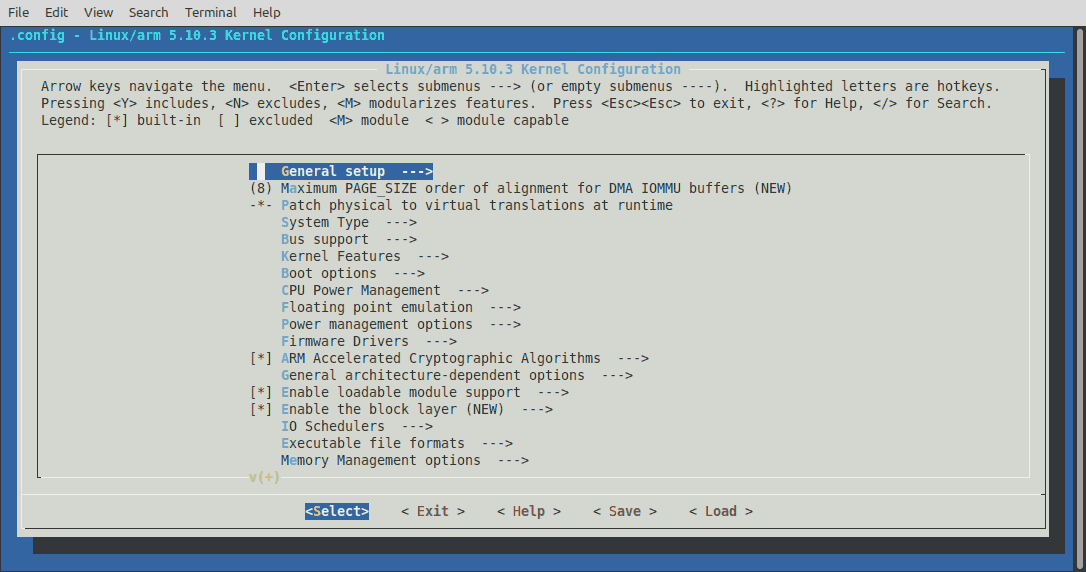
Fortunately, there is a body of work from some Cortex A53 (Pine64) kernel hackers23, though abandoned since 2018. What they left for me to reverse engineer is two kernel configurations for the same hardware I’m targeting with nominal settings and minimal settings. One line item I noticed is CONFIG_KERNEL_MODE_NEON=y. What is this? According to Arm4,
Neon technology is a packed SIMD architecture. Neon registers are considered as vectors of elements… Neon can also accelerate signal processing algorithms and functions to speed up applications such as audio and video processing, voice and facial recognition, computer vision, and deep learning.
That sounds wonderful – let’s keep that, right? I admit I have no idea what to include, so I’ll include all I can for now and whittle down features as I learn about them.
__int128_t not being defined (available on x64 toolchains), which means the toolchain needs to be reworked on my own.Cryptography and Deep-Learning Settings
Let’s take a moment to see what is under the hood in the Cortex A53 CPU since CPU instruction sets came up.
The CLFS guide suggests using CLFS_ARM_ARCH=armv7. I know the 64-bit Arm chips are at least armv8. Digging around the net I came to an Arm article that piqued my curiosity – it made reference to minor versions of the Armv8 architecture: armv8.1-a, armv8.2-a, etc. that add vector support and SIMD instructions for deep learning. My Cortex A53 chips are ubiquitous, but they only use the armv8.0-a instruction set. Adding to that, we can select extensions to the instruction set:
+crc– The Cyclic Redundancy Check (CRC) instructions.+simd– The ARMv8-A Advanced SIMD and floating-point instructions.+crypto– The cryptographic instructions.+sb– Speculation Barrier Instruction5.+predres– Execution and Data Prediction Restriction Instructions.+nofp– Disable the floating-point, Advanced SIMD, and cryptographic instructions.
How do we want to tune the compiled code? Looking at the above, if my tuned code is aimed at processing whole-number time-series data (and it is), then I want floating-points off to speed up whole-number arithmetic. However, if performing ML (and I will), then floats are critical to have in hardware. Decisions, decisions. For now, I will leave hardware floats on and tweak these in the future. Regardless, this is valuable information about tuned instruction sets for specific work.
AArch64 Musl Cross-Compile Toolchain
Trying to keep this a manageable project, I forked and updated an existing toolchain project: https://github.com/ericdraken/musl-cross-make. This is the latest, stable cross-compile build tool using Musl for ARM64 with SHA1 download verifications. With this, I’ll continue on to build the kernel again, next.
1 2 3 4 5 6 7 8 9 10 11 12 13 | # Docker environment variables to build Linux and the toolchain (2021) ENV TARGET = aarch64-linux-musl ENV BINUTILS_VER = 2.35.1 ENV GCC_VER = 10.2.0 ENV MUSL_VER = 1.2.1 ENV GMP_VER = 6.2.1 ENV MPC_VER = 1.2.1 ENV MPFR_VER = 4.1.0 ENV ISL_VER = 0.21 ENV LINUX_VER = 5.10.4 RUN git clone --depth 1 -b envvars https://github.com/ericdraken/musl-cross-make . &&\ make -j8 && make -j8 install |
These tools compiled beautifully, so let’s update the initial Dockerfile to use the new toolchain. That should work, right?
Enter Buildroot – A Cross-Compilation Embedded-Linux Build Tool
After manually going through all the CLFS steps to compile a Linux distro, it turns out there is a project by the team at the Buildroot Association to do exactly my goal: compile a kernel and rootfs using the latest Linux source, musl, GCC 10+, and all on AArch64 for Cortex A53 and with the device trees for my SoC boards. Just beautiful. Here, I’ll offer my automated and optimized scripts for building complete embedded Linux “distros” for my cluster computer.
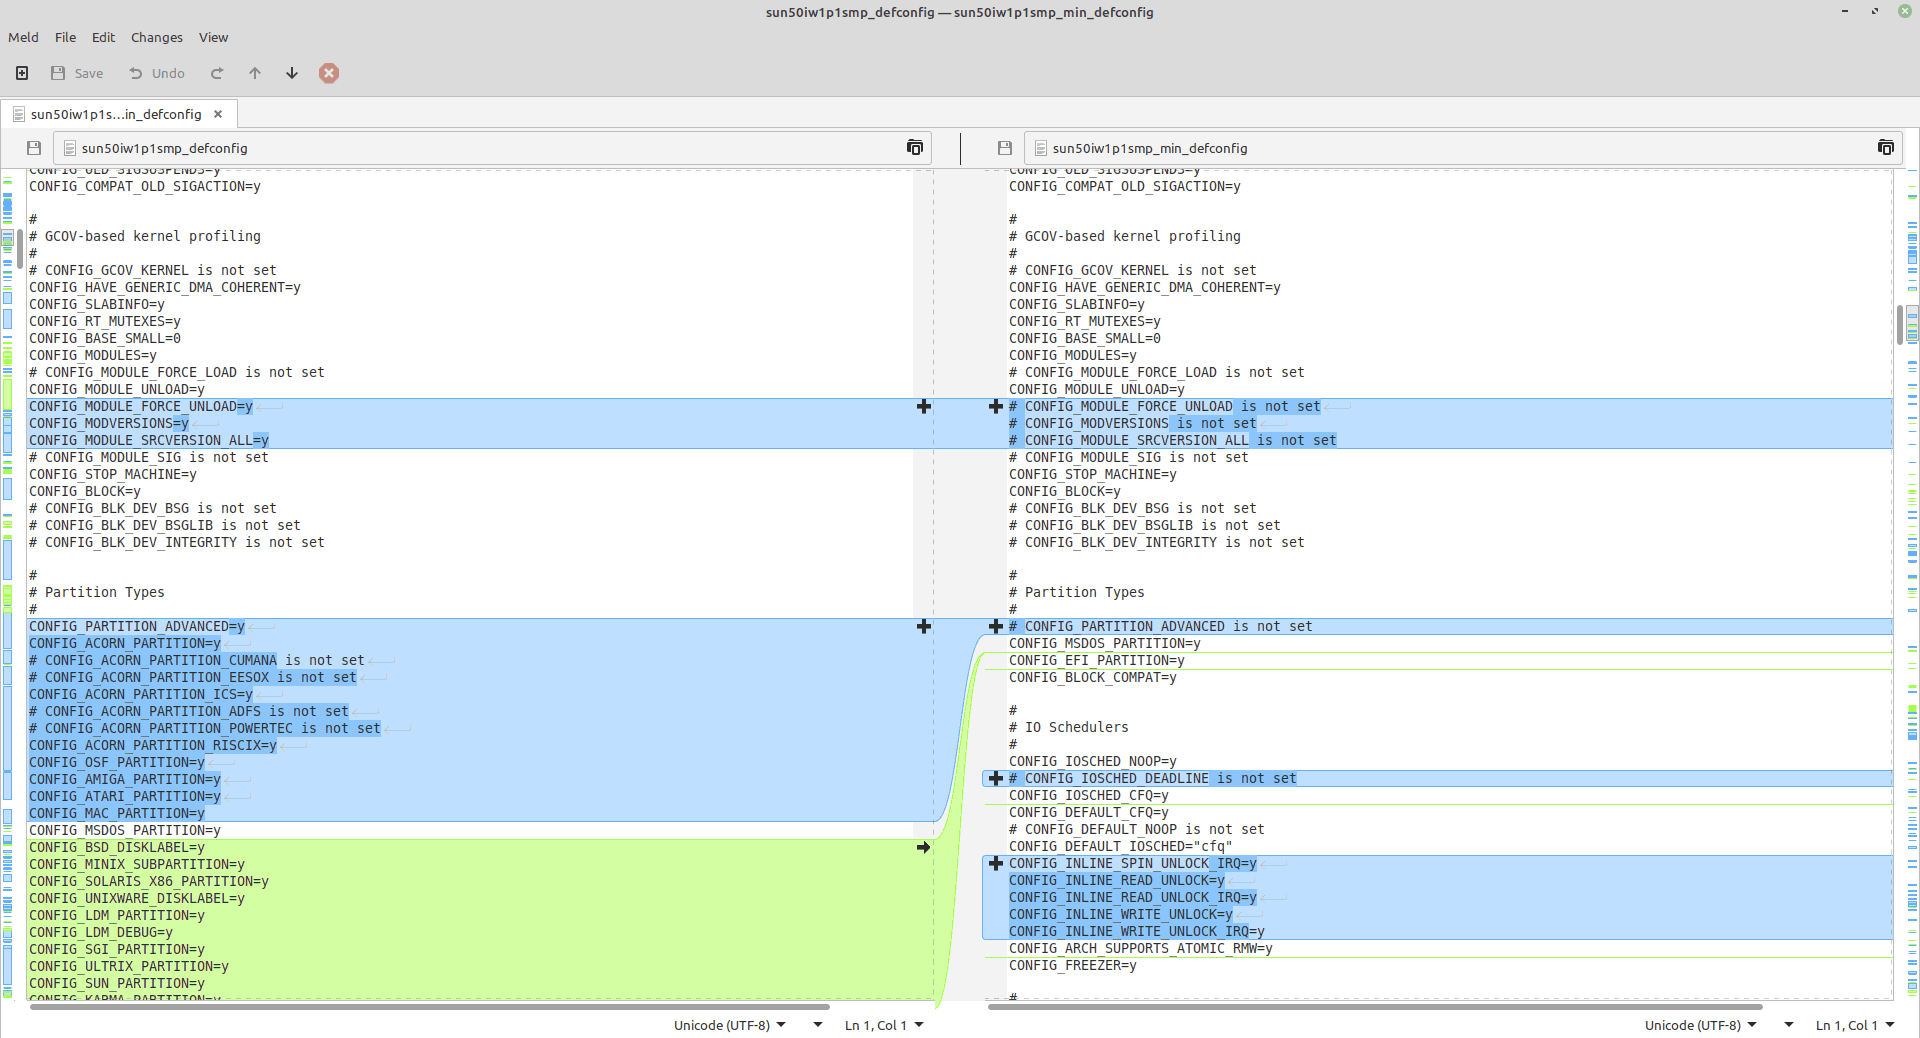
Buildroot has a handy Xconfig GUI to visually edit the configuration settings, but most of the time I will edit them in the shell by hand and for faster diffing between tweaks.

Increase Build Speed
What works great is to use a Docker image with host build tools, and when I run it for a build, I mount a local folder to /downloads, and a wipeable Docker volume to /ccache. This way compilation is greatly sped up with caching, and downloads are already present. This saves downloading hundreds of megabytes per build.
Compiling the toolchain takes about 70% of the build time. Let’s cache that too. Buildroot suggests to compile a toolchain SDK, save to a tarball, and use it again as an external toolchain.
Additionally, I like to blow away my entire work folder on each run. Why? Believe me, runs from previous builds are additive, not selective. I like to maintain individual config files and a pristine git folder of Buildroot. After cleaning, I copy those back to a work folder. Clean.
ccache folder (or Docker volumes) to avoid downloading over 800MB of packages each build, and speed up GCC on recompilation of gigabytes of object files. A full rebuild takes about 8 minutes.External Toolchain
This is the most important section. I’ve experimented with several toolchains like Linaro, ARM’s, glibc, musl, and others. I prefer musl because builds compile smaller, and it feels like I’m working with Alpine Docker images.
Building my own toolchain, I can use the latest kernel headers, GCC, and musl version. Plus I can tune the builds for performance and size closely. Nice.
Linux Kernel Settings
We can compile the latest kernel from source. However, configuring the kernel is amazingly complex – there are far too many options and tri-state drivers to choose from for all kinds of hardware. What I’ve learned is to include all possible USB and USB HID modules because soon I will control a Blinkstick from this forthcoming tiny distro. One way to go is to select all options and drivers and bloat the kernel image like a blowfish, then whittle away drivers once all hardware works outright.
Here is a sample of those complex build options again:
BusyBox
Space is at a premium, but only a subset of shell utilities is required in embedded systems. BusyBox handles most of what an embedded system needs. Some features are missing, like sort -h (human-readable number sort), but the space savings greatly make up for these inconveniences at around ~720KiB for one binary that does it all.
BusyBox must also be compiled from source and can be heavily configured. Again, include everything so that userspace apps work, then remove features, build, and bisect until an optimal BusyBox binary is reached.
1 2 3 4 5 6 7 8 9 10 11 | # du -ah /bin/* | sort -n -r | head -10 724.0K /bin/busybox 272.0K /bin/iozone 216.0K /bin/nano 192.0K /bin/netserver 184.0K /bin/netperf 64.0K /bin/ping 36.0K /bin/smtpd.py.9 36.0K /bin/fileop 28.0K /bin/ramsmp 20.0K /bin/ramspeed |
Device Trees (DTBs)
This is an interesting one: the Linux kernel can compile the DTBs, or not, or the U-Boot bootloader can compile them. The DTBs (FIT) can be baked into the Kernel, specified externally with “bootargs”, or referenced from memory when U-Boot loads the DTB independently. I spent a good deal of time experimenting here because with the wrong settings, the kernel doesn’t display anything to the console. Fun.
1 2 3 4 | 27K sun50i-a64-pine64-lts.dtb 27K sun50i-a64-pine64-plus.dtb 27K sun50i-a64-pine64.dtb 27K sun50i-a64-sopine-baseboard.dtb |
dtb=... through the bootloader.QEMU Kernel Emulation
This was a beast. I put QEMU into a Docker image to protect my host from bloat, then I figured out how to pipe USB devices into the container, safely, without the dangerous --privileged flag using Cgroups. Templating this script to be included with each kernel build, here is a sample QEMU script to illustrate some useful flags. See near the end of the script below for the QEMU flags.
1 2 3 4 5 6 7 8 9 10 11 12 13 14 15 16 17 18 19 20 21 22 23 24 25 26 27 28 29 30 31 32 33 34 35 36 37 38 39 40 41 42 43 44 45 46 47 48 49 50 51 52 53 54 55 56 57 58 59 60 61 62 63 64 65 66 67 68 | #!/bin/bash set -e CWD="$(realpath $(dirname $(readlink -f $0)))" IMAGE_FOLDER="$CWD" QEMU_VERSION="5.2.0" echo -e "Starting QEMU...\n" # Locate the first Blinkstick device vendor BS_VENDOR_ID="20a0" BS_PRODUCT_ID="41e5" BLINKSTICK_MAJOR_NUMBER=189 # Default QEMU_USB_DEVICE= USB_PATH="$(grep $BS_VENDOR_ID /sys/bus/usb/devices/*/idVendor | cut -d "/" -f6)" if [ ! -z $USB_PATH ]; then USB_BUS=$(echo $USB_PATH | cut -d "-" -f1); USB_PORT=$(echo $USB_PATH | cut -d "-" -f2); if [ ! -z $USB_BUS ] && [ ! -z $USB_PORT ]; then echo -e "\n*** Blinkstick found ***\n" QEMU_USB_DEVICE="-device qemu-xhci,id=xhci -device usb-host,hostbus=${USB_BUS},hostport=${USB_PORT}" # Get the hardware major number for cgroups USB_BUS_ID="$(lsusb | grep ${BS_VENDOR_ID}:${BS_PRODUCT_ID} | cut -d " " -f2)" USB_DEVICE_ID="$(lsusb | grep ${BS_VENDOR_ID}:${BS_PRODUCT_ID} | cut -d " " -f4 | cut -d ":" -f1)" if [ ! -z "${USB_BUS_ID}" ] && [ ! -z "${USB_DEVICE_ID}" ]; then BLINKSTICK_MAJOR_NUMBER=$(ls -al "/dev/bus/usb/$USB_BUS_ID/$USB_DEVICE_ID" | cut -d " " -f5 | cut -d "," -f1) echo -e "Device major number: ${BLINKSTICK_MAJOR_NUMBER}\n" fi # Test cgroups in docker docker run -it --rm \ -v /dev/bus/usb:/dev/bus/usb:rw \ --device-cgroup-rule "a ${BLINKSTICK_MAJOR_NUMBER}:* rmw" \ --entrypoint "/bin/bash" \ ericdraken/qemu-aarch64:${QEMU_VERSION} \ -c "echo 'Docker USB tree:' && lsusb -t && echo" fi fi # TIP: sudo socat - UNIX-CONNECT:/tmp/qemu-monitor/socket docker run -it --rm \ -v "${CWD}:/buildroot:ro" \ -v "${IMAGE_FOLDER}:/images:ro" \ -v /dev/bus/usb:/dev/bus/usb:rw \ -v /tmp/qemu-monitor:/tmp/qemu-monitor:rw \ --device-cgroup-rule "a ${BLINKSTICK_MAJOR_NUMBER}:* rmw" \ ericdraken/qemu-aarch64:${QEMU_VERSION} \ --trace events="/buildroot/trace-events.txt" \ -M virt \ -m 2048 \ -nographic \ -echr 2 \ -boot n \ -cpu cortex-a53 \ -smp 2 \ -initrd /images/initramfs \ -kernel /images/Image \ -append "console=ttyAMA0" \ -netdev user,id=eth0 \ -device virtio-net-device,netdev=eth0 \ -rtc base=localtime \ -object rng-random,id=rng0,filename=/dev/urandom \ -device virtio-rng-pci,rng=rng0 \ -monitor unix:/tmp/qemu-monitor/socket,server,nowait \ ${QEMU_USB_DEVICE} \ 2>&1 |& tee "${IMAGE_FOLDER}/qemu-log.txt" |
Success. The kernel and RAM filesystem boot up to an interactive shell.
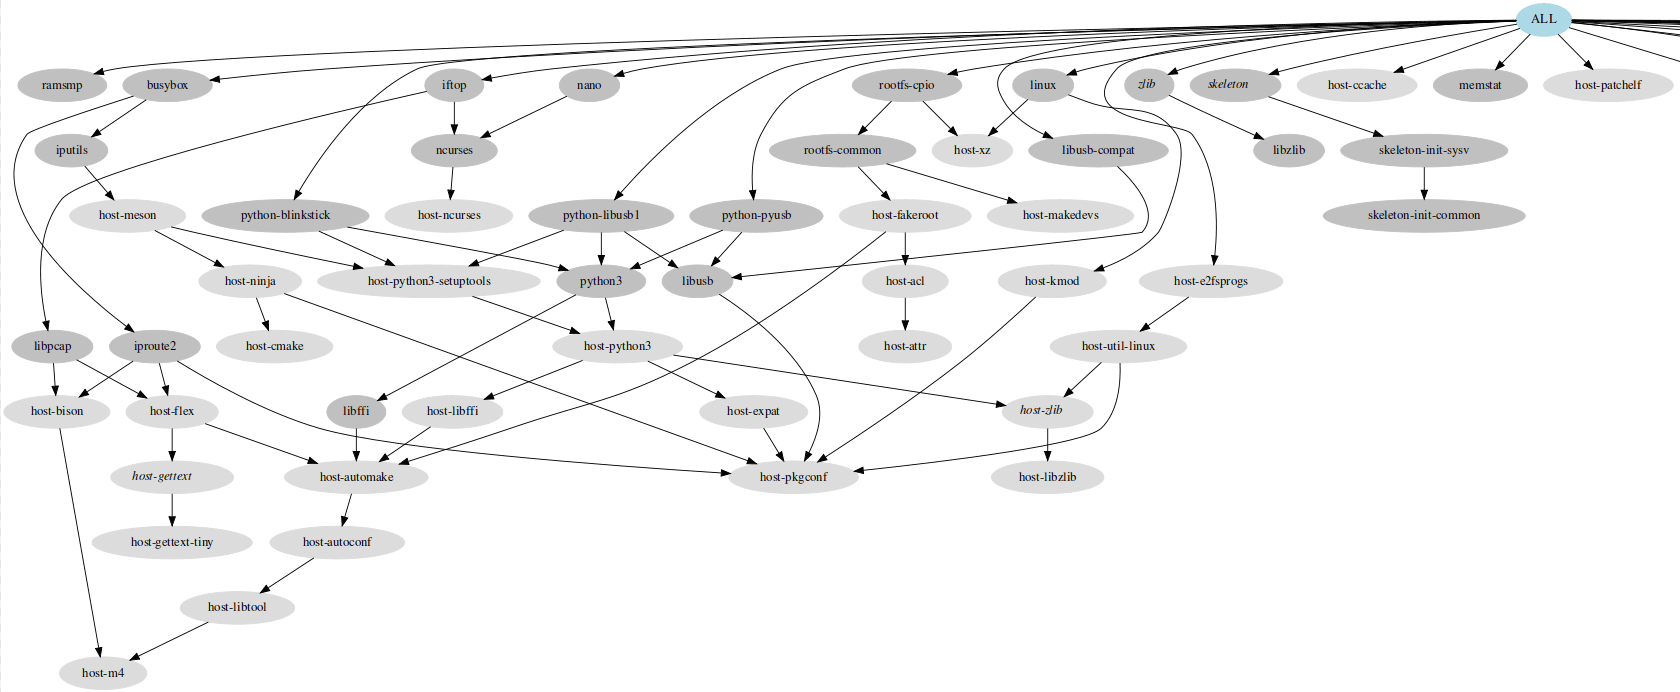
With custom and maintainable build scripts, the result is stripped config files (defconfigs), the device-tree binaries (DTBs), the initramfs and Image files, and even a handy Graphviz graph of the dependencies.
1 2 3 4 5 6 7 8 9 10 11 12 13 14 15 16 17 18 19 20 21 22 | Created assets: . |-- [ 12M] Image |-- [4.0K] configs | |-- [111K] buildroot-config.txt | |-- [1.7K] buildroot-defconfig.txt | |-- [ 31K] busybox-config.txt | |-- [110K] kernel-config.txt | |-- [ 11K] kernel-defconfig.txt | `-- [ 94K] toolchain-config.txt |-- [4.0K] dtb | `-- [4.0K] allwinner | |-- [ 27K] sun50i-a64-pine64-lts.dtb | |-- [ 27K] sun50i-a64-pine64-plus.dtb | |-- [ 27K] sun50i-a64-pine64.dtb | `-- [ 27K] sun50i-a64-sopine-baseboard.dtb |-- [8.9K] graph-depends.dot |-- [ 57K] graph-depends.svg |-- [3.9M] make-log.txt |-- [ 91K] overlay.tar.gz |-- [ 26M] rootfs.cpio `-- [8.2M] rootfs.cpio.xz |
Here is a sample of a Buildroot dependency graph.
Part 2 – U-Boot and iPXE Bootloaders
The next milestone is to compile mainline U-Boot and iPXE, the latter allowing booting over HTTP.
U-Boot – Bare-Metal Bootloader
Credit where credit is due, I reverse-engineered this project to figure out how to flash SPI memory with U-Boot. With this information, I turned to mainline U-Boot to make some custom build scripts. Now I can keep up with mainline releases. Here are my U-Boot settings for my Pine64 modules with detailed logging enabled:
1 2 3 4 5 6 7 8 9 10 11 12 13 14 15 16 17 18 19 20 21 22 23 24 25 26 27 28 29 30 31 32 33 34 35 36 37 38 39 40 41 42 43 44 45 46 47 48 49 50 51 52 53 54 55 56 57 58 59 60 61 62 63 64 65 66 67 68 69 | CONFIG_ARM=y CONFIG_ARCH_QEMU=y CONFIG_NR_DRAM_BANKS=1 CONFIG_ENV_SIZE=0x40000 CONFIG_ENV_SECT_SIZE=0x40000 CONFIG_AHCI=y CONFIG_DISTRO_DEFAULTS=y CONFIG_FIT=y CONFIG_FIT_SIGNATURE=y CONFIG_FIT_VERBOSE=y CONFIG_FIT_BEST_MATCH=y CONFIG_LEGACY_IMAGE_FORMAT=y CONFIG_USE_PREBOOT=y CONFIG_PCI_INIT_R=y CONFIG_CMD_BOOTEFI_SELFTEST=y CONFIG_CMD_NVEDIT_EFI=y CONFIG_CMD_DFU=y CONFIG_CMD_MTD=y CONFIG_CMD_PCI=y CONFIG_CMD_USB=y CONFIG_CMD_MTDPARTS=y CONFIG_OF_BOARD=y CONFIG_ENV_IS_IN_FLASH=y CONFIG_ENV_ADDR=0x4000000 CONFIG_SCSI_AHCI=y CONFIG_AHCI_PCI=y CONFIG_BLK=y CONFIG_DFU_TFTP=y CONFIG_DFU_RAM=y CONFIG_DFU_MTD=y CONFIG_MTD=y CONFIG_DM_MTD=y CONFIG_MTD_NOR_FLASH=y CONFIG_FLASH_CFI_DRIVER=y CONFIG_CFI_FLASH=y CONFIG_SYS_FLASH_USE_BUFFER_WRITE=y CONFIG_FLASH_CFI_MTD=y CONFIG_SYS_FLASH_CFI=y CONFIG_DM_ETH=y CONFIG_E1000=y CONFIG_NVME=y CONFIG_PCI=y CONFIG_DM_PCI=y CONFIG_PCIE_ECAM_GENERIC=y CONFIG_SCSI=y CONFIG_DM_SCSI=y CONFIG_SYSRESET=y CONFIG_SYSRESET_PSCI=y CONFIG_USB=y CONFIG_DM_USB=y CONFIG_USB_EHCI_HCD=y CONFIG_USB_EHCI_PCI=y CONFIG_CMD_MEMTEST=y CONFIG_SYS_PROMPT="U-Boot> " # Prevent "bad CRC" warning CONFIG_ENV_IS_IN_FAT=n CONFIG_ENV_IS_NOWHERE=y CONFIG_SPL_OPTIMIZE_INLINING=y # Detailed logging CONFIG_LOG=y CONFIG_LOG_CONSOLE=y CONFIG_LOG_SYSLOG=y CONFIG_LOGLEVEL=7 CONFIG_LOG_DEFAULT_LEVEL=7 CONFIG_LOG_ERROR_RETURN=y CONFIG_LOGF_FILE=y CONFIG_LOGF_LINE=y CONFIG_LOGF_FUNC=y |
The embedded commands to flash the SPI with U-Boot are quite small (named flash-spi.cmd):
1 2 3 4 5 6 7 8 9 10 11 12 | sf probe echo Reading flash... ${devtype} read ${kernel_addr_r} 10 1f40; echo Erasing flash... sf erase 0 3e8000 echo Eriting flash... sf write ${kernel_addr_r} 0 3e8000 echo Done |
Then, the most important addition to the mainline U-Boot Makefile is some appended rules to build the SPI flasher:
1 2 3 4 5 6 7 8 9 10 11 12 13 14 15 16 17 18 19 20 21 22 23 24 25 26 27 28 | # Extra makefile targets cat << 'EOF' >> "$BASE_DIR/Makefile" u-boot-%.img: custom-u-boot-sunxi-with-spl.bin tmp/u-boot/%/boot.img rm -f $@.tmp dd if=$(word 2,$^) of=$@.tmp seek=8192 conv=notrunc status=none parted -s $@.tmp mklabel msdos parted -s $@.tmp unit s mkpart primary fat16 8192 100% parted -s $@.tmp set 1 boot on dd if=$(word 1,$^) of=$@.tmp seek=16 conv=notrunc status=none mv "$@.tmp" $(BUILD_DIR)/$@ custom-u-boot-sunxi-with-spl.bin: cat $(BUILD_DIR)/spl/sunxi-spl.bin $(BUILD_DIR)/u-boot.itb > $@ tmp/u-boot/%/boot.scr: %.cmd mkdir -p $$(dirname $@) mkimage -C none -A arm -T script -d $< $@ tmp/u-boot/%/boot.img: tmp/u-boot/%/boot.scr dd if=/dev/zero of=$@ bs=1M count=2 mkfs.vfat -n "u-boot-flash" $@ mcopy -sm -i $@ $< :: .PHONY: spi-flasher spi-flasher: \ u-boot-flash-spi.img EOF |
With this technique of appending Makefile targets, we can continue to use mainline and simply append my SPI-flasher targets on new releases, then build with make all && make spi-flasher.
iPXE – Secondary HTTP Bootloader
iPXE (Pre-eXecution Environment) is overkill, but as a secondary bootloader that can load the kernel and initramfs over HTTP(S) with a lot of flexibility, it’s wonderful. If we need to drop into the iPXE shell, there are several handy networking and debugging tools available as well. Plus, we can chainload over HTTP meaning iPXE can ask for bootscripts to make further HTTP network-boot requests. The responses can be dynamic since the requests call an HTTP server. Imagination, activate.
Not everything is rainbows, as iPXE uses interrupts, but U-Boot (which launches iPXE) runs on a single thread, so hacking is needed. Also, several ARM64 features have not been added to iPXE (they exist in x86-64) and from reading the room in the message boards they will not be added, so, more hacking. Honestly, I was a hair away from abandoning iPXE and bootloading over NFS, but I persisted. Maybe this will be useful to others.
1 2 3 4 5 6 7 8 9 10 11 12 13 14 15 16 17 18 19 20 21 22 23 24 25 26 27 28 29 30 31 32 33 34 35 36 37 38 39 40 41 42 43 44 45 46 47 48 49 50 51 52 53 54 55 56 57 58 59 60 61 62 63 64 65 66 67 68 69 70 71 72 73 | # iPXE Builder Dockerfile FROM ericdraken/aarch64-tools:debian RUN git clone --depth=1 -b v1.21.1 https://github.com/ipxe/ipxe.git /ipxe WORKDIR /ipxe/src ENV make_cmd="make -j8 ARCH=arm64 CROSS_COMPILE='aarch64-linux-gnu-' " # Fix the problem when PXE is single-threaded, but iPXE uses interrupts, # and prevent redefining cpu_nap() by avoiding efiarm_nap.h from loading. RUN echo "\ \n#undef NAP_PCBIOS\ \n#undef NAP_EFIX86\ \n#undef NAP_EFIARM\ \n#define NAP_NULL\ " >> config/local/nap.h # Add more menu items RUN echo "\ \n#define DOWNLOAD_PROTO_NFS\ \n#define DOWNLOAD_PROTO_HTTPS\ \n#define DOWNLOAD_PROTO_FTP\ \n#define PING_CMD\ \n#define IPSTAT_CMD\ \n#define NSLOOKUP_CMD\ \n#define TIME_CMD\ \n#define REBOOT_CMD\ \n#define POWEROFF_CMD\ \n#define CONSOLE_CMD\ \n#define IMAGE_EFI\ \n#define VLAN_CMD\ \n#define LOTEST_CMD\ \n#define PCI_CMD\ \n#define PROFSTAT_CMD\ \n\ \n#undef NET_PROTO_IPV6\ \n\ \n#undef BANNER_TIMEOUT\ \n#define BANNER_TIMEOUT 50\ " >> config/local/general.h RUN echo "\ \n#undef LOG_LEVEL\ \n#define LOG_LEVEL 7\ \n\ \n#undef CONSOLE_SYSLOG\ \n#define CONSOLE_SYSLOG CONSOLE_USAGE_ALL\ \n\ \n#undef CONSOLE_LOG\ \n#define CONSOLE_LOG CONSOLE_USAGE_ALL\ " >> config/local/console.h # Change the syslog level RUN sed -i 's|8 * (facility) + (severity)|7*1|' include/ipxe/syslog.h &&\ grep -q '7*1' include/ipxe/syslog.h ENV targets="\ bin-arm64-efi/ipxe.efi \ bin-arm64-efi/snp.efi \ bin-arm64-efi/snponly.efi RUN mkdir /out ENV USER="nobody:nogroup" CMD echo 'Production targets' &&\ /bin/sh -c "$make_cmd $targets" &&\ cd bin-arm64-efi &&\ (chown $USER *.efi || true) &&\ find . -type f | grep -E "\.efi$" | xargs -i cp -p {} /out/ &&\ echo 'Results' &&\ ls -al /out |
QEMU PXE Bootload Emulation
This is slightly easier, and good news: QEMU has a built-in TFTP server (through SLiRP), so with a few modifications to my early QEMU launcher script, we can demonstrate bootloading in QEMU. One caveat is that the bootloader script must be baked into the iPXE binary because we don’t have a Dnsmasq server, but just for QEMU.
iPXE bootloader script for QEMU:
1 2 3 4 5 6 7 8 9 10 | #!ipxe echo QEMU iPXE script started... dhcp # This IP is always the same set base-url tftp://10.0.2.2 kernel ${base-url}/Image \ initrd=initramfs \ console=ttyAMA0 initrd ${base-url}/initramfs boot |
Modified QEMU launcher script:
1 2 3 4 5 6 7 8 9 10 11 12 13 14 15 16 17 18 19 20 21 22 23 24 25 26 | ...[snip]... docker run -it --rm \ -v "${CWD}:/buildroot:ro" \ -v "${IMAGE_FOLDER}:/images:ro" \ -v /dev/bus/usb:/dev/bus/usb:rw \ -v /tmp/qemu-monitor:/tmp/qemu-monitor:rw \ --device-cgroup-rule "a ${BLINKSTICK_MAJOR_NUMBER}:* rmw" \ ericdraken/qemu-aarch64:${QEMU_VERSION} \ --trace events="/buildroot/trace-events.txt" \ -M virt \ -m 2048 \ -nographic \ -echr 2 \ -boot n \ -cpu cortex-a53 \ -smp 2 \ -bios /buildroot/u-boot-qemu_arm64.bin \ -netdev user,id=eth0,tftp=/buildroot,bootfile=snp.efi \ -device virtio-net-device,netdev=eth0 \ -rtc base=localtime \ -object rng-random,id=rng0,filename=/dev/urandom \ -device virtio-rng-pci,rng=rng0 \ -monitor unix:/tmp/qemu-monitor/socket,server,nowait \ ${QEMU_USB_DEVICE} \ 2>&1 |& tee "${IMAGE_FOLDER}/qemu-log.txt" |
The relevant lines are:
1 2 | -bios /buildroot/u-boot-qemu_arm64.bin \ -netdev user,id=eth0,tftp=/buildroot,bootfile=snp.efi \ |
Part 3 – User Processes and Daemons
The next milestone is to add background daemons to run on boot. One could be a SaltStack listener. Another could be a performance monitor (RAM, temperature, etc.). But, how to add these in Buildroot?
Let’s have some fun and install a background process that lights a USB-connected LED green when Linux has booted, and goes dark if Linux crashes or hasn’t booted yet, or when shutdown gracefully. Let’s call this the Blinkstick daemon. This is an opportunity to explore compiling custom modules with Buildroot.
Add Modules to Buildroot
Needed: Python3, libusb1.0, a python controller script, and all the kernel USB drivers we can get. The fun part is that all these prerequisites can be added as modules within the Buildroot configuration menu. Let’s see how to do that. For example,
1 2 3 4 5 6 7 8 9 10 11 | # packages/python-blinkstick/Config.in config BR2_PACKAGE_PYTHON_BLINKSTICK bool "python-blinkstick" depends on BR2_PACKAGE_PYTHON3 select BR2_PACKAGE_LIBUSB select BR2_PACKAGE_PYTHON_LIBUSB1 select BR2_PACKAGE_PYTHON_PYUSB select BR2_PACKAGE_HOST_DOS2UNIX help Python package to control BlinkStick USB devices. http://pypi.python.org/pypi/BlinkStick/ |
Then, in the main Buildroot Config.in, we can add these menu items to include the Blinkstick module:
1 2 3 4 5 6 7 8 9 10 | # Config.in if BR2_PACKAGE_PYTHON || BR2_PACKAGE_PYTHON3 menu "External python modules" comment "------- Blinkstick Specific -------" source "package/python-blinkstick/Config.in" source "package/python-pyusb/Config.in" source "package/libusb/Config.in" comment "-----------------------------------" source "package/python-aenum/Config.in" ... |
libusb and pyusb are required. They seem like they both install libusb1.0, but they complement each other.I’m quite proud of this next part. With Buildroot, you can add Make instructions for additional modules. In the case of Blinkstick, it was abandoned at Python2, and clearly written in Windows based on the line endings (CRLF). Let’s make it work with Python3, on Linux, and fix a critical bug where libusb cannot be found when using musl (our toolchain).
1 2 3 4 5 6 7 8 9 10 11 12 13 14 15 16 17 18 19 20 21 22 23 24 25 26 27 28 29 30 31 | # packages/python-blinkstick/python-blinkstick.mk ################################################################################ # # python-blinkstick # ################################################################################ PYTHON_BLINKSTICK_VERSION = 1.2.0 PYTHON_BLINKSTICK_SOURCE = BlinkStick-$(PYTHON_BLINKSTICK_VERSION).tar.gz PYTHON_BLINKSTICK_SITE = https://files.pythonhosted.org/packages/d5/bb/d57bfbe938e6f2135d14a153999c3bf82288e315bfc546411160c6cbaadd PYTHON_BLINKSTICK_SETUP_TYPE = setuptools # Run dos2unix define PYTHON_BLINKSTICK_CONVERT_CRLF echo "Dos2Unix on Blinkstick line endings: $(@D)" find $(@D) -type f -print0 | xargs -0 dos2unix endef PYTHON_BLINKSTICK_POST_EXTRACT_HOOKS += PYTHON_BLINKSTICK_CONVERT_CRLF # Hardcode libusb path define PYTHON_BLINKSTICK_HARDCODE_LIBUSB_PATH @eval \ LIBUSB_PATH="/usr/lib/libusb-1.0.so"; \ FIND_LIBLOADER_PATH="$$(find $(TARGET_DIR)/usr/lib/python*/site-packages/usb/ -name 'libloader.py' | head -n 1)"; \ sed -i -r -e "s|locate_library\(candidates, find_library\)|'$$LIBUSB_PATH'|" "$$FIND_LIBLOADER_PATH"; endef PYTHON_BLINKSTICK_TARGET_FINALIZE_HOOKS += PYTHON_BLINKSTICK_HARDCODE_LIBUSB_PATH $(eval $(python-package)) |
In this makefile fragment, we convert the line endings to Linux (LF) and hardcode the libusb-1.0.so path due to incompatibilities with Linux and musl. This is just a proof-of-concept; I’m determined to rewrite this controller in C++.
BusyBoxy Init
Finally, with BusyBox’s inittab, we can write a single line of code, or place a script in an init.d folder.
1 2 3 | # /inittab # Blinkstick ::once:/usr/blinkstick-daemon.sh |
The invoked script is then:
1 2 3 4 5 6 7 8 | #!/bin/sh # /usr/blinkstick-daemon.sh echo "Starting Blinkstick daemon" while [ true ]; do # The light shuts off after 10s /usr/bin/blinkstick green sleep 5 done |
A background daemon that keeps a green light alive as long as the kernel is running is now resident.
inittab.Part 4 – Network Bootloading on Real Hardware
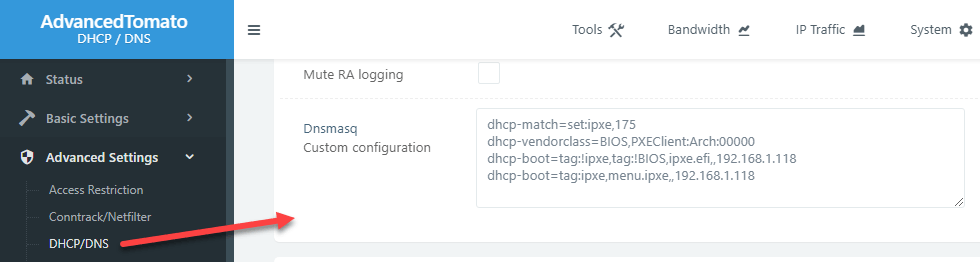
It’s not wizardry, but yes you can have two DHCP servers on the same LAN. With Dnsmasq, you can create some neat forwarding rules. Actually, with plain DHCP you can specify an upstream/next server on PXE requests. Let’s PXE boot the kernel on real hardware.
Main DHCP Server
With just the principal (home) router on the LAN running Tomato, the extra Dnsmasq options are as simple as:
1 2 3 4 | dhcp-match=set:ipxe,175 dhcp-vendorclass=BIOS,PXEClient:Arch:00000 dhcp-boot=tag:!ipxe,tag:!BIOS,ipxe.efi,,192.168.1.118 dhcp-boot=tag:ipxe,menu.ipxe,,192.168.1.118 |
U-Boot DHCP requests come in and the response contains the instruction to fetch ipxe.efi (iPXE binary) from the TFTP server at 192.168.1.118. When iPXE loads and makes a DHCP request, its request is tagged with “ipxe” so this time the DHCP server responds with the instruction to fetch menu.ipxe from the same TFTP server. This avoids an infinite loop of iPXE loading itself.
Docker TFTP and HTTP Servers
Docker comes in handy again. One of the reasons I opted away from NFS bootloading is because NFS is tied to the kernel so it is not possible to dockerize an NFS service independent of the host kernel. TFTP is good for minimal file transfers like the secondary bootloader iPXE, and we’ll need an HTTP server, so this can all be trivially rolled into a Docker Compose YAML file. Just for some oompf, I added a Syslog server to catch log messages from U-Boot and iPXE.
1 2 3 4 5 6 7 8 9 10 11 12 13 14 15 16 17 18 19 20 21 22 23 24 25 26 27 28 29 30 31 32 33 34 35 36 37 38 39 40 41 42 | version: '3' services: syslog: container_name: syslog-public image: balabit/syslog-ng:3.30.1 ports: - 1514:514/udp networks: - pxe-public command: "-edv" httpd: container_name: httpd-public image: httpd:2.4-alpine ports: - 8080:80/tcp networks: - pxe-public volumes: - ${DOC_ROOT_PATH}:/usr/local/apache2/htdocs/:ro pxe: container_name: pxe-public build: context: . dockerfile: Dockerfile.pxe-server depends_on: - httpd - syslog cap_add: - NET_ADMIN volumes: - ${EFI_PATH}:/tftp/ipxe.efi:ro - ${IPXE_TPL_PATH}:/tftp/menu.ipxe.tpl:ro - ${DTB_PATH}:/tftp/dtb:ro #ports: #- 69:69/udp network_mode: host networks: pxe-public: |
Run this on a non-NAT’d host, or else port-forward ports 69/udp, 8080/tcp, and 1514/udp (for Syslog) to the containers above.
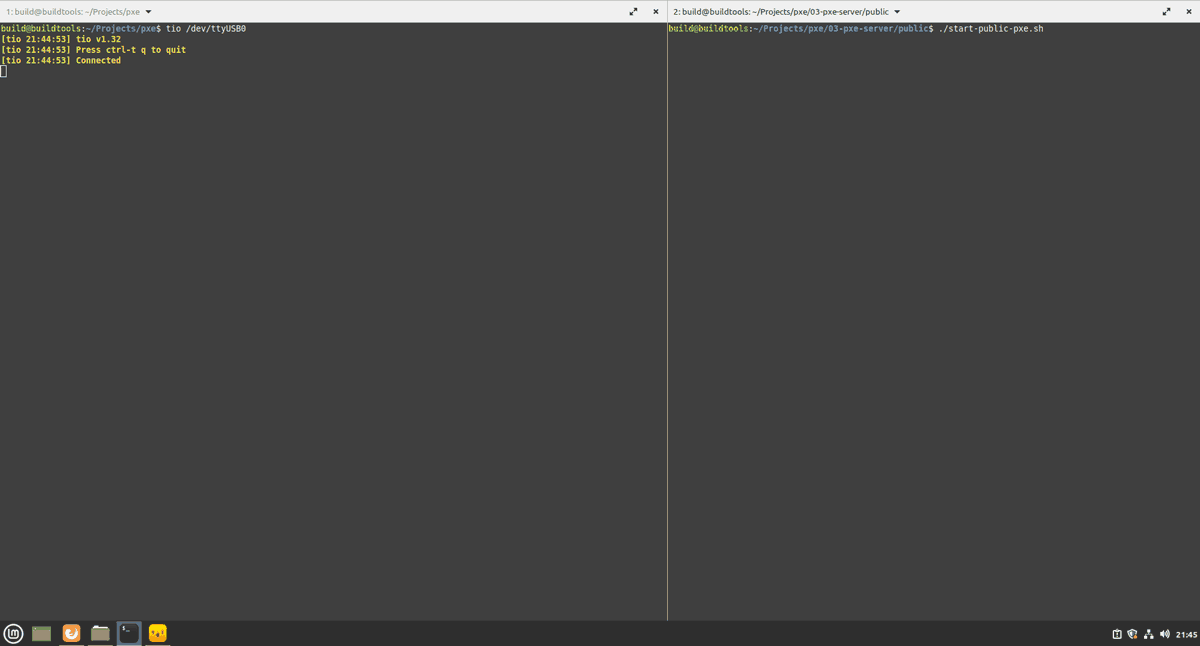
Results and Demo
Success. On real hardware wired to a USB serial adapter, we can see the PXE boot process from power-on to shell prompt. We start with connecting the serial cable to the terminal, then running docker compose up, and then powering up a Pine64 compute module. You can see U-Boot, iPXE, then the kernel load. Lastly, there is a user script to report on the system, and the demo ends with the Blinkstick daemon starting.
This has been an educational, long row to hoe, but so much has been accomplished and learned in this project.
Part 5 – Gotchas and More Tips
When I come back to this project periodically to compile future major-release kernels, here some gotchas I’d like to remember.
Disk Space
Have plenty of disk space. This project takes gigabytes and gigabytes of space to compile the kernel and the other binaries. Plus there is over a gigabyte in downloads and GCC cache. When building in Docker containers, be sure to docker system prune often or else you’ll wonder where 100GiB went in a couple of days.
USB Power Management (PM)
These compute modules should act like warm lambdas, so it makes life easier to disable power management. Why? On boot, I find that USB devices enter low-power mode, so my Blinkstick daemon cannot find the USB devices. By blanket disabling CONFIG_SUSPEND and/or CONFIG_PM in the kernel config, this issue goes away and all USB ports have full power.
Large Packages
Including Git core through Buildroot incurs 23Mi, and Python 3 adds another 16 MiB in the initramfs (filesystem in memory). The BTRFS filesystem adds 1.7MiB to the kernel image. This may seem like nickel-and-diming, but I want this system to be a lean greyhound and lend as much memory to user processes as possible.
Bisecting Configurations
First include most options and drivers, save backups, then remove large swaths of maybe-unneeded options in the kernel, BusyBox, and Buildroot configs. When components fail, perform a diff and add back options. Repeat until the sweet spot is found.
Even better, generate the so-call defconfigs for each build for even easier diffing.
Part 6 – Conclusion
Let’s see how we’re doing with “disk” usage, RAM, and even benchmark the memory.
Kernel Footprint
Most would be pretty happy with a 12MiB compressed Linux kernel footprint. But, how much memory does a minimally-booted Linux kernel with no userspace apps take up? Let’s find out with some useful commands.
1 2 3 4 5 6 7 8 9 10 11 12 13 14 | echo "Largest folders:" du -a / 2>/dev/null | grep -v /proc | sort -n -r | head -n 10 echo "System memory:" cat /proc/meminfo | head -3 echo "Kernel memory:" dmesg | grep Memory: | awk -F'] ' '{print $2}' echo "Heap usage:" grep Slab /proc/meminfo echo "Largest loaded modules:" awk '{ printf("%06d %s\n", $2, $1) }' /proc/modules | sort -n -r | head -10 |
So far, here are my respectable stats on a 2GiB compute module:
1 2 3 4 5 6 7 8 9 10 11 12 13 14 15 16 17 18 19 20 21 22 23 24 25 26 27 28 29 30 31 32 | Largest folders (KiB): 28716 / 28388 /usr 22176 /usr/lib 12208 /usr/lib/python3.9 3560 /usr/lib/libpython3.9.so.1.0 3028 /usr/lib/modules/5.10.4 3028 /usr/lib/modules 2708 /usr/lib/modules/5.10.4/kernel 2528 /usr/sbin 2264 /usr/lib/python3.9/ensurepip System memory: MemTotal: 1976744 kB MemFree: 1906672 kB MemAvailable: 1846040 kB Kernel memory: Memory: 1934076K/2097152K available (7168K kernel code, 932K rwdata, 2796K rodata, 1472K init, 371K bss, 130308K reserved, 32768K cma-reserved) Heap usage: Slab: 29404 kB Largest loaded modules: 176128 stmmac 024576 sun6i_dma 020480 sunxi_wdt 020480 realtek 020480 pcs_xpcs 020480 dwmac_sun8i 016384 virt_dma 016384 stmmac_platform |
Glass-half-full, there is about 92% of the real RAM available with minimal BusyBox and rootfs tuning on boot. We can do better, but this is a win.
Bootup Time
Excluding the bootloading stages and the final DCHP request, booting to the shell prompt takes about 5 seconds. Very respectable.
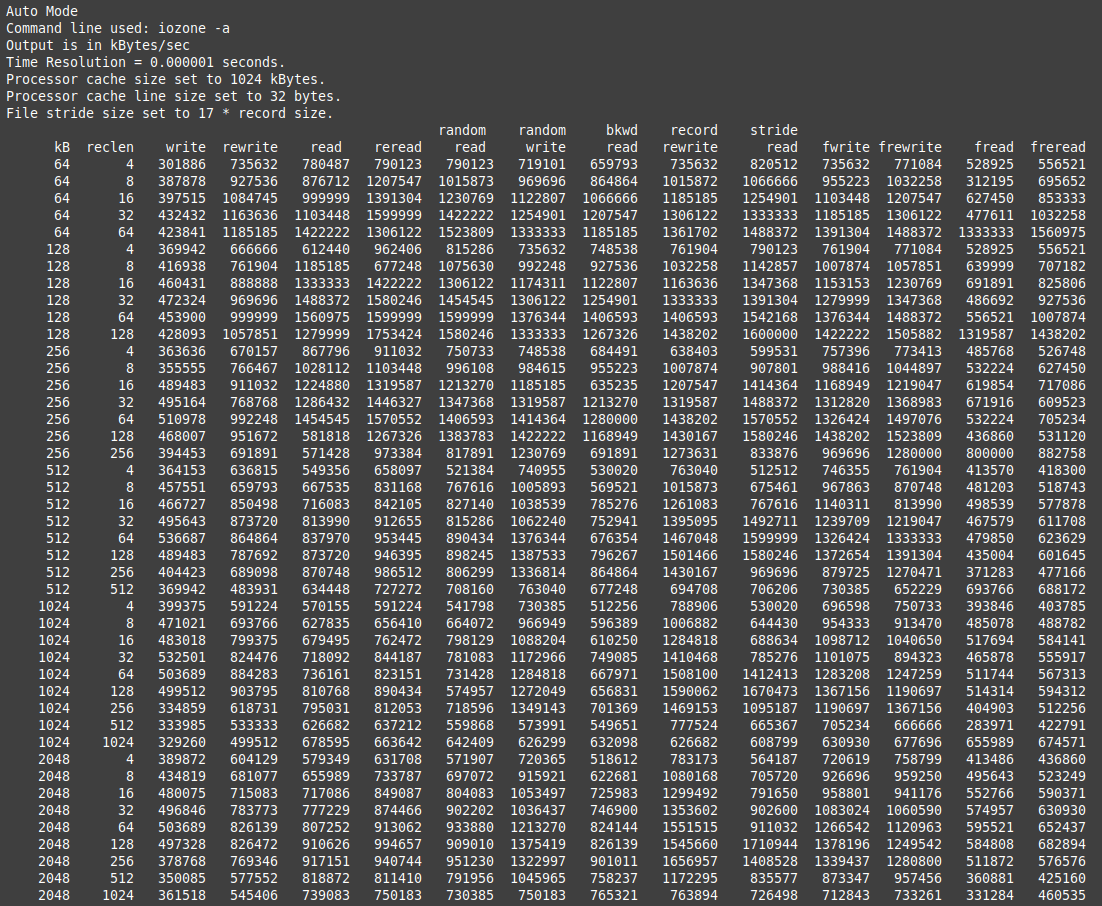
IOZone and RAMspeed
Let’s end this project with some benchmarks. First, running IOZone with iozone -a shows results similar to the following with several gigabyte-speed operations.
More succinct, here is sample output from the ramspeed integer and floating-point memory tests.
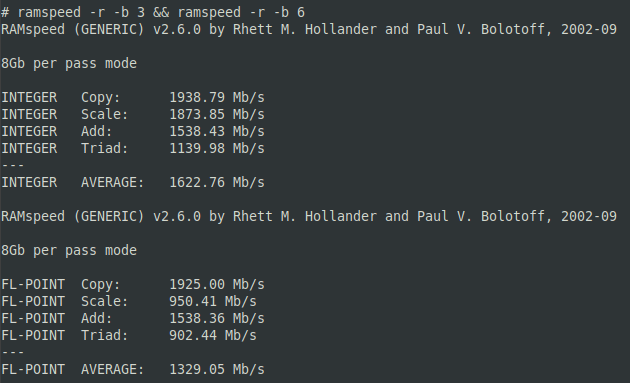
These speeds are on target for LPDDR3 RAM from 2016, and still quite decent.
Notes: