Compile Marlin (3D Printer Firmware) with Docker
Let’s see what we are working with from https://marlinfw.org. Usually, to compile Marlin you must do one of two unfortunate things:
The first thing you’ll need to do is download the Arduino IDE and install it following the usual procedure for your OS (REF). Or, install Python and PlatformIO as a standalone CLI or with your choice of environment. (REF)
Do you want to install the Arduino IDE, build tools, extra libraries, and so on? Or install Python and another heavy library?
Let’s take a look at Marlin-2.1.x – the current release at this time.
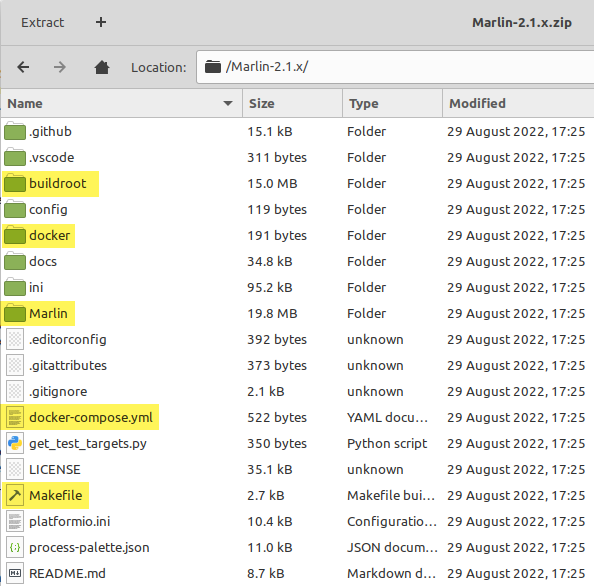
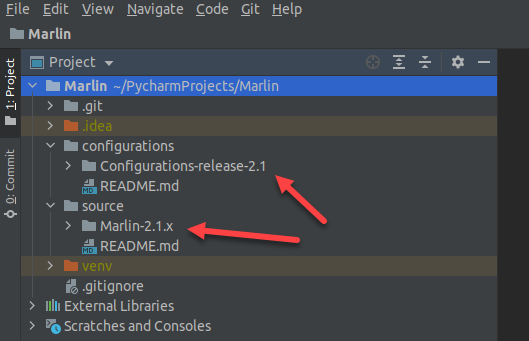
Neat. There is a Makefile and some Docker artifacts. Can we use these to automate building the firmware.bin? Let’s start with downloading the latest source and machine configurations into an IDE (not VSCode) and explore the file structures.
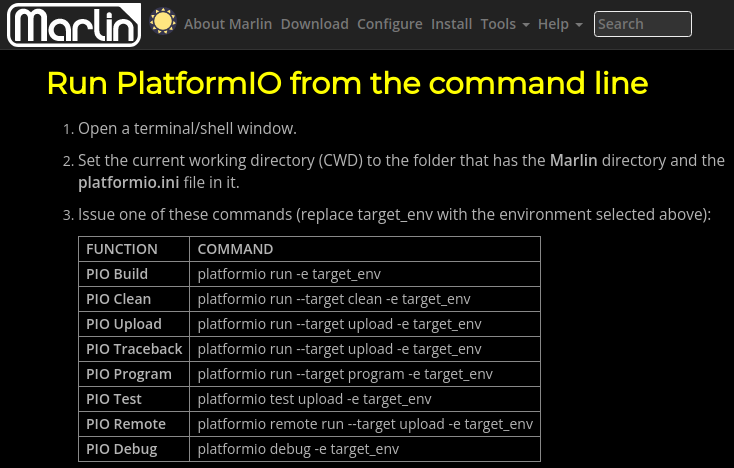
Digging around, I see Marlin tests are run using PlatformIO, which is new to me but is included in the Dockerfile. Let’s explore it and figure out how to use it.
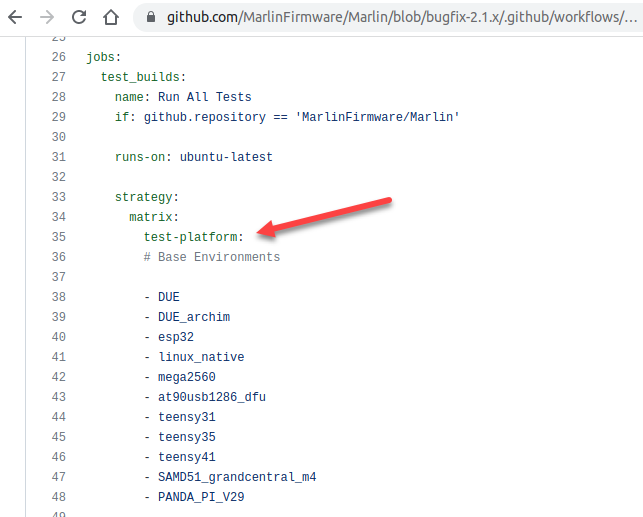
Something is missing from the Zip file from marlinfw.org but is included in the GitHub repo: the workflows/ folder and its YAML files. This is apparent when looking at the get_test_targets.py:
1 2 3 4 5 | with open('.github/workflows/test-builds.yml') as f: github_configuration = yaml.safe_load(f) test_platforms = github_configuration\ ['jobs']['test_builds']['strategy']['matrix']['test-platform'] print(' '.join(test_platforms)) |
On GitHub, those test targets are these:
Fortunately, they match up with the buildroot/tests files in the repo. I had to double-check.
The ones most interesting for the Ender 3 crowd are:
- STM32F103RE_creality
- STM32F103RC_btt
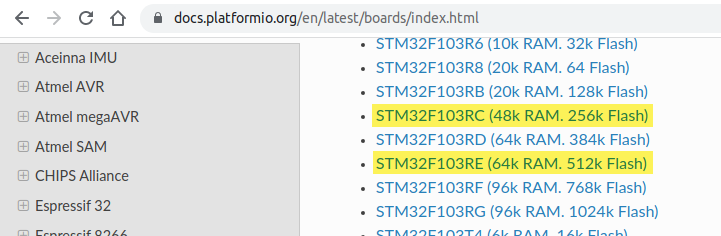
What do the PlatformIO board strings mean?
I suspected that STM32F103RE_creality is not a platform, but STM32F103RE is. If we exclude what we know about tests and investigate the PlatformIO boards, the boards are simpler strings.
However, this gives a compile error:
Error: Build environment ‘STM32F103RE’ is incompatible with BOARD_CREALITY_V427. Use one of these: STM32F103RE_creality, STM32F103RE_creality_xfer, …
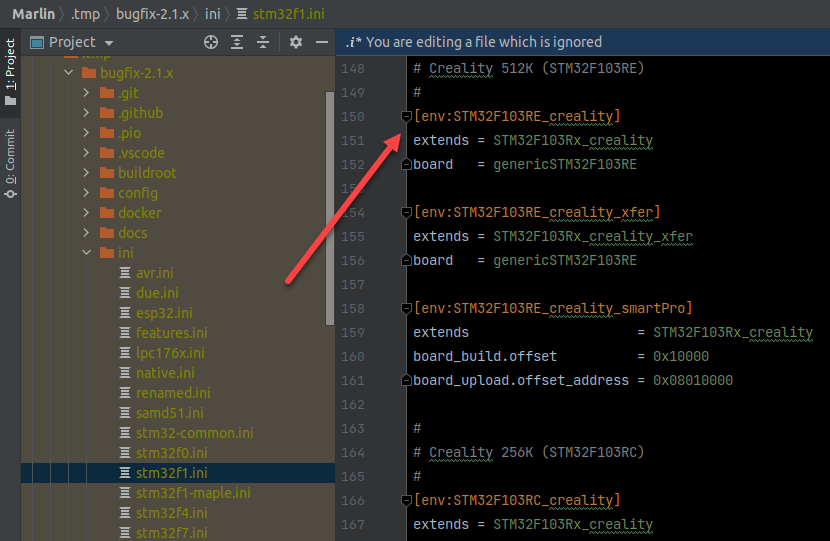
Why is this? Because platformio.ini in the Marlin/ folder includes the actual environment names recognized by PlatformIO.
Let’s compile some firmware
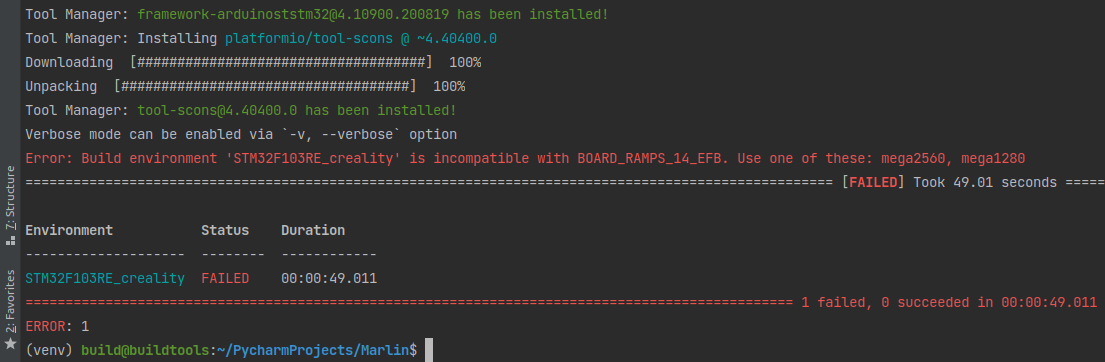
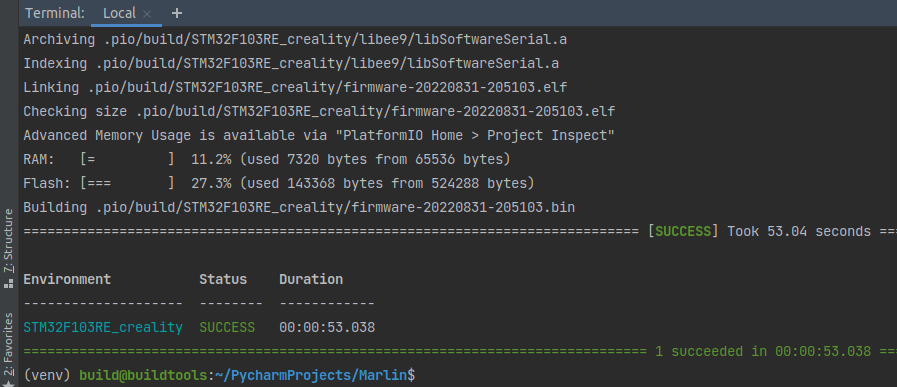
We’ll give compiling the firmware a shot using STM32F103RE_creality.
1 | docker-compose run --rm marlin platformio run -e STM32F103RE_creality |
Right away we see a compile error.
Let’s figure out how to direct PlatformIO to use custom configurations for Ender machines. Forgive me for trying this for the first time as I write this.
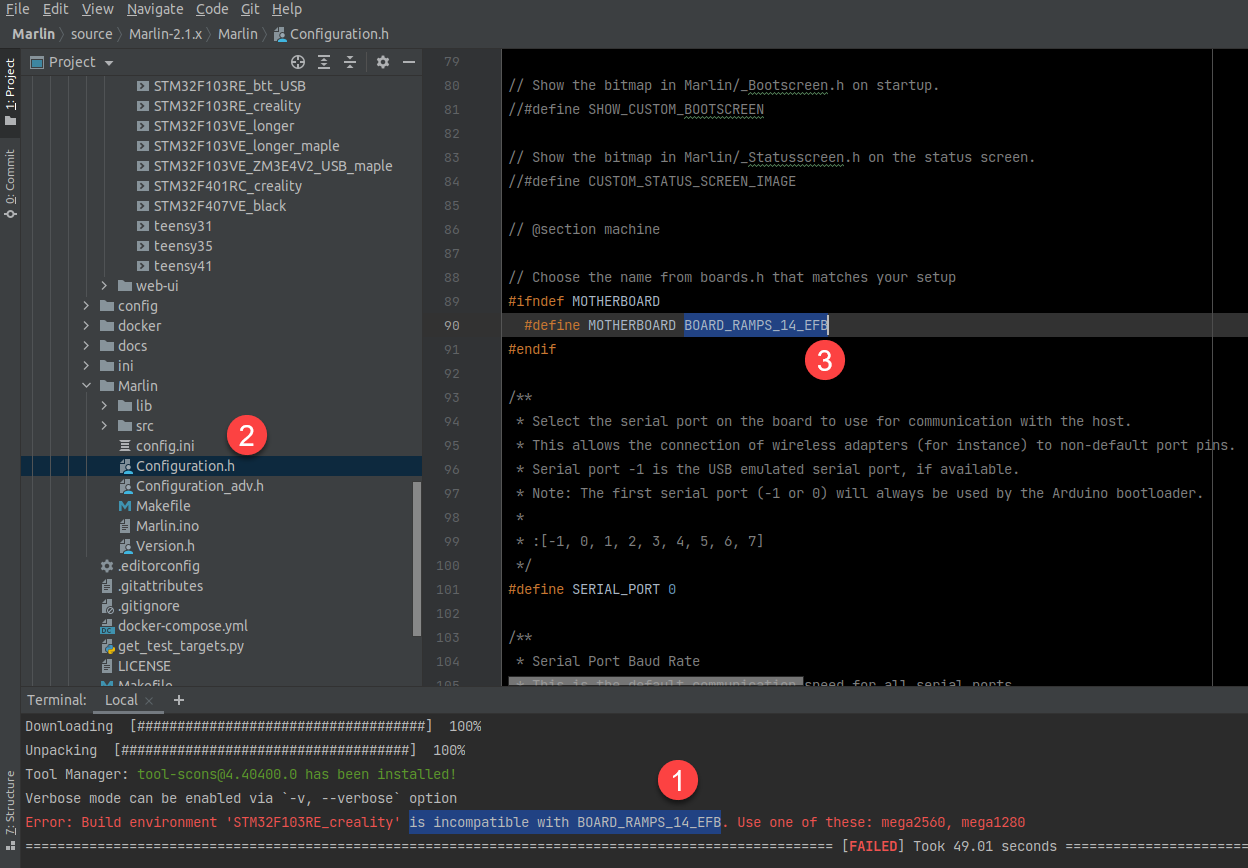
Of course the Configuration.h et al. is coming from the C++ source folder (i.e. Marlin/). Still, we don’t want to edit those template files manually when we have config files the community has provided (and we can further adjust) outside the Git repo.
Could we use a script to overwrite them from an external folder on compile? Use some symlinks? What do the platform tests do, I wonder? Back to the Makefile.
1 2 3 4 5 6 | tests-single-local: @if ! test -n "$(TEST_TARGET)" ; then echo "***ERROR*** Set TEST_TARGET=<your-module> or use make tests-all-local" ; return 1; fi export PATH=./buildroot/bin/:./buildroot/tests/:${PATH} \ && export VERBOSE_PLATFORMIO=$(VERBOSE_PLATFORMIO) \ && run_tests . $(TEST_TARGET) "$(ONLY_TEST)" .PHONY: tests-single-local |
We then trace run_tests . $(TEST_TARGET) to
1 2 3 4 5 | run_tests . $(TEST_TARGET) --> exec_test $1 "$2 --target clean" "Setup Build Environment" --> exec_test . "$(TEST_TARGET) --target clean" "Setup Build Environment" --> platformio run --project-dir $1 -e $2 -v --> platformio run --project-dir . -e $(TEST_TARGET) --target clean -v |
PlatformIO doesn’t know about Configuration.h
The build command didn’t use any arguments to pass in configuration files. Let’s see what other plumbing there is.
1 2 3 4 5 6 7 8 9 10 11 12 13 14 | # buildroot/bin/use_example_configs which curl >/dev/null && TOOL='curl -L -s -S -f -o wgot' which wget >/dev/null && TOOL='wget -q -O wgot' ... REPO=bugfix-2.1.x CONFIGS="https://raw.githubusercontent.com/MarlinFirmware/Configurations/$REPO/config/${EXAMPLES}" cd Marlin $TOOL "$CONFIGS/Configuration.h" >/dev/null 2>&1 && mv wgot Configuration.h $TOOL "$CONFIGS/Configuration_adv.h" >/dev/null 2>&1 && mv wgot Configuration_adv.h $TOOL "$CONFIGS/_Bootscreen.h" >/dev/null 2>&1 && mv wgot _Bootscreen.h $TOOL "$CONFIGS/_Statusscreen.h" >/dev/null 2>&1 && mv wgot _Statusscreen.h |
I see it now: on every platform test, the script downloads the configuration files for the target directly into the Marlin source folder, then after the test performs a git reset --hard to undo the downloads. Interesting approach to integrating two tightly coupled Git repos.
Let’s just copy over the zipped config files to Marlin/, recompile, and see what happens.
1 2 3 4 5 | In file included from Marlin/src/HAL/STM32/../../inc/MarlinConfig.h:49, from Marlin/src/HAL/STM32/HAL_SPI.cpp:27: Marlin/src/HAL/STM32/../../inc/SanityCheck.h:76:4: error: #error "Your Configuration.h file is for an old version of Marlin. Downgrade Marlin or upgrade your Configuration.h." 76 | #error "Your Configuration.h file is for an old version of Marlin. Downgrade Marlin or upgrade your Configuration.h." | ^~~~~ |
And therein lies the difficulty of maintaining two tightly coupled Git repos. Let’s remove what we downloaded previously, curl the bugfix-2.1.x repo again, and recompile. We’ll need to engineer a way to keep these versions in sync in a compile script.
Hotend/extruder fan gotcha with the 4.2.7 board
For the Ender using the Creality 4.2.7 board, I ran into a gotcha I can share.
In Configuration_adv.h, the line #define E0_AUTO_FAN_PIN -1 means that the hotend/extruder fan is always on because automatic control is disabled (-1). That’s silly. Previously, the extruder fan would come on automatically at 50℃ with the old board and the BTT boards. However, when we try to fix it with #define E0_AUTO_FAN_PIN FAN_PIN, we are presented with this error:
error: #error “You cannot set E0_AUTO_FAN_PIN equal to FAN_PIN.”
Why is this? From digging around the Marlin source (pins_CREALITY_V4.h) and looking at the v4.2.7 mainboard schematic, we see that not only are both k-fan ports hooked up in parallel, but the “normal fan” terminal connection is also wired to the power supply.
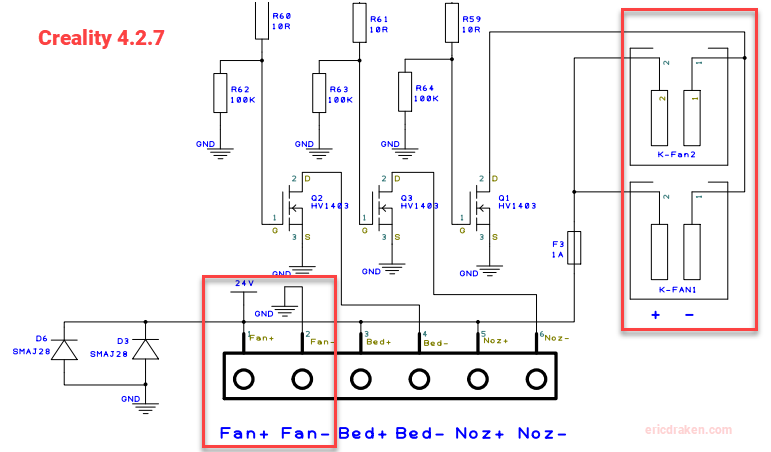
This means we’re stuck controlling the hotend/extruder fan automatically. Dang. Better invest in a quiet Noctua fan with this board.
k-fan JST port or else the mainboard fan will only come on when the part-cooling fan is on, which may never happen when printing ABS (and you may fry your mainboard).BLTouch/3D Touch z-stop gotcha with the 4.2.7 board
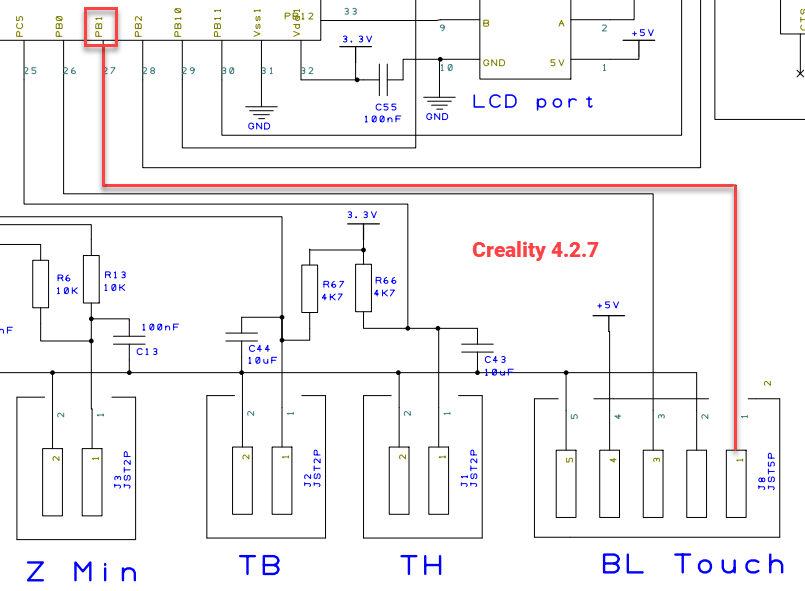
Some online guides for configuring Configuration.h suggest the setting #define Z_MIN_PROBE_PIN 17. No. Leave Z_MIN_PROBE_PIN commented out in Configuration.h because in pins_CREALITY_V4.h we see
1 2 3 | #ifndef Z_MIN_PROBE_PIN #define Z_MIN_PROBE_PIN PB1 // BLTouch IN #endif |
For the 4.2.7 board, is this PB1 pin correct? Yes. Here is the schematic.
BLTouch/3D Touch still does not stop on z-axis homing?
Sometimes, who knows what’s going on with bugfix-2.x and we’ve caught a bad build, or Creality made the 5-pin JST port only work with a CR Touch? The board fried a little bit when you put the pins in backwards? Who knows? The 5-pin dedicated BLTouch port should work. If you’ve tested the wiring with an ohmmeter to rule out shorts, and are sure your 5-wire wiring is spot on, then cut your time loss and drop to plan B: use the z-axis endstop JST port as shown in the Teaching Tech guide. Remember to update your Configuration.h to use Z_MIN_PROBE_USES_Z_MIN_ENDSTOP_PIN and not USE_PROBE_FOR_Z_HOMING.

Something interesting to note is that the BLTouch probe’s OUT pin connects directly to the CPU, whereas the endstop has some current-limiting functionality. It’s possible the clone 3D Touch might not work but a genuine BLTouch works? Who is to say? Here is the schematic of the differences between the z-min endstop and the dedicated BLTouch endstop.

Hotend thermistor reporting the wrong temperature?
I picked up a modded secondhand printer with a 10kΩ thermistor (too inaccurate), so I bought a 10-pack of popular NTC 100kΩ thermistors from Amazon. However, the PLA filament wasn’t melting at 210℃; a thermal camera showed that “210℃” was in fact 165℃. The seller advertised using TEMP_SENSOR 11 in Marlin, but this was also inaccurate.
Want to learn to build your own thermal curve table in Marlin? Here is a fun guide if you already have the ADC data. If you don’t, or have trust issues or are a perfectionist, you can make your own table with a temperature probe on a multimeter. First, enable this:
1 2 3 4 | // Configuration_adv.h // Show Temperature ADC value // Enable for M105 to include ADC values read from temperature sensors. #define SHOW_TEMP_ADC_VALUES |
Using OctoPrint or Pronterface, we can send temperature G-codes and observe the ADC values.

With a bit of macro magic in Notepad++, and remembering to divide by 4 and sort by descending temperature, here is my temperature table after about half an hour of work:
1 2 3 4 5 6 7 8 9 10 11 12 13 14 15 16 17 18 19 20 21 22 23 24 25 26 27 28 29 30 31 32 33 34 35 36 37 38 39 40 41 42 43 44 45 46 47 48 | // Eric Draken - the SIMAX3D 100K 3950 from Amazon // Why /4 ? We need to downsample from 12-bit ADC (4096) to 10-bit ADC (1024). // See: https://reprap.org/forum/read.php?1,872228 // Why override table #2? To compare how far the drift is from expected table #11 or #1. constexpr temp_entry_t temptable_2[] PROGMEM = { // Borrowed from table #11 to backfill the interpolation { OV( 1), 938 }, // Real measurements { OV( (int)(117/4) ), 255 }, { OV( (int)(124/4) ), 251 }, { OV( (int)(133/4) ), 246 }, { OV( (int)(143/4) ), 240 }, { OV( (int)(193/4) ), 225 }, { OV( (int)(239/4) ), 217 }, { OV( (int)(274/4) ), 209 }, { OV( (int)(308/4) ), 205 }, { OV( (int)(314/4) ), 200 }, { OV( (int)(357/4) ), 197 }, { OV( (int)(359/4) ), 195 }, { OV( (int)(411/4) ), 190 }, { OV( (int)(410/4) ), 188 }, { OV( (int)(476/4) ), 182 }, { OV( (int)(562/4) ), 176 }, { OV( (int)(644/4) ), 169 }, { OV( (int)(757/4) ), 162 }, { OV( (int)(886/4) ), 153 }, { OV( (int)(1045/4) ), 145 }, { OV( (int)(1209/4) ), 137 }, { OV( (int)(1418/4) ), 129 }, { OV( (int)(1632/4) ), 121 }, { OV( (int)(1886/4) ), 112 }, { OV( (int)(2150/4) ), 103 }, { OV( (int)(2424/4) ), 94 }, { OV( (int)(2729/4) ), 85 }, { OV( (int)(2977/4) ), 76 }, { OV( (int)(3222/4) ), 68 }, { OV( (int)(3416/4) ), 59 }, { OV( (int)(3622/4) ), 47 }, { OV( (int)(3752/4) ), 39 }, { OV( (int)(3862/4) ), 28 }, { OV( (int)(3889/4) ), 27 }, // Borrowed from thermistor_11.h for the zero crossing. // This doesn't matter in the grand scheme of things. { OV( 981), 23 }, { OV( 991), 17 }, { OV(1001), 9 }, { OV(1021), -27 } }; |
This is a good time to dial in your extruder E-steps
If you update your firmware, you might have upgraded your extruder from Bowden tube to direct-drive, for example. You’ll want to calibrate your extruder E-steps. As a quick reminder:
- Heat up your nozzle to 210℃ for PLA.
- Extrude a bit of filament.
- Wait for the filament to stop oozing out.
- Mark out 120mm of filament with calipers and a Sharpie.
- Raise the nozzle to about 20cm for a nice, straight extrusion.
- Use Pronterface to send the G-code
G1 E100 F100to extrude 100mm. - Measure how much filament is remaining.
e.g. 105.94mm on a geared extruder, yikes - Issue G-code
M503and find the row starting with M92 for the current E-steps.
e.g. E93.00 - Subtract (7) from 100mm.
e.g. 120mm – 105.94mm = 14.06mm extruded - Take (8) and multiply by 100mm, then divide by the actual length extruded.
e.g. (93.00*100)/14.06 = 661.5 steps/mm - Send G-code
M92 E###.#.
e.g. M92 E661.5 - Send G-code
M500to save this value. - Repeat steps 4 to 12 one more time, or stop when you get exactly 100mm extruded.
In my case with my secondhand, modded Ender 3 printer with a dual-gear extruder, I performed the above procedure three times to get exactly 100mm of extrusion at E406.5 steps/mm.
How to get the new firmware on the mainboard?
Great. What’s next?
Creality took away the ISP port for the V4.2.7 but pre-installed a bootloader on the board so that you can update firmware just with the microSD card. On the new boards, all you have to do is include the firmware BIN file on the microSD card, and the printer will update itself! (REF)
also
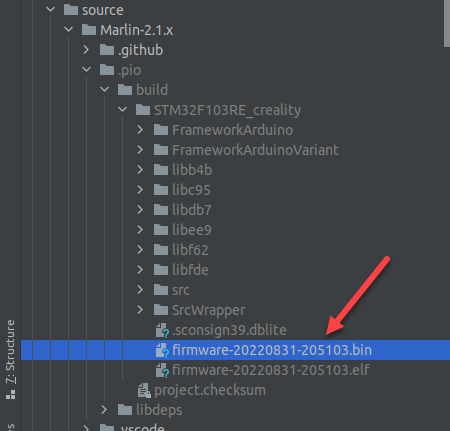
Go to your “Marlin-2.0.x” folder, and find and open the “.pio” folder. Open the build folder, then open the folder with a name beginning with “STM32” (names might vary depending on the mainboard). Find and copy the most recent (by time) BIN file. Make sure not to change the firmware’s name, as it won’t work if the name is changed. (REF)
Let’s see if I can copy that file to an SD card and if my Ender 3 Pro with a 4.2.7 board takes it.
Let’s make a Marlin firmware compiler script in Bash
I’ve made a simple Bash script that clones Marlin to a temp folder, copies the configuration files for a given board for a clean slate, copies any existing user configuration files instead, and compiles the firmware. Here is the result.
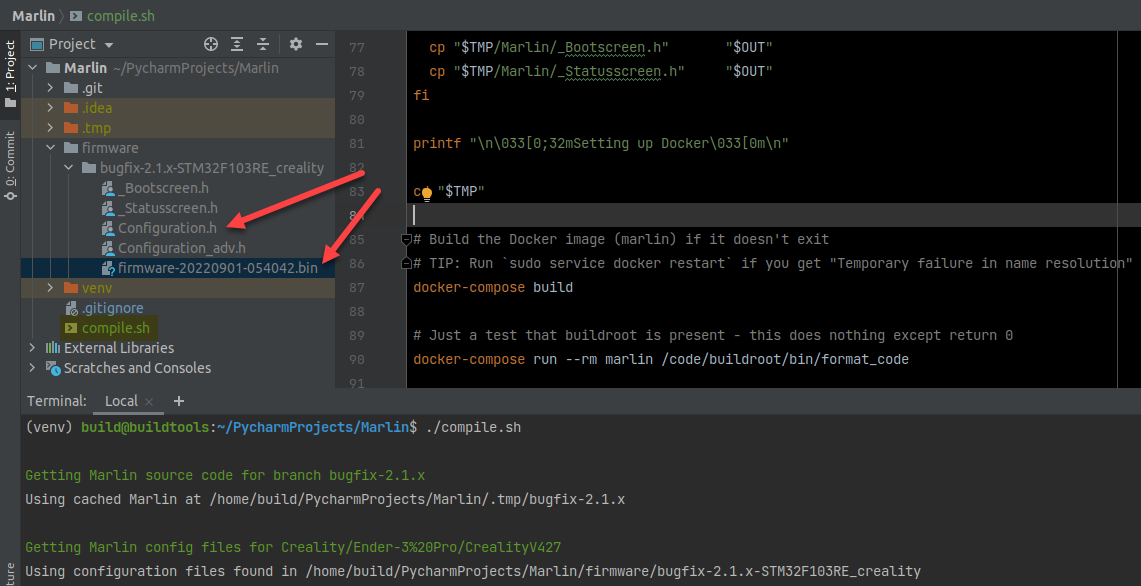
Marlin Firmware Compile Script
Here is my working script. There are only three strings to be edited for your given board. We can run it over and over again and newer firmware files will be created. Feel free to make Configuration.h tweaks, recompile, test on hardware, and repeat until happy. Feel free to fork and improve on this script.
If you share this script, kindly attribute it. Thank you.
1 2 3 4 5 6 7 8 9 10 11 12 13 14 15 16 17 18 19 20 21 22 23 24 25 26 27 28 29 30 31 32 33 34 35 36 37 38 39 40 41 42 43 44 45 46 47 48 49 50 51 52 53 54 55 56 57 58 59 60 61 62 63 64 65 66 67 68 69 70 71 72 73 74 75 76 77 78 79 80 81 82 83 84 85 86 87 88 89 90 91 92 93 94 95 96 97 98 99 100 101 102 103 104 105 106 107 108 109 110 111 112 113 114 115 | #!/usr/bin/env bash ############################################### # Marlin firmware compilation script # # Copyright Eric Draken, 2022, ericdraken.com # ############################################### set -e #################### # BEGIN SETTINGS # #################### # e.g. bugfix-2.1.x, release-2.1.1, etc. # See https://github.com/MarlinFirmware/Marlin branches MARLIN_BRANCH="bugfix-2.1.x" # Given https://raw.githubusercontent.com/MarlinFirmware/Configurations/$MARLIN_BRANCH/config/examples/Creality/Ender-3%20Pro/CrealityV427, # the remote config folder is: Creality/Ender-3%20Pro/CrealityV427 REMOTE_CONFIG_FOLDER="Creality/Ender-3%20Pro/CrealityV427" # e.g. STM32F103RE_creality, STM32F103RE_btt # See ini/stm32f1.ini for more strings PLATFORM="STM32F103RE_creality" ################## # END SETTINGS # ################## CONFIGS="https://raw.githubusercontent.com/MarlinFirmware/Configurations/$MARLIN_BRANCH/config/examples/${REMOTE_CONFIG_FOLDER}" GITREPO=https://github.com/MarlinFirmware/Marlin.git HERE="$( cd "$(dirname "${BASH_SOURCE[0]}")" ; pwd -P )" printf "\n\033[0;32mGetting Marlin source code for branch %s\033[0m\n" ${MARLIN_BRANCH} # Create a temporary folder TMP="$HERE/.tmp/$MARLIN_BRANCH" [[ -d "$TMP" ]] || mkdir -p "$TMP" # Create the out folder OUT="$HERE/firmware/$MARLIN_BRANCH-$PLATFORM" [[ -d "$OUT" ]] || mkdir -p "$OUT" # Clone Marlin into the temporary folder if [[ ! -e "$TMP/README.md" ]]; then echo "Cloning Marlin from GitHub to $TMP" git clone --depth=1 --single-branch --branch "$MARLIN_BRANCH" $GITREPO "$TMP" || { echo "Failed to clone Marlin"; exit ; } else echo "Using cached Marlin at $TMP" fi printf "\n\033[0;32mGetting Marlin config files for %s\033[0m\n" ${REMOTE_CONFIG_FOLDER} # Select a tool to download config files which curl >/dev/null && TOOL='curl -L -s -S -f -o wgot' which wget >/dev/null && TOOL='wget -q -O wgot' cd "$TMP/Marlin" $TOOL "$CONFIGS/Configuration.h" >/dev/null 2>&1 && mv wgot Configuration.h $TOOL "$CONFIGS/Configuration_adv.h" >/dev/null 2>&1 && mv wgot Configuration_adv.h $TOOL "$CONFIGS/_Bootscreen.h" >/dev/null 2>&1 && mv wgot _Bootscreen.h $TOOL "$CONFIGS/_Statusscreen.h" >/dev/null 2>&1 && mv wgot _Statusscreen.h rm -f wgot cd - >/dev/null # Copy over existing config files from the user, if present if [[ -e "$OUT/Configuration.h" ]]; then echo "Using configuration files found in $OUT." echo "Delete these files to use the remote configuration files instead." cp "$OUT/Configuration.h" "$TMP/Marlin" cp "$OUT/Configuration_adv.h" "$TMP/Marlin" cp "$OUT/_Bootscreen.h" "$TMP/Marlin" cp "$OUT/_Statusscreen.h" "$TMP/Marlin" else echo "Using remote configuration files found at $REMOTE_CONFIG_FOLDER." cp "$TMP/Marlin/Configuration.h" "$OUT" cp "$TMP/Marlin/Configuration_adv.h" "$OUT" cp "$TMP/Marlin/_Bootscreen.h" "$OUT" cp "$TMP/Marlin/_Statusscreen.h" "$OUT" fi # Use a custom thermistor table if it exists, and be sure # to set #define TEMP_SENSOR_0 2 in Configuration.h. You should get # #warning "Using custom thermistor table temptable_2" [-Wcpp] # if you have successfully set the thermistor to 2 if [[ -e "$OUT/thermistor_2.h" ]]; then echo "Using thermistor_2.h found in $OUT." cp "$OUT/thermistor_2.h" "$TMP/Marlin/src/module/thermistor" fi printf "\n\033[0;32mSetting up Docker\033[0m\n" cd "$TMP" # Build the Docker image (Marlin) if it doesn't exist # TIP: Run `sudo service docker restart` if you get "Temporary failure in name resolution" docker-compose build # Just a test that buildroot is present - this does nothing except return 0 docker-compose run --rm marlin /code/buildroot/bin/format_code printf "\n\033[0;32mCompiling Marlin for %s\033[0m\n" "$PLATFORM" # Clean docker-compose run --rm marlin platformio run --target clean -e "$PLATFORM" # Build time docker-compose run --rm marlin platformio run -e "$PLATFORM" --silent printf "\n\033[0;32mCopying compiled firmware\033[0m\n" find "$TMP/.pio/build/$PLATFORM" -name "firmware-*.bin" -exec cp '{}' "${OUT}" \; printf "\n\033[0;32mFirmware successfully compiled\033[0m\n" |
Conclusion
With a bit of reverse-engineering, we’ve figured out how to easily compile the Marlin firmware without installing VSCode, Arduino IDE, Python, or PlatformIO and instead leveraged the existing testing framework of the Marlin team to invoke Docker to perform all the magic for us, wrapped up in a single Bash script.