Advanced 3D Printing Tips & Tricks
Just for myself, I’ll document some advanced 3D printing tricks (for both FDM and SLA printers) I’ve picked up along the way so I don’t have to Google them and dig out that one comment from that random person on page 5 of some forum to jog my memory. Maybe this will help others?
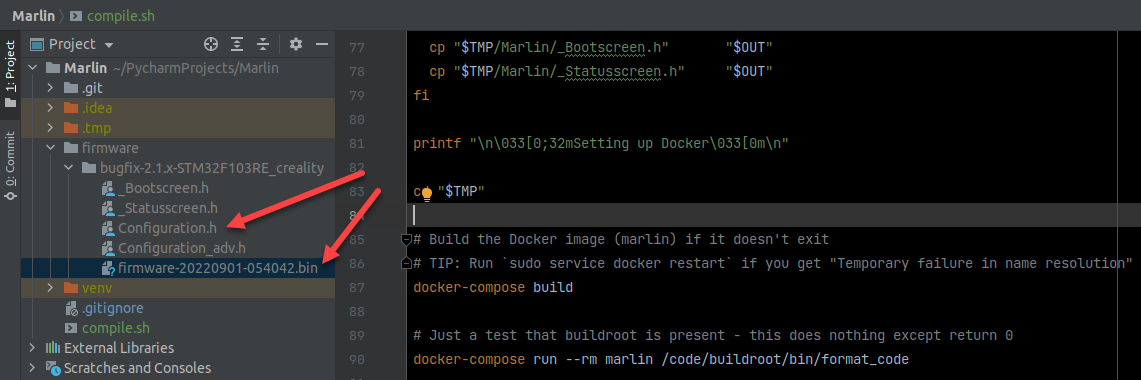
Use Docker. Here is a complete solution for building the firmware with a single Bash script using Docker. You do not need to install VSCode or Arduino IDE to compile Marlin firmware.
Unplug the motors first. Actually, first, turn the power off, then unplug the motors. Important! Power off first, then unplug the motors.
The grinding sound heard is simply the manual pushing on the build plate/X-axis powering the mainboard via the stepper motors – they act like generators when unpowered. This causes the firmware to try to boot and power the steppers in a holding position. Naturally, this is antagonistic to our sliding of the build plate, so motor “slippage” is heard and felt.
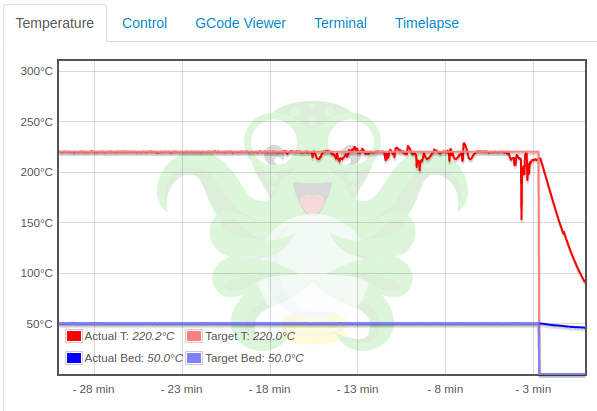
Issue G-code M303 E0 S210 C8 U1 from Pronterface. Turn your fan on first.
M303 – G-code for autotuning PIDs.
E0 – Tune extruder 0.
S210 – Tune the PID for 210 ℃.
C8 – Perform the PID tune 8 times.
U1 – Activate the resultant P, I, and D determinations.
Don’t forget to issue M500 to save and M503 to confirm the save.
Cure an entire layer and peel it off. Do not dump your resin back into the bottle, which takes time (gloves, filter, funnel, towels, cleanup, etc.). Instead, leave the resin or add more resin, then expose the entire bottom layer to UV for 60 seconds with the test pattern tool.
Raise the build plate out of the way, unscrew and remove the resin vat carefully, and gently press on the bottom edges of the FEP edges while walking a slow perimeter with your finger (no glove needed). The cured layer will pop up along the edges. From there, use a spatula or plastic scraper to lift one corner of the cured layer and gently peel it away from the vat.
Replace the vat. No need to auto home again. Gently run the spatula or plastic scraper along the inside of the FEP to ensure the layer edges are gone. Use the spatula to place the cured layer into a holding jar instead of the garbage (you can melt it down with paint thinner if you like).
With a 10-micron aquarium sock and a UV lamp.
Take the metal basket out of the wash basin and set it aside. Clean it manually with nitrile gloves on using IPA in a separate area. Let the basin dry. Safety goggles and respirator on. Pour the wash bucket through the usual funnel and paper resin strainer (190 microns, used when you cycle vat resin) into a large glass container with an air lock that allows 405 nm UV through (most glass will allow 75% of 405 nm to pass, but you can test it with a handheld 405 nm UV flashlight).
Either shine a bright UV lamp at the glass jar for about 30 minutes, or place the jar on a bright windowsill for a few days; I have a 150 W UVA lamp and it works fantastically.
With the UV lamp approach, the jar will look like foam filled it. That is because the suspended resin cured but did not settle to the bottom. No problem. Place the large aquarium filter sock in another glass jar – preferably bigger – and pour the foamy mix into it. Then slowly pull up the 10-micron sock and see the clear IPA remains in the jar. Elegant, inexpensive, and simple. Turn the sock inside out and wash with soapy water to clean it for next time.
Coffee filters (~20 microns) clog up with fine particulates; do not use coffee filters.
No, don’t. It’s a clever idea, but resin and IPA will creep behind the flex plate and the magnet, and the whole plate/magnet will need to be washed frequently.
Also, there will be adhesion problems, and you will have to adjust your Z-axis stopper if you can find it.
Plus, if there are any vacuum/suction/jumping issues with non-basic resin, the flex plate will buckle and your print will fall off into the vat of sorrow. I threw my flex plate out. Stay with the all-steel, solid, OEM build plate and scrape it after each print. It just works.
I like to have a few genuine, OEM build plates around so one is always clean for the next print.
You can use Super Glue. I use cyanoacrylate glue with no accelerator to bond two halves of a ball together, for example. Gorilla Glue is overkill for resin prints because the bond strength greatly exceeds the part crush strength.
How strong is a Super Glue bond? It’s stronger than cured resin, but even with basic resin, you may want an epoxy or enamel paint to strengthen the entire print.
You can use Super Glue. I regularly bond Neodymium magnets to UV resin parts and they hold very well, even when another magnet is nearby.
Use 400-grit wet sandpaper. 1000-grit is too fine and will take a long time, but I find wet 400-grit sandpaper with IPA smooths a part well. You will leave white marks when you sand a resin-printed part, which can be minimized by rubbing the part with IPA afterward.
Coat it in Plasti Dip. Plasti Dip is meant for dipping metal in liquid rubber to coat tool handles in rubber. It works well for resin-printed parts such as balls and levelling feet. You need to suspend the part by a string or wire, dip it into a vat of Plasti Dip of any colour (even clear), and wait at least 30 minutes between coats with an average of four coats. Set a timer.
Tip: You may want to build a hook or tie point into your model that is recessed into the surface: when you fill it with Plasti Dip by way of dipping, you can cut off the excess rubber without accidentally exposing the surface of the print.
Use compressed air. Hold the nozzle about 10 cm away and move closer as needed, blowing away any lumps while each fresh layer of Plasti Dip rubber dries.
Use mineral spirits. Never use sandpaper of any grit. Put a small amount of mineral spirits in a shallow dish. With nitrile gloves on, dip your finger into the spirits. Rub the area you want to smooth out gently with your finger(s). The surface of the Plasti Dip will slowly re-liquefy and flow under your finger. When the Plasti Dip starts to feel tacky, dip your finger again and keep going. (ref).
Be careful not to rub too hard, or the rubber may come off and expose the print.
You can use clear packing tape temporarily. Just like patching a tire puncture, you can use clear packing tape to temporarily seal the backside of FEP. To make it last longer, cut the corners of the packing tape to make the patch more rounded. Prolonged use of such a mended FEP will cause the puncture to curl into the vat – this is only a temporary solution that can last several hours of printing.
Yes, you can. As long as the breaker doesn’t trip, a good power supply like the Meanwell LRS-350-24 (on the Ender 3 Pro) has very good capacitors and can take momentary voltage drops without skipping a beat. It handles 24 V at 350 W. I have been using Meanwell power supplies for a while now, and love them.
Print half the model before midnight and the other half past midnight. In British Columbia, the residential rate is, as of 2022, $0.0950 per kWh for the first 1,350 kWh, then $0.1408 per kWh over the 1,350 kWh. If you print a long print every two days, straddle midnight.
Over 30 ℃. You don’t need to actively heat some aluminum enclosure; the 200 ℃ extruder and 50 ℃ hotbed will keep any enclosure warm and draft-and-dust free. I use a large grow tent and it works great, plus the warmth cuts down on humidity near the printer.
Use two 1 mm spacers. Place a spacer of desired thickness (0.5 mm or 1 mm) on each Z-axis motor screw to quickly add a gap to that stepper motor. Move the gantry up and down and confirm the lead-screw rod stays centered.
Use a spacer. Unscrew the two grub screws connecting the lead-screw rod to the motor shaft, place a 1 mm spacer between the motor and the connector, and tighten both grub screws. Remove the spacer. The rod connector no longer rubs against the stepper motor.
Crack open the shell and manually focus the lens. I like the Jiga webcam at $30 with a 2 MP CMOS sensor. Its factory focus starts at 2 feet, which is no good for OctoPrint and OctoLapse. If you can, crack open the shell, use some force with a pair of pliers to break the dot of glue holding the lens at its factory focus. Then twist until focus is perfectly at the hotbed center.
Scrape, sand, IPA. After each print, scrape off stuck PLA/PETG/ABS, etc., with a metal scraper, then lightly sand with a small square of 1000-grit sandpaper to avoid sending plastic dust flying. Finally, wet a tissue with IPA and wipe the hotbed. The printer is now ready for the next print.
Edit Configuration.h. Make sure these lines are as follows:
1 2 3 4 5 6 7 8 9 10 11 12 13 14 | // Or use the BLTouch firmware version of BTT SKR #define BLTOUCH #define MESH_BED_LEVELING #define MESH_EDIT_MENU // Do bed leveling before each print - always a good idea. #define RESTORE_LEVELING_AFTER_G28 #define LCD_BED_LEVELING // #define PROBE_MANUALLY #define G26_MESH_VALIDATION // The following is for 25 touch points #define GRID_MAX_POINTS_X 5 #define GRID_MAX_POINTS_Y 5 // Make the ABL twice as fast as the default (*2) #define XY_PROBE_FEEDRATE (133*60*2) |
Save, compile the firmware.bin, copy the binary to the root of an SD card, and insert it into the Ender 3 mainboard. The firmware will update. Remove the SD card.
Check the extruder shaft grub screws and/or broken filament. In my case, the extruder was turning and the filament spool was twitching, but no filament was coming out. It turned out the grub screws on the gear that feeds the filament were loose, so the extruder would visibly move, the PTFE tube and filament spool would twitch, but no filament was extruding. Another time, the filament simply snapped at the head of the direct-drive extruder.
The thermistor is wrong. There are dozens and dozens of temperature tables in Marlin for known thermistors. If you bought a dodgy thermistor from overseas, it might report 210℃, but the hotend is only 160℃, so the filament isn’t melting. Either purchase a new thermistor or manually build a temperature table. For example:
1 2 3 4 5 6 7 8 9 10 11 12 13 14 15 16 17 18 19 20 21 22 23 24 25 26 27 28 29 30 31 32 33 34 35 36 37 38 39 40 41 42 43 44 45 46 47 | // Eric Draken - the SIMAX3D 100K 3950 from Amazon // Why /4 ? We need to downsample from 12-bits ADC to 10 bits ADC. See: https://reprap.org/forum/read.php?1,872228 // Why override table #2? To compare how far the drift is from expected table #11. constexpr temp_entry_t temptable_2[] PROGMEM = { // Borrowed from table #11 to backfill the interpolation { OV( 1), 938 }, // Real measurements { OV( (int)(117/4) ), 255 }, { OV( (int)(124/4) ), 251 }, { OV( (int)(133/4) ), 246 }, { OV( (int)(143/4) ), 240 }, { OV( (int)(193/4) ), 225 }, { OV( (int)(239/4) ), 217 }, { OV( (int)(274/4) ), 209 }, { OV( (int)(308/4) ), 205 }, { OV( (int)(314/4) ), 200 }, { OV( (int)(357/4) ), 197 }, { OV( (int)(359/4) ), 195 }, { OV( (int)(411/4) ), 190 }, { OV( (int)(410/4) ), 188 }, { OV( (int)(476/4) ), 182 }, { OV( (int)(562/4) ), 176 }, { OV( (int)(644/4) ), 169 }, { OV( (int)(757/4) ), 162 }, { OV( (int)(886/4) ), 153 }, { OV( (int)(1045/4) ), 145 }, { OV( (int)(1209/4) ), 137 }, { OV( (int)(1418/4) ), 129 }, { OV( (int)(1632/4) ), 121 }, { OV( (int)(1886/4) ), 112 }, { OV( (int)(2150/4) ), 103 }, { OV( (int)(2424/4) ), 94 }, { OV( (int)(2729/4) ), 85 }, { OV( (int)(2977/4) ), 76 }, { OV( (int)(3222/4) ), 68 }, { OV( (int)(3416/4) ), 59 }, { OV( (int)(3622/4) ), 47 }, { OV( (int)(3752/4) ), 39 }, { OV( (int)(3862/4) ), 28 }, { OV( (int)(3889/4) ), 27 }, // Borrowed from thermistor_11.h for the zero crossing. // This doesn't matter in the grand scheme of things. { OV( 981), 23 }, { OV( 991), 17 }, { OV(1001), 9 }, { OV(1021), -27 } }; |
Use G-code with OctoPrint. Use the following snippets in the pause and resume sections of OctoPrint. Cura uses M82 (absolute extruder) so be sure to use M82 and not M83 in the following snippets:
1 2 3 4 5 6 7 8 9 10 11 12 13 14 15 16 | ; After print job is paused {% if pause_position.x is not none %} ; relative XYZE G91 M83 ; retract filament of 0.8 mm up and move Z slightly upwards G1 Z+5 E-0.8 F4500 ; absolute XYZE M82 G90 ; move to a safe rest position, adjust as necessary G1 X0 Y0 {% endif %} |
1 2 3 4 5 6 7 8 9 10 11 12 13 14 15 16 17 18 19 20 21 22 23 24 25 26 27 28 | ; Before a print job is resumed {% if pause_position.x is not none %} ; relative extruder M83 ; prime nozzle G1 E-0.8 F4500 G1 E0.8 F4500 G1 E0.8 F4500 ; absolute E M82 ; absolute XYZ G90 ; reset E G92 E{{ pause_position.e }} ; WARNING!!! - use M83 or M82 (extruder absolute mode) according to what your slicer generates M82 ; extruder ABSOLUTE mode!!! ; move back to pause position XYZ G1 X{{ pause_position.x }} Y{{ pause_position.y }} Z{{ pause_position.z }} F4500 ; reset to feed rate before pause if available {% if pause_position.f is not none %}G1 F{{ pause_position.f }}{% endif %} {% endif %} |
The screw holding the thermistor is too tight. If the hotend screw is too tight, the temperature may melt the wires under pressure and cause a short to ground. Unscrew, wrap both wires individually in Kapton thermal tape, and screw the thermistor back into the hotend.
Use a direct-drive extruder, and increase temperatures. I switched to a direct-drive extruder and removed the Bowden tube. Now I have a simple HDPE tube from the spool to the extruder (with a dust filter at one end). Next, increase the extruder stepper motor from the stock NEMA 17 (32 mm) motor to 40 mm or higher; get one with higher amperage to handle the harder and faster extruding and retracting. Next, make sure the power supply can handle 2 amps per stepper motor (including dual Z-axis motors), as well as the hotbed and hotend: the Meanwell LRS-350-24 (24 V, 20 A) on the Ender 3 v2 is perfect. Finally, in Cura, increase the hotend temperature to 220℃ for PLA. Without any fan modifications, you can easily get 100 mm/s with superb prints.
Use an extruder with a 3:1 ratio for more torque. My other printer uses a Bowden tube with a 3:1 dual-gear extruder with e-steps set to 406 steps/mm and there is virtually no stringing, plus it prints quite fast.
Switch to 0.6 mm nozzles and Cura 5. Cura 5 can slice a model accurately using 0.6 mm nozzles, and prints are significantly faster even if the feedrate is below 100 mm/s.
Let the hotbed cool. When the hotbed gets back to room temperature, it shrinks a bit and the printed part will come right off like magic.
2.8 mm with a wall line count of 4 or more. Actually, a multiple of the nozzle diameter is best. So, for stock 0.4 mm nozzles, 2.8 mm is better than 3.0 mm to avoid squishing the filament to the sides by 0.2 mm in order to keep dimensional fidelity. Also, if the wall line count is 4 or more, no infill is used and no time is spent on micro zig-zagging. If the wall line count is 4, then both sides of the wall are drawn like so: 0.4 mm x 4 x 2 = 3.2 mm. However, only 7 lines will be drawn, so that becomes 2.8 mm.
Slow down the print. Yes, your belts may be loose or tight, but we can pass over that because of our good maintenance routine. I found that on parts that require rapid jumping to give the part a certain pattern or texture, a speed over 100 mm/s causes my layer shifting. Also, the filament has a speed rating that I shouldn’t exceed by too much.
If you want speed and consistent layers, try creating “individual setting regions” in Cura. It’s too advanced for a quick answer, but you can create regions that have individual settings. For example, you can set half a part to 20% infill, and the rest to 40%. Pretty neat.
Install Meshmixer, Mesh Enabler, Autodesk 3DS, or Autoconverter. In Meshmixer (free), I find that you can cut off sections you wish to rework, save as STL, and then import into Autodesk Inventor or SolidWorks. However, the mesh is just a representation in Autodesk Inventor, so use Mesh Enabler or 3DS to make a solid. 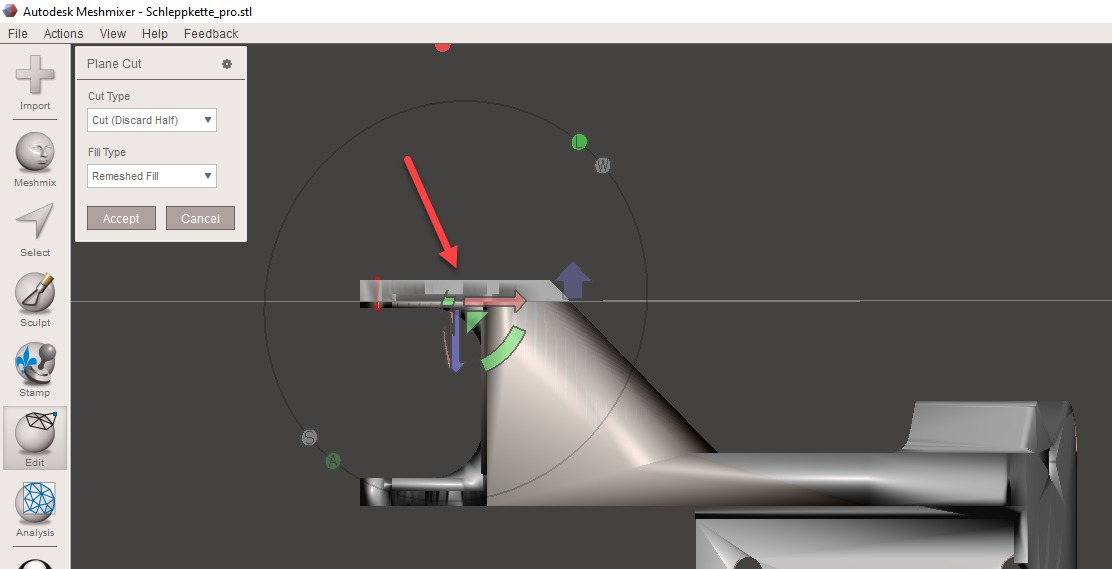
Too much UV. Try to cure the resin part for less than 10 minutes in weak UV light (i.e. the curing station). If you use a 150 W UV lamp, the part will definitely yellow in just a few minutes. Using a handheld 365 nm UV flashlight works well to cure delicate parts. Just focus the light if your pen light is adjustable and blast the joints or small parts with UV light. Let the rest cure in weak UV light, but not sunlight.
Designs are supplied by hobbyists. Though well-intentioned, I’ve found that many 3D printer upgrades need to be printed at 102%, need thicker walls, or are just dimensionally incorrect. I truly feel you can derive inspiration from Thingiverse, but it is far better to design your own parts. Another example is how a 20 mm drag chain didn’t fit into several holders I once printed; it turned out the tolerances on commercial drag chains are very low: measure and design your own.
More to come…