Leave GoDaddy and Go Completely Serverless Using Just Cloudflare and S3 Buckets: Part One
Results
Here is my serverless WordPress website now:

I show you how to back up your GoDaddy WordPress sites including databases, move your domain registrar to Cloudflare, set up a catch-all email to Gmail, host your WordPress site locally with Docker, repeatedly create static HTML pages, easily host your HTML files in AWS S3, set up 301/302 redirects, load dynamic content with Cloudflare Workers, and satisfyingly close your GoDaddy account.
Some advanced topics include: page-paint boosting with multiple domain aliases, cache and edge-cache tuning, WAF and bot protection, SEO boosts, S3 protection, hosting Google Fonts, analyzing site speed, and adding comments and a search bar.
Background Story
While overseas, I needed to make some WordPress websites, so I got a 5-year Ultimate Web Hosting Linux plan for $450 and installed WordPress myself. About $90 per year on good hosting is not bad, right?
The hosting worked okay, but several times a year I’d have to call GoDaddy because my websites weren’t loading and discover another tenant was abusing shared resources. They wouldn’t detect it automatically. Also, the server used HDDs, not SSDs which cost extra.
Also, to get HTTPS on a few domains, I had to hand over $287.96 to get Standard UCC SSL (have you ever heard of Starfield Technologies, Inc. which is owned by GoDaddy and issues these certs? I didn’t think so).
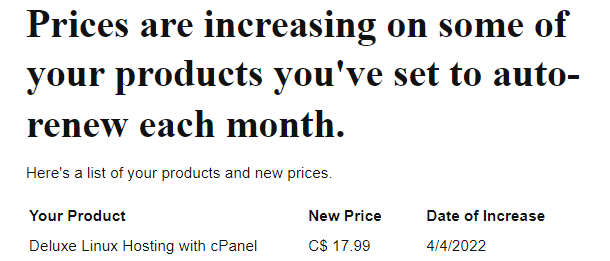
The contract is over. To keep this same hosting now costs $18/mo—hosting is now $216 per year (plus tax). That’s a far cry from the $90 per year they initially offered. And still on HDDs. And the HTTPS certificates need renewal!
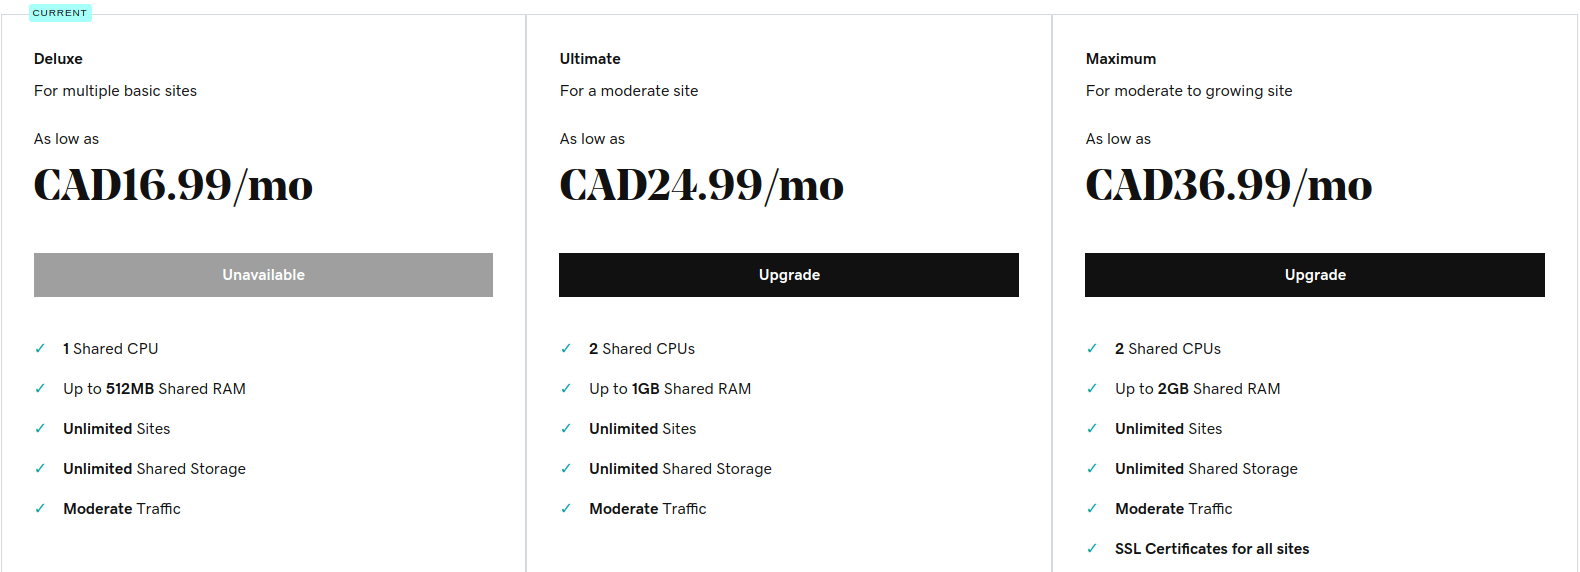
But first, here’s what $18/mo gets me with GoDaddy:
1 2 3 4 5 6 7 8 9 10 11 12 13 | cat /proc/cpuinfo | grep model # Intel(R) Xeon(R) CPU E5-2630L v2 @ 2.40GHz cat /proc/version # Linux version 2.6.32-954.3.5.lve1.4.87.el6.x86_64 # Note: This is RHEL 6 cat /proc/meminfo # MemTotal: 32724832 kB # MemFree: 978880 kB cat /proc/loadavg # 3.84 3.12 3.10 14/2456 343076 |
In sum, my shared GoDaddy server uses a retired, custom RHEL 6 Linux called CloudLinux 6 (EOL 2020), has a 6-core CPU from 2013 that’s three times slower than my laptop, and 32 GB of shared RAM at 98% usage1: no power for burst visitors.
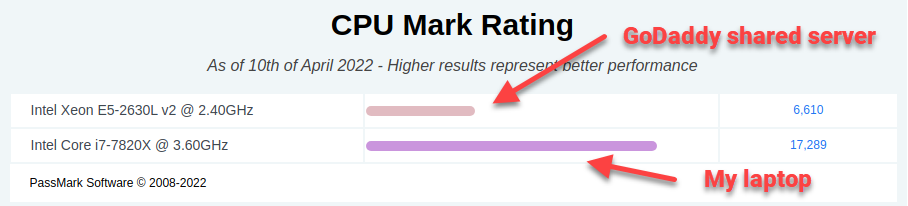
Friends, for $18/mo I get one vCPU on a 6-core CPU shared by hundreds of accounts2, and a 512 MB slice of that RAM. It’s time to break up with GoDaddy.
Table of Contents
Part One
- More Reasons to Leave GoDaddy
- GoDaddy is Indirectly Vulnerable to Hacks
- Many Domains Point to the GoDaddy Shared Server
- Motivation to Leave
- Let’s Get Organized
- High-Level Plan of Action
- Step 1. Calculate the Monthly Cost with AWS S3
- Step 2. Back Up Everything
- Step 3. Test the Cloudflare Email Routing Service
- Step 4. (Optional) Test a Third-Party Email Forwarder
- Step 5. Create a Virtual Machine Running Docker
- Step 6. Install Docker with Cloud-Init
- Step 7. Replicate GoDaddy’s WordPress Environment
- Step 8. Generate Static HTML Offline
- Step 9. Sync Static Production Files to S3
- Step 10. Verify the 404 Page Works
- Step 11. Allow Cross-Origin Resource Sharing (CORS)
- Step 12. Allow Subdomain Virtual Hosts with S3
- Step 13. Query Strings and S3 Bucket Keys
- Step 14. Enable HTTPS with HTTP-Only S3
- Summary of AWS S3 Bucket CLI Commands
- Serverless: Serve a WordPress Website Without a Server
- The Plan for Apache’s .htaccess
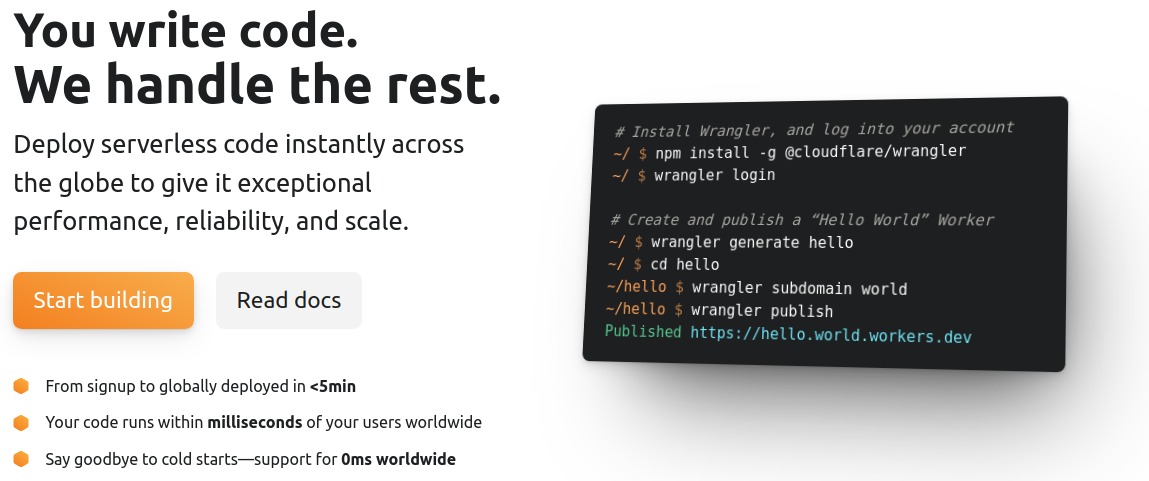
- Step 15. Set Up a Cloudflare Worker Dev Environment
- Step 16. Serve Dynamic Content, Formerly PHP Scripts
- Step 17. Publish a Cloudflare Worker
- Step 18. Prevent Bots from Hammering Your Workers
- Step 19. Cron Jobs Without a Server
- Step 20. Move Comments and Schedules to a Third-Party
- Advanced Serverless Options
- Advanced Concepts and Gotchas
- Checklist: Move Sites from GoDaddy
- The GoDaddy Experience Simulator
- Results and Summary
More Reasons to Leave GoDaddy
- GoDaddy secretly injected JavaScript into customers’ web pages.
- GoDaddy supported the broadly worded SOPA bill.
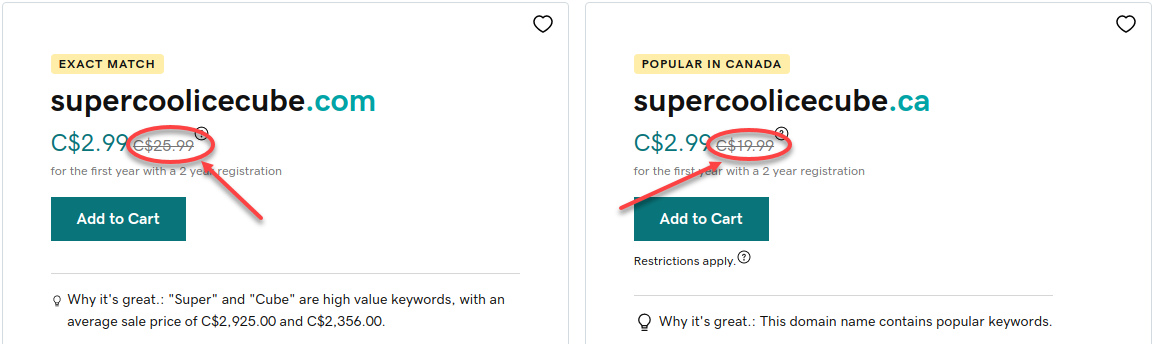
- GoDaddy engages in unreasonable price jumps. For example, domain names renew at $26 on GoDaddy but only $10 at Cloudflare or Namecheap. Shameful.

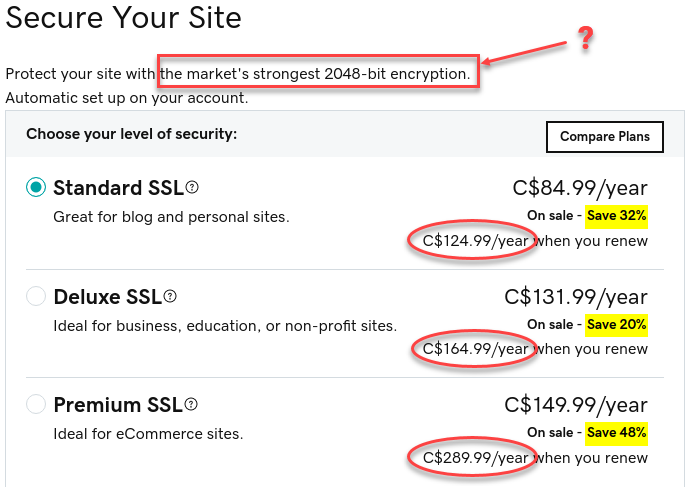
Shameful GoDaddy domain pricing - GoDaddy’s pricing is garbage. You get free TLS (it’s TLS, not SSL) with any CDN (e.g. Cloudflare), or even with Let’s Encrypt. Hint: You need Deluxe just to get the lock icon. These certs come from Starfield Technologies, Inc. (owned by GoDaddy)—ever heard of them?
Garbage GoDaddy TLS cert pricing - GoDaddy always has affiliate coupons for the first year but none for renewals—you’re stuck at their inflated rates.
- GoDaddy’s cPanel is slow to change pages I often forget what I was doing.
Incredibly slow GoDaddy cPanel GoDaddy’s cPanel often just crashes - GoDaddy tweaks your environment without notice. Suddenly:
Where did Memcached go, GoDaddy?


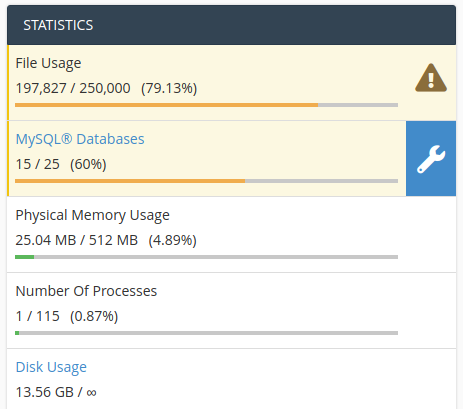
Imagine you have a GoDaddy Deluxe shared hosting plan with one vCPU and 512 MB of RAM. And you keep getting emails like this:
Here is more strength to my resolve to leave GoDaddy.
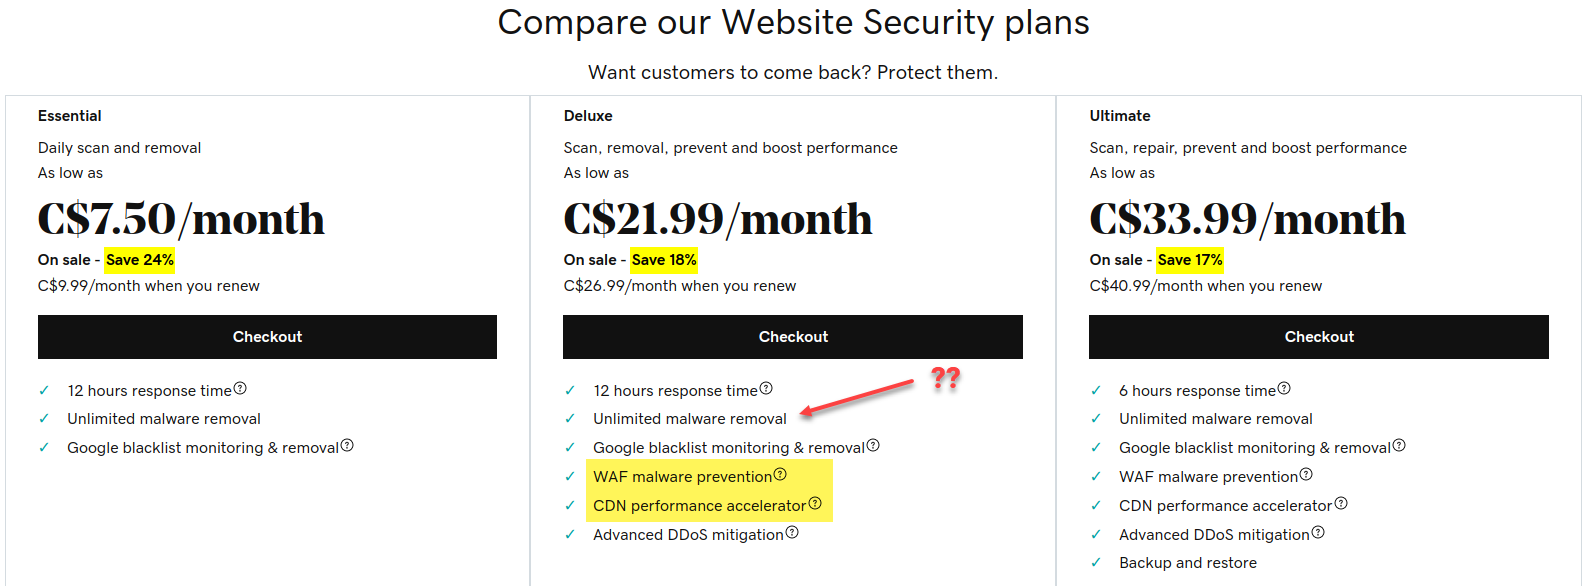
The following pricing is also garbage and misleading.
For one, it’s in GoDaddy’s best interest to use a WAF (Web Application Firewall) automatically to prevent their data centers from turning into a bot farm. This is available by default and for free with Cloudflare, along with effective DDoS protection. Besides, who puts “CDN accelerator” on their “Website Security” cash-grab page? Avoid GoDaddy.
Also, suddenly SSH is not supported on my account anymore. I needed to upload a PHP web shell to force shell access. We have to end this terrible relationship.

I’ve already moved all my domains away from GoDaddy.
GoDaddy Is Indirectly Vulnerable to Hacks
Try a Google search for the custom Linux kernel and patch level my GoDaddy shared server uses:2.6.32-954.3.5.lve1.4.87.el6.3

Shared hosts are like modern airplanes: more seats, less room, squeezing out profit.
While not directly hackable, shared hosts use something like CageFS (from CloudLinux) to isolate tenants on the physical server. WordPress is notorious for being hackable through dodgy plugins.
What does this mean?
If one tenant’s WordPress or Joomla site gets hacked and joins a botnet or spam campaign, CPU, RAM, disk, and network usage go up, and the whole server grinds to a halt. This is more common than you think. I’ve had to call Tech Support many times.
Many Domains Point to the GoDaddy Shared Server
How many domains are hosted on my shared GoDaddy server?
I’m in a jailed filesystem, so I need to be creative to find this out.
My GoDaddy sites’ DNS records point to 107.180.51.231. That IP unhelpfully resolves toip-107-180-51-231.ip.secureserver.net.
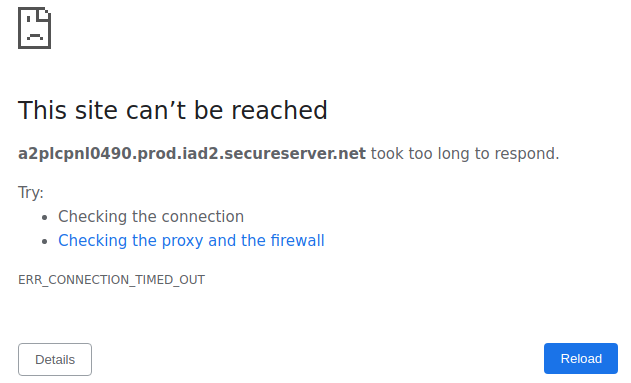
Running hostname returns a2plcpnl0490.prod.iad2.secureserver.net, which resolves to 198.71.235.88. When I inspect /etc/hosts, I get:
1 2 3 4 5 6 | # HEADER: This file was autogenerated at 2017-05-17 10:56:28 -0700 # HEADER: by puppet. While it can still be managed manually, it # HEADER: is definitely not recommended. 127.0.0.1 localhost localhost.localdomain 107.180.51.231 xxxxx.xxxxxxx.com 198.71.235.88 a2plcpnl0490.prod.iad2.secureserver.net a2plcpnl0490 |
Now, ip, ifconfig, tracert, and similar tools are not installed. But I can curl out and discover the server’s external IP is reported as 198.71.235.88. However, when I perform a tracert to a domain on this box, the final IP is 107.180.51.231. Then what is the true IP of my server?
New tactic using the Host header:curl -H "Host: my-site.net" http://107.180.51.231/ reaches my site, butcurl -H "Host: my-site.net" http://198.71.235.88/ results in a generic 404 page.
That means 107.180.51.231 is my shared server’s IP.
Now, let’s see how many domains we can find that point to the same IP address.

Is this IP a Load Balancer?
Could this IP address belong to a load balancer? Let’s find out. I ran an nmap scan in “polite” -T2 mode, and the WAF did not stop me.
1 2 3 4 5 6 7 8 9 10 11 12 | Scanning ip-107-180-51-231.ip.secureserver.net (107.180.51.231) [1000 ports] Discovered open port 143/tcp on 107.180.51.231 Discovered open port 993/tcp on 107.180.51.231 Discovered open port 53/tcp on 107.180.51.231 Discovered open port 3306/tcp on 107.180.51.231 Discovered open port 995/tcp on 107.180.51.231 Discovered open port 22/tcp on 107.180.51.231 Discovered open port 110/tcp on 107.180.51.231 Discovered open port 587/tcp on 107.180.51.231 Discovered open port 80/tcp on 107.180.51.231 Discovered open port 443/tcp on 107.180.51.231 Discovered open port 21/tcp on 107.180.51.231 |
If this is a load balancer, then it routes ports FTP (21) and SFTP (22) to “somewhere,” as we can see. The alternative is that GoDaddy left FTP open on this “load balancer,” which would be about the worst thing a hosting provider could do.
If it were a load balancer, where would it load-balance an FTP connection? That doesn’t make any sense: people need to upload files to their accounts, not to random machines. This must be a server.
Let’s look at port 443:
1 2 3 4 5 6 7 | 443/tcp open ssl/http syn-ack Apache httpd | http-methods: |_ Supported Methods: OPTIONS HEAD GET POST |_http-title: Coming Soon | ssl-cert: Subject: commonName=*.prod.iad2.secureserver.net | Subject Alternative Name: DNS:*.prod.iad2.secureserver.net, DNS:prod.iad2.secureserver.net | Issuer: commonName=Starfield Secure Certificate Authority - G2/organizationName=Starfield... |
The most interesting part is that Apache is serving a “Coming Soon” page on port 443. On my shared server, I do see these default index.shtml and 404.shtml in the root folder. I’d expect a load balancer to be Nginx, unless GoDaddy uses a transparent proxy. But again, given that I gave nmap an IP address with no hostname, did nmap scan some random machine the load balancer routed it to, or is this a server?
One way to tell the difference is to interrogate SMTP on port 465. Notice the server announces itself as a2plcpnl0490.prod.iad2.secureserver.net.
1 2 3 | 465/tcp open ssl/smtp syn-ack Exim smtpd 4.94.2 | smtp-commands: a2plcpnl0490.prod.iad2.secureserver.net Hello ... |_ Commands supported: AUTH HELO EHLO MAIL RCPT ... |
Let’s run nmap again.
1 2 3 | 465/tcp open ssl/smtp syn-ack Exim smtpd 4.94.2 | smtp-commands: a2plcpnl0490.prod.iad2.secureserver.net Hello ... |_ Commands supported: AUTH HELO EHLO ... |
Same machine.
Are you not convinced yet? Well, we can interrogate the MySQL info next.
1 2 3 4 5 6 7 8 9 10 | 3306/tcp open mysql syn-ack MySQL 5.6.51-cll-lve | mysql-info: | Protocol: 10 | Version: 5.6.51-cll-lve | Thread ID: 3635341 | Capabilities flags: 63487 | Some Capabilities: Support41Auth, ... | Status: Autocommit | Salt: cjk[ddK('*;,hJv7LYY6 |_ Auth Plugin Name: mysql_native_password |
Let’s run nmap again.
1 2 3 4 5 6 7 8 9 10 | 3306/tcp open mysql syn-ack MySQL 5.6.51-cll-lve | mysql-info: | Protocol: 10 | Version: 5.6.51-cll-lve | Thread ID: 3644375 | Capabilities flags: 63487 | Some Capabilities: Support41Auth, ... | Status: Autocommit | Salt: 7V+pstlBAaDo$a@Y!3!G |_ Auth Plugin Name: mysql_native_password |
The salt always changes, but it is interesting that all other mysql-info information is the same, except for the thread ID, which has been incremented and thus makes sense.
Same machine.
Need more convincing that GoDaddy is cramming their servers with as many domains as they can? Let’s use a simple curl command.
1 2 3 4 5 6 7 8 9 10 11 12 13 14 15 | build@buildtools:~$ curl -I 107.180.51.231 HTTP/1.1 200 OK Date: Wed, 20 Apr 2022 03:01:18 GMT Server: Apache Upgrade: h2,h2c Connection: Upgrade Last-Modified: Sat, 11 May 2019 03:27:39 GMT ETag: "17e001f-7ab-5889443eb502e" Accept-Ranges: bytes Content-Length: 1963 Vary: Accept-Encoding Cache-Control: no-cache, no-store, must-revalidate Pragma: no-cache Expires: 0 Content-Type: text/html |
1 2 3 4 5 6 7 8 9 10 11 12 13 14 15 | build@buildtools:~$ curl -I -H "host: example.com" 107.180.51.231 HTTP/1.1 200 OK Date: Wed, 20 Apr 2022 03:01:41 GMT Server: Apache Upgrade: h2,h2c Connection: Upgrade Last-Modified: Sat, 11 May 2019 03:27:39 GMT ETag: "17e001f-7ab-5889443eb502e" Accept-Ranges: bytes Content-Length: 1963 Vary: Accept-Encoding Cache-Control: no-cache, no-store, must-revalidate Pragma: no-cache Expires: 0 Content-Type: text/html |
1 2 3 4 5 6 7 8 9 10 11 12 13 14 15 | build@buildtools:~$ curl -I -H "host: 3dvermont.org" 107.180.51.231 HTTP/1.1 200 OK Date: Wed, 20 Apr 2022 03:03:02 GMT Server: Apache Upgrade: h2,h2c Connection: Upgrade Last-Modified: Sat, 11 May 2019 03:27:39 GMT ETag: "17e001f-7ab-5889443eb502e" Accept-Ranges: bytes Content-Length: 1963 Vary: Accept-Encoding Cache-Control: no-cache, no-store, must-revalidate Pragma: no-cache Expires: 0 Content-Type: text/html |
I’ll leave this an exercise to the reader as to why, but: the same machine. I’ll repeat an earlier statement:
Motivation to Leave
While overseas years back, I needed a hosting solution. I got stuck in the GoDaddy ecosystem, especially with email.
Why is 512 MB of shared RAM painful?
If I want to walk my site to generate static pages, that takes RAM. If I want to resize images that already exist, that takes RAM. If I want more than two visitors at a time on a WordPress site, that takes RAM.
My presentation sites (such as this one) are fortunately simple: I have several themed sites with 98 % statically-generated pages. However, only CDN provider Cloudflare with its edge cache makes the sites load quickly; the static HTML pages still take seconds to load, and eons to load dynamically. It’s now a matter of criticality to leave GoDaddy.
Let’s Get Organized
Let’s perform some thought experiments.
- Should I render static HTML pages offline and upload them to AWS (or even GitHub)?
- If so, then where are the media assets served from?
- There may be too many assets for GitHub, but free (e.g. 4 sizes for each image).
- AWS S3 is a safe bet for a lot of media at a small recurring cost.
- How to maintain MIME headers for S3 files?
- Can I make a VM to host several WordPress sites?
- If so, then editing websites is restricted to a physical computer.
- There can be no dynamic content.
- Dynamic content can come from Lambdas or Edge Workers.
- Can I make a Docker Compose file to build the infrastructure on demand?
- If so, then I still need a VM.
- I can install exact versions to match GoDaddy’s PHP and MariaDB.
- If so, then I still need a VM.
- If so, then where are the media assets served from?
- Should I host the whole WordPress infrastructure in AWS?
- If so, do I create a Linux EC2 and MariaDB instance for an extra cost?
- This is prone to high-maintenance security updates and an evolving AWS stack.
- If so, can I Dockerize PHP and MariaDB somehow?
- This minimizes hands-on maintenance, but some EC2 still needs to run.
- Can I use AWS Terraform to make this easier?
- This is not the time nor place for Terraform/Chef/Ansible.
- If so, do I create a Linux EC2 and MariaDB instance for an extra cost?
- Where to host catch-all email servers for multiple domains?
- Purchase an email hosting plan?
- Requires another hosting plan, like GoDaddy.
- Purchase a Google Workspace account?
- Gmail only allows one email address per CAD $7.80/mo.
- Use AWS for email somehow?
- AWS + SES is not managed and is complex.
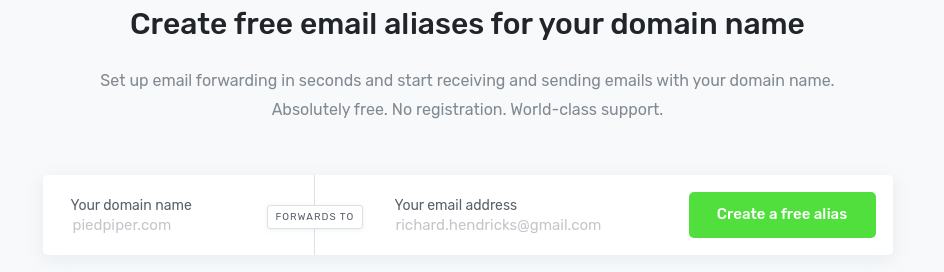
- Use the free email forwarder service ImprovMX?
- ImprovMX does everything I need for one domain.
- Use the free Cloudflare Email Routing private beta?
- This could be perfect.
- Purchase an email hosting plan?
High-Level Plan of Action
AWS is constantly evolving, the Console and CLI are ever-updating, and settings, security, IAMs, roles, backups, etc. are moving and adapting. We shouldn’t be slaves to maintaining the infrastructure behind static HTML pages. Also, I don’t want to be a slave to updating WordPress or core PHP after every security update, nor the plugins and the sieve of security holes they open (remember TimThumb?).
I presently hold terabytes of data in S3 Glacier for a few dollars a month. According to cPanel, with all the raw uploads and multiple backup chains per site, I’m sitting just under 14 GB.
Will I have an Ubuntu VM with LAMP (Linux, Apache, MariaDB, PHP) to run WordPress to mirror my GoDaddy environment? Yes. With Docker and Compose we can quickly recreate the GoDaddy Linux environment down to PHP 5.6 and MySQL 5.6.
HTML text files, PNGs, JPGs, MP4s and the like are self-described by the calling HTML5 tags and extensions, so there shouldn’t be a problem without web server MIME headers, except when loaded in their own tabs (e.g. open an image in a new tab). There are some files for download on my site(s), and hopefully, a visitor will click “Save As”.
What about 404 pages?
404.html needs to be uploaded to S3 as well.What about HTTPS? S3 URLs are by design not HTTPS.
There is some dynamic content using PHP. It is very limited in scope and usage. What can AWS or Cloudflare do here?
Finally, what about all the catch-all email domains from various sites that are forwarded to various Gmail accounts? This is the problem that held off until now to change hosting providers: it looked like a hosting account was needed to catch and forward emails, and AWS SES is inexpensive but quite complicated. However, many people online rave about ImprovMX.
MX 10 high-priority DNS record, I’ll use Cloudflare Email Routing. For my backup MX 20 record, I’ll experiment with ImprovMX.Step 1. Calculate the Monthly Cost with AWS S3
With AWS S3, the first year is free with the AWS Free Tier, but S3 is estimated to cost only $0.023 per GB of storage and $0.0004 per 1,000 GET requests from the second year. Happily, “data transferred out to the internet for the first 100 GB per month” is free.
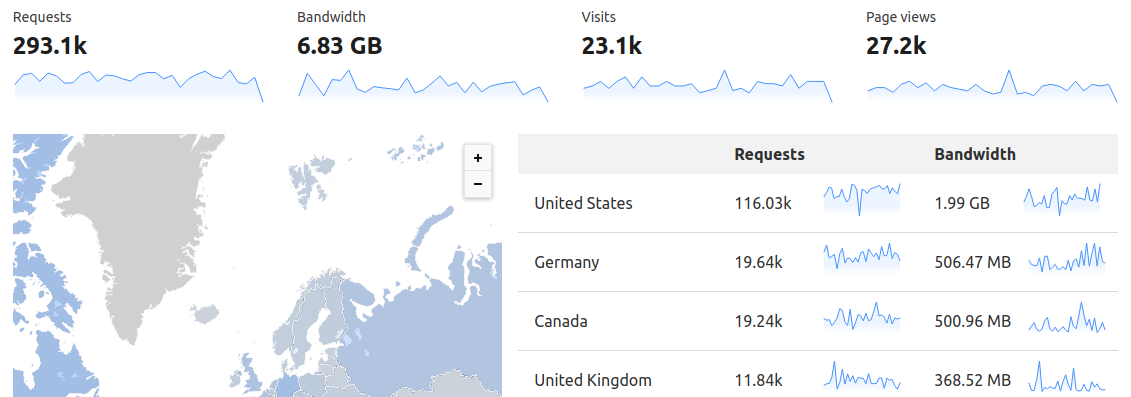
I can see that in a one-month period I would incur:
- $0.0004 (per 1,000) × 293 = $0.12 for the
GETrequests. - $0.023 (per GB) × 14 GB = $0.32 for S3.
- $0 for the 6.8 GB bandwidth.
For AWS SES (Simple Email Service),
- $0 for the first 62,000 emails forwarded from Lambda.
- $0.12 per GB of forwarded attachments.
- $0 for the first 1,000 emails received.
- $0.10 for every 1,000 emails received thereafter.
- $0.09 for every 1,000 email chunks (256 KB including attachments).
Looking at Gmail, I’m using about 2 GB of storage and have only a few thousand emails (including spam). I rarely get attachments and can even set an SES filter to reject large attachments as well. A typical email from Amazon showing an AWS invoice or something clocks in under 50 KB with the CSS and HTML included. According to the SES pricing calculator, such an email would not incur a chunk cost. Then I expect to pay less than $0.12 per month.
Unless I am missing something, on the AWS side given my current monthly usage, I expect to incur a fee of just 56 cents per month.
Step 2. Back Up Everything
I’m excited to leave GoDaddy — a host that is known to inject surreptitious opt-out code into your web pages. The first step is to back up everything. First, I’ll calculate how much space is needed for the backup with some SSH commands.
1 2 3 4 5 6 7 8 | # Total home folder size du -sh ~ # Specific folder size du -sh ~/public_html/ # List all item sizes in a folder with a grand total du -shc -- * |

I have about 5.6 GiB in my GoDaddy home folder, but only 3.4 GiB in my web folders. Everything can be rsync-d in about 10 minutes, but I will let cPanel do the heavy lifting shortly.
Important Web Folders
These are the most important folders in my shared hosting account. However I choose to back up my hosting account, I must ensure these folders are saved.
- ~/.htpasswds – Holds the Apache basic-auth passwords
- ~/.mysql_backup – Holds weekly MySQL backups for shared WordPress sites
- ~/.ssh – Holds the public keys used to SSH into the shared hosting account
- ~/access-logs (symlink) – Holds the plain-text website access logs for the current day
- ~/error-logs – If specified in the root
php.inifile, this folder holds a running PHP error log. Check the ini file for the actual error-log location if it has moved. - ~/logs – Holds the archived website access logs going far back in time
- ~/mail – Holds all mail messages and attachments
- ~/public_html – This is the most important folder. It holds all the shared web-hosting files for each website, or just the main website if there is only one
- ~/ssl – Holds the TLS keys to make HTTPS connections. This may or may not have any certificates present. I currently use Let’s Encrypt and Cloudflare instead
Generate a Full Account Backup
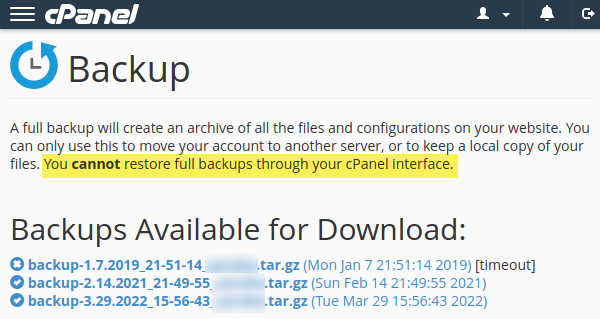
cPanel has the functionality to perform a full and complete backup of the sites and all settings, including DNS entries and mail-forwarding rules.
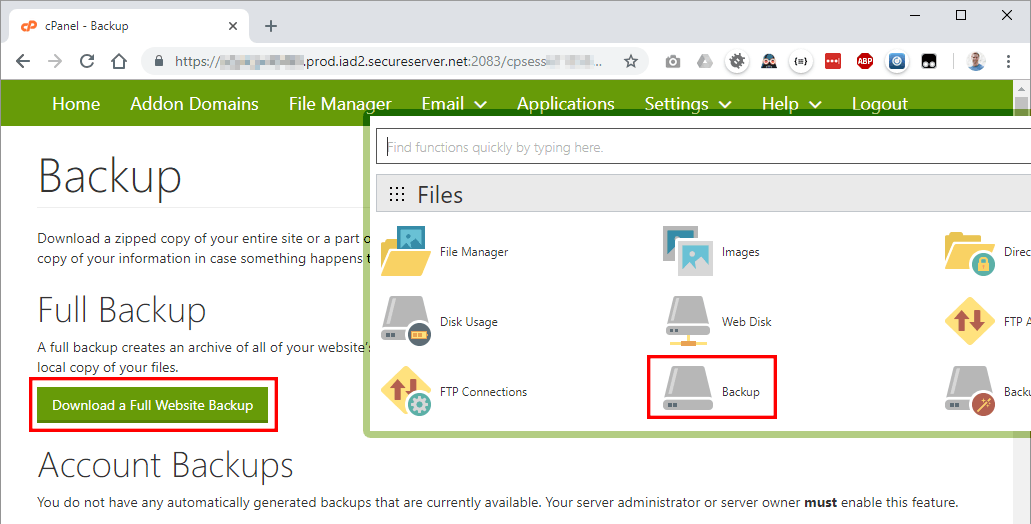
Through cPanel, I’ll download all my files and settings to a single tarball archive. I’ve chosen the home-directory backup location and started the backup process.

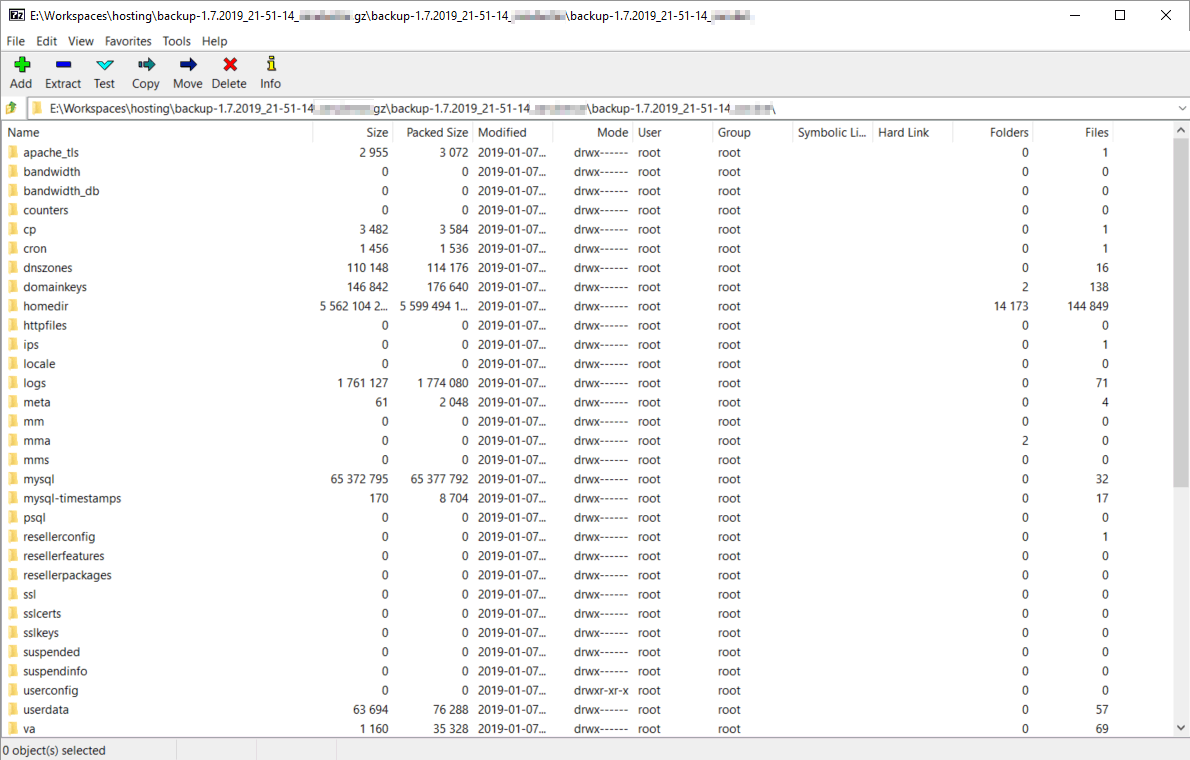
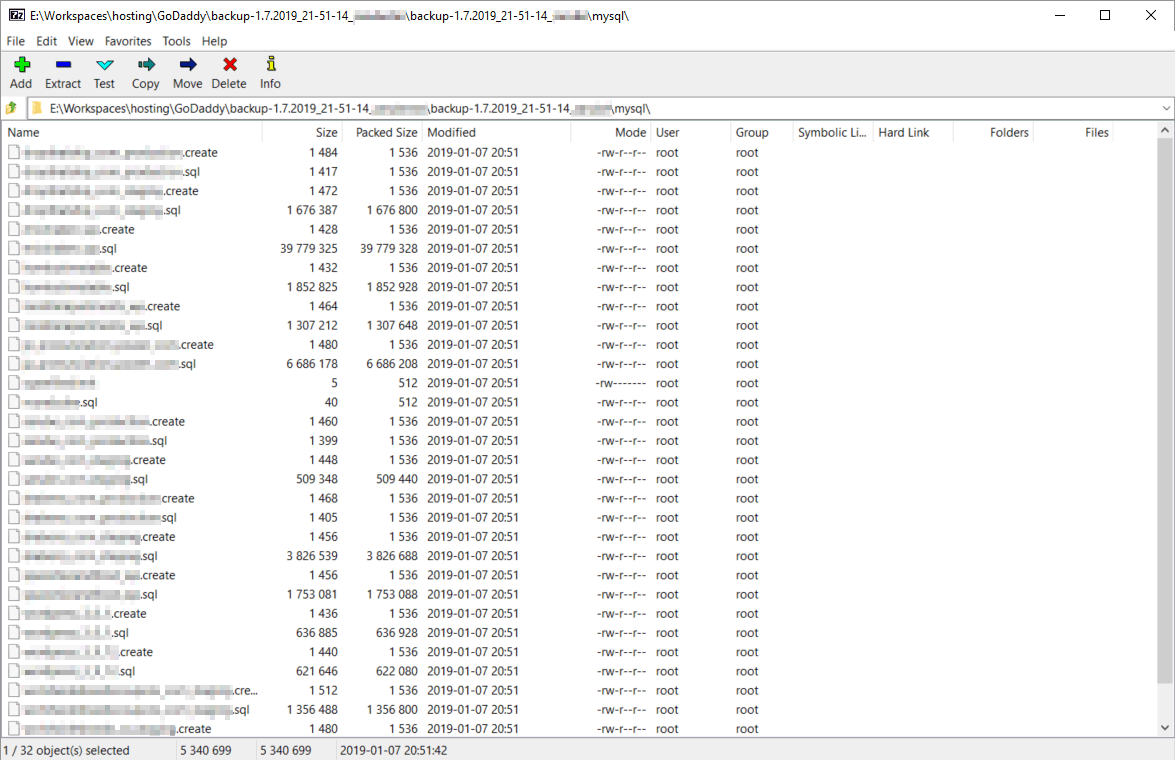
After about ten or so minutes—to GoDaddy’s credit—a single archive containing more data and settings than I imagined appears in my home folder. Here are the contents of that archive.
Crontab, DNS Settings, Site Aliases, and TLS Certs
The shared-hosting SSH home folder ~ is archived to homedir. It contains all the important folders outlined above. The other folders in the archive conveniently contain TLS certificates, crontab information, DNS settings, domain aliases, MySQL dumps, current logs, and cPanel configuration files. This is fantastic because it saves a lot of time rummaging through cPanel to note such settings. I’ll briefly explain what information each special folder contains.
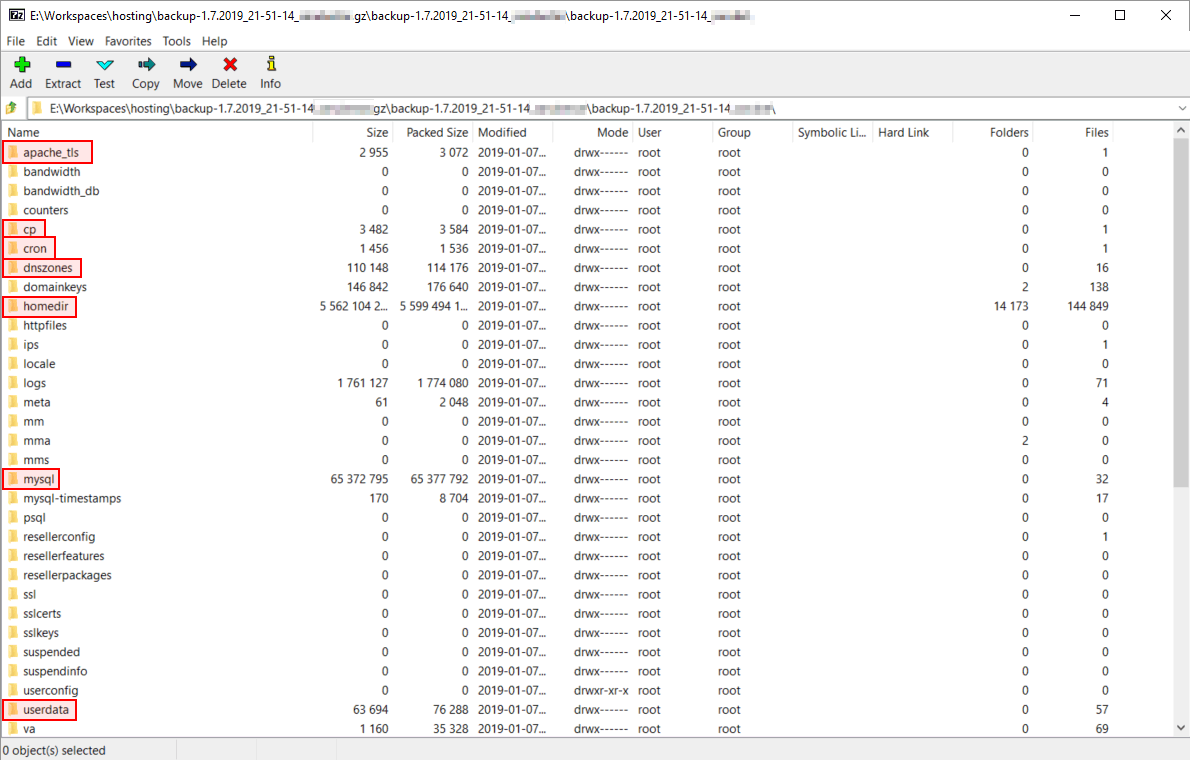
- apache_tls – Holds a copy of the TLS keys to make HTTPS connections. This may or may not have any certificates present. I currently use Let’s Encrypt and Cloudflare, so I will disregard this folder.
- cp – Holds a single file containing all the TLDs and SLDs associated with my account
- cron – Holds a copy of the
crontabfile. The cron jobs can also be seen by runningcrontab -lvia SSH, and the live crontab file is found in either/usr/bin/crontabor/usr/bin/crontab.cagefs. You can edit the crontab file withcrontab -e(:qquits). - dnszones – Holds the DNS settings for each TLD associated with my account. These can largely be ignored as Cloudflare will be the DNS provider from now on.
- homedir – This is a copy of the home folder at
~. - mysql – Holds an uncompressed dump of each MySQL database made at the time the archive is generated. When inflated, these files can become quite large.
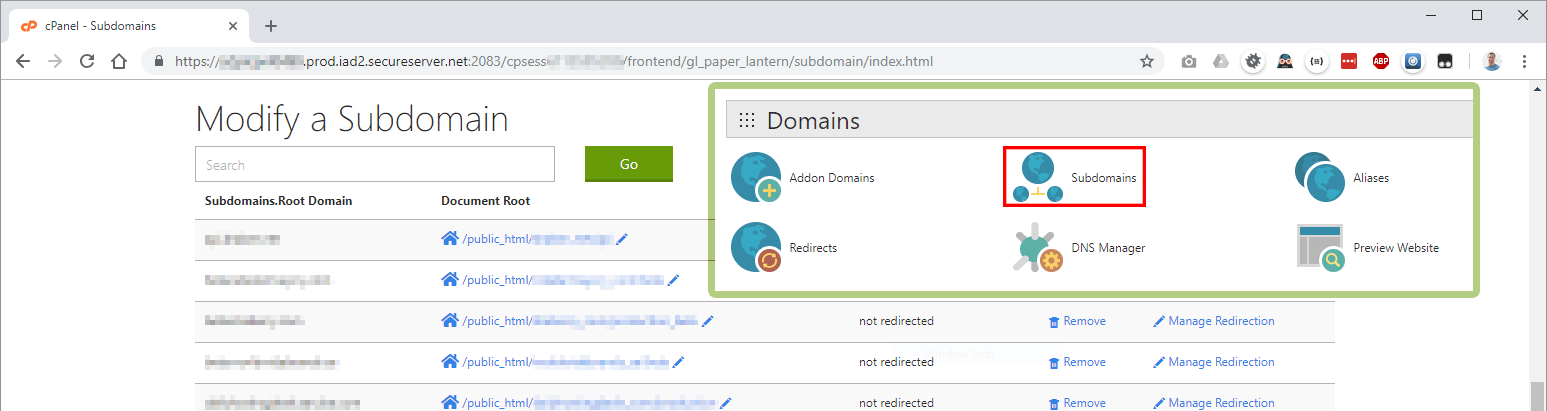
- userdata – Contains information about the document root and domain aliases of each site associated with the shared account
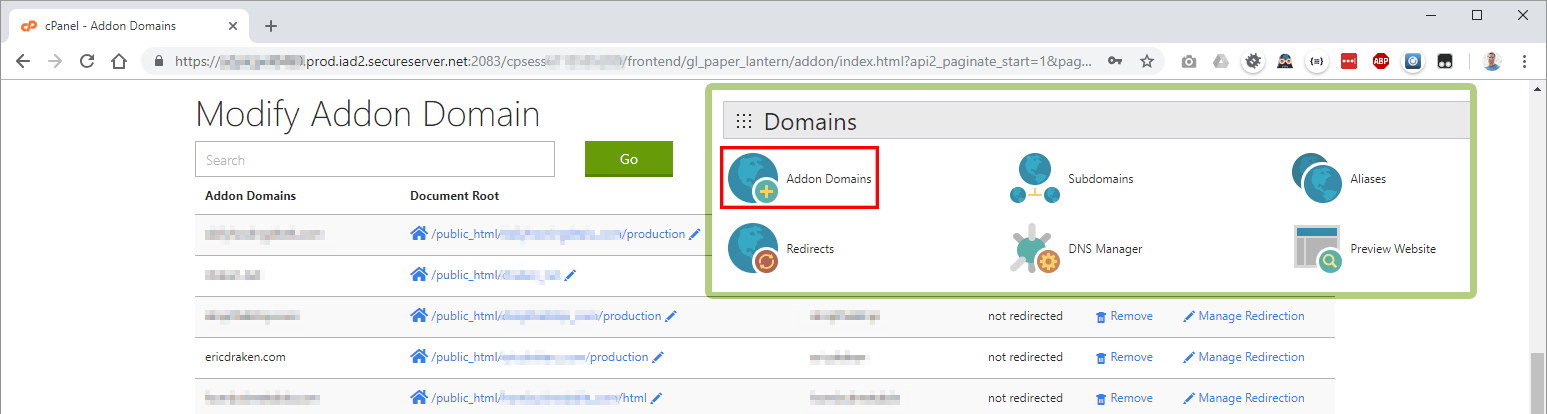
cp folder has a single file with all the domain, subdomain, and document-root information. If I didn’t create a full backup I could find this information in cPanel—but I’d have to look in two panels: Addon Domains and Subdomains.Manual locations to look for the domain and subdomain document-root mappings:
WordPress Databases
If enabled, GoDaddy creates weekly backups of the WordPress databases—but only for the previous week. They can be found in ~/.mysql_backup. I won’t be using this folder because the backups are outdated.
Instead, uncompressed database dumps are exported along with the entire hosting account in the full backup archive above, in the mysql folder.
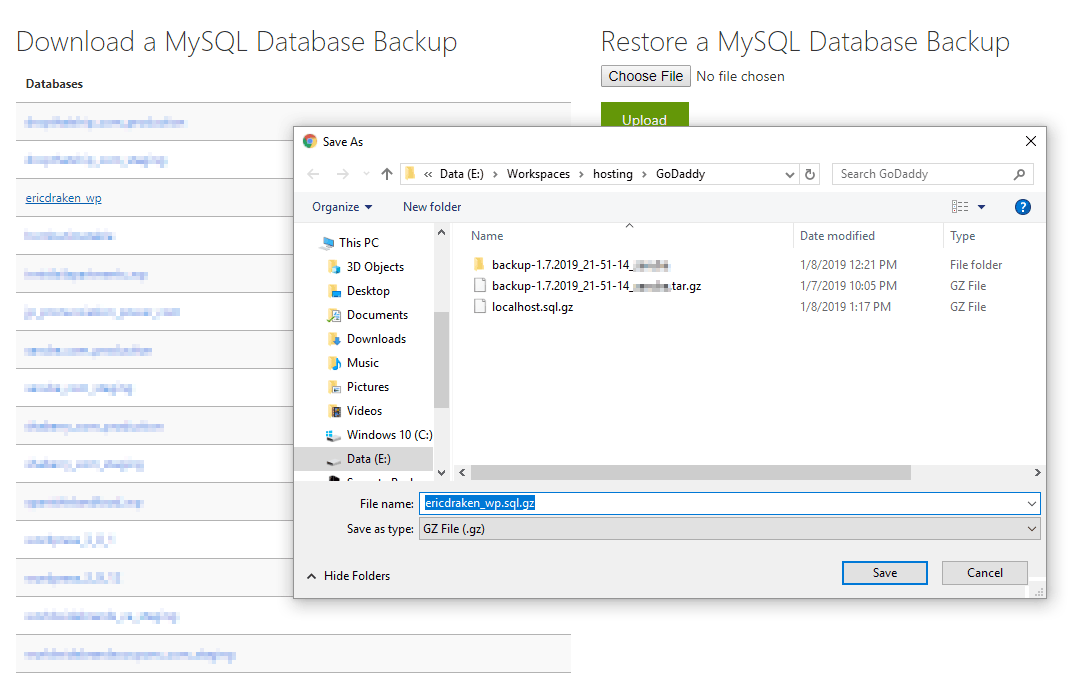
These are great when initially migrating sites, but I won’t be archiving my entire account each time I need database dumps. The databases can also be exported individually or in bulk from the phpMyAdmin panel in hosting. Here I can customize the dump file and specify where I’d like it saved.

The easiest method to export individual, compressed database dumps is through cPanel again.
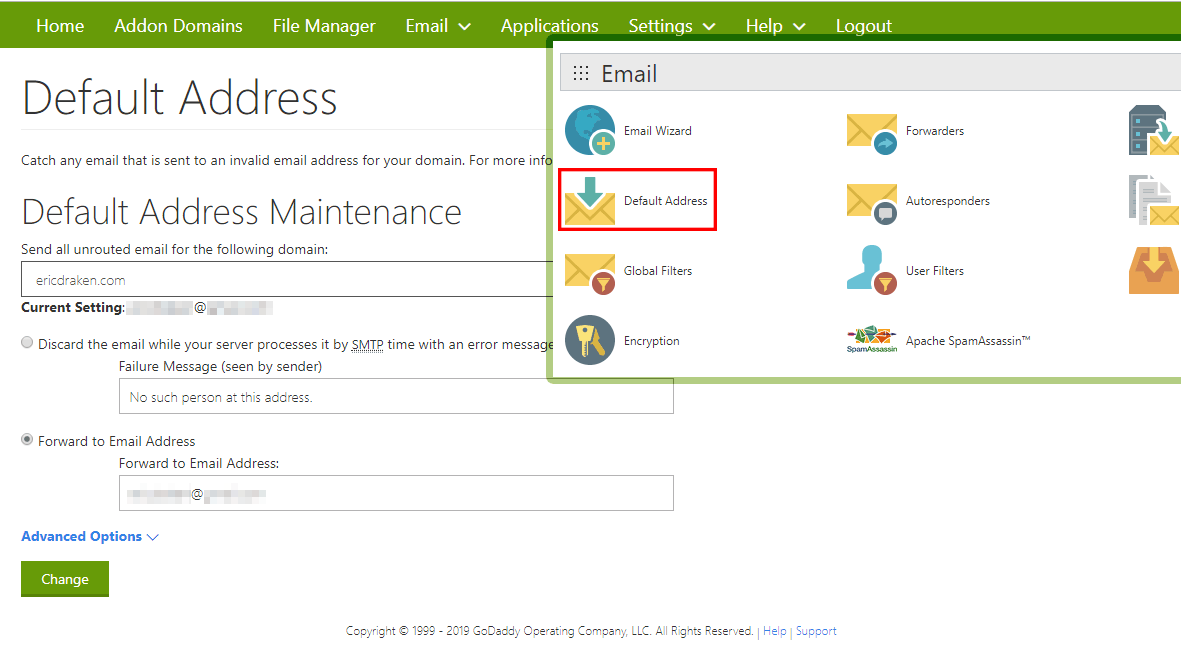
Email Settings
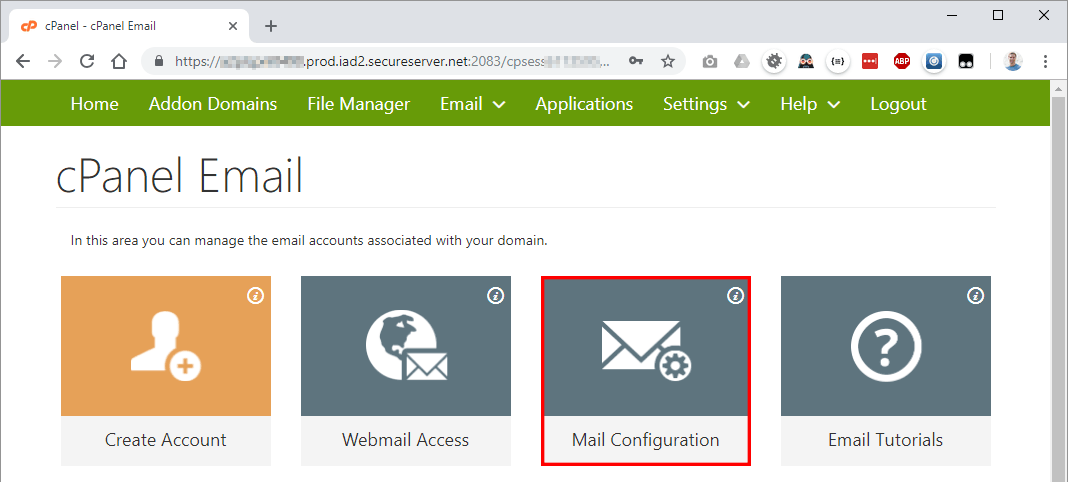
If I had used GoDaddy as my email-solution provider, then I would have saved email messages. In that case, I would enable POP3 or IMAP access to all my email accounts and import my mail to Gmail or Outlook. Those settings can be found in the cPanel Email panel.
What I actually do is use a catch-all setting to forward mail on a per-domain basis to Gmail accounts. I do this because Gmail has much better spam filters than I could ever set up manually, so I know if I were a shared-hosting provider, I would not be able to provide as good spam filtering as an email industry leader. That being said, I need to record all my catch-all settings. They must be in the archive, so I performed a grep of the archive and found the location of the email catch-all rules: va/.
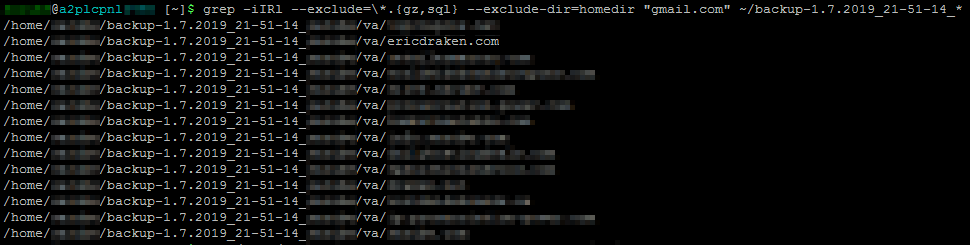
These are also in cPanel, but it requires a lot of clicking and refreshing to see every catch-all.
Search the Site Archive for Other Settings
To find important settings in the special folders, I like to untar the archive so I can grep for strings like in the email example above. I’ll untar the archive on the shared-hosting side and use their resources to perform the search. If you have a huge archive, I’d even recommend starting with the screen command to resume sessions later.
1 2 3 4 5 6 7 8 9 10 | # Untar the archive tar -xzf backup-1.7.2019_21-51-14_*.tar.gz -C ~/ # (Optional) Start a screen session for long-running searches # `Ctrl+A, D` to disconnect from a screen session # `screen -r` to resume a screen session screen # Search the archive for a string, excluding homedir, binary/gzip files, and databases grep -iIRl --exclude=\*.{gz,sql} --exclude-dir=homedir "gmail.com" ~/backup-1.7.2019_21-51-14_* |
The entire account is now backed up, and all the settings to recreate the shared hosting in a local Docker environment are present or can be searched for quickly.
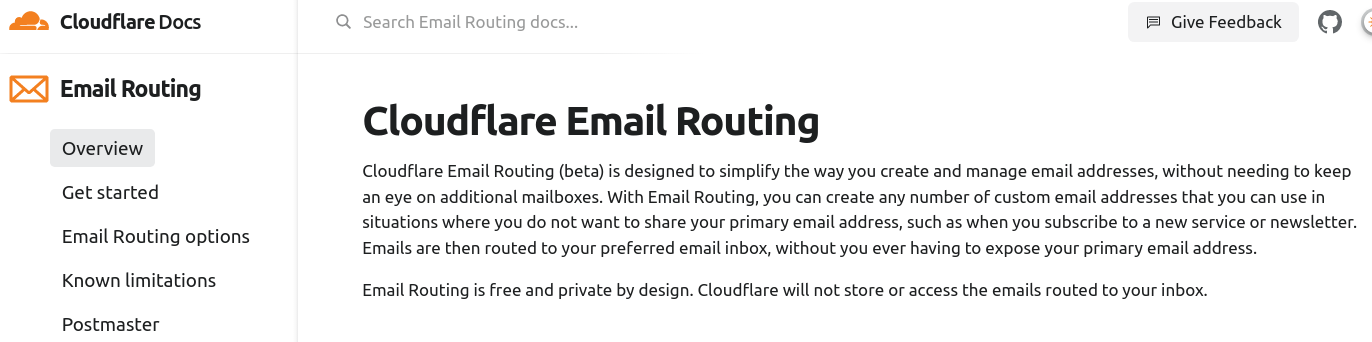
Step 3. Test the Cloudflare Email Routing Service
Cloudflare Email Routing only works if Cloudflare is your DNS provider as well. Check. I left GoDaddy’s $26 .COM domain names a long time ago.

The setup is quick and their screens are bound to change, so let’s skip to the Catch-All screen which is happily just a toggle switch. Cloudflare does UI right.
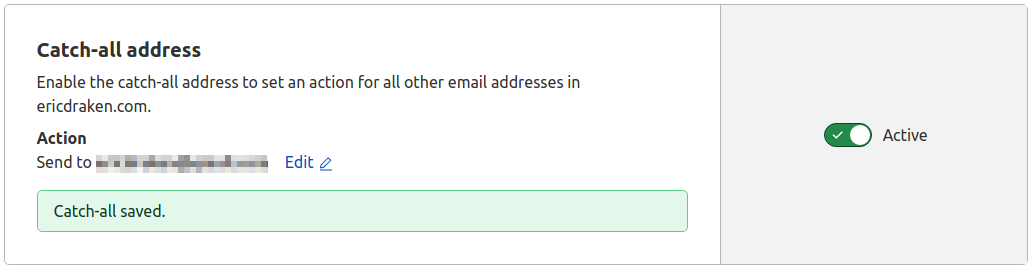
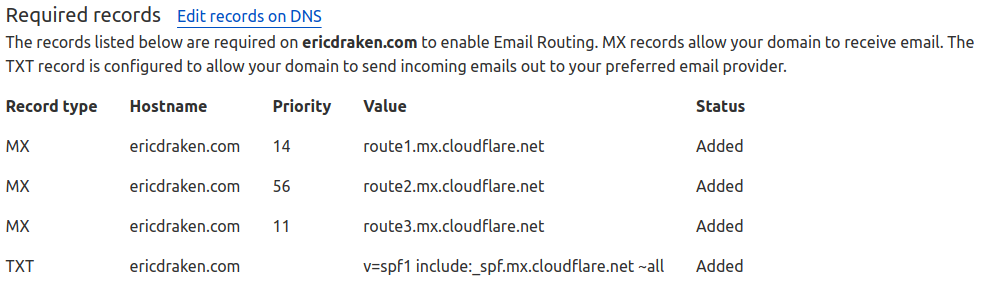
Then, the MX records are updated to use mx.cloudflare.net as the email forwarding provider. After I experiment with ImprovMX, I may adjust the priority levels.
reply-to header when forwarding email, so if all your domains point to a single Gmail account, you must be creative when replying.Here is an example of the DNS records you would have to add in Cloudflare.
Let’s give this a try by sending myself an email.
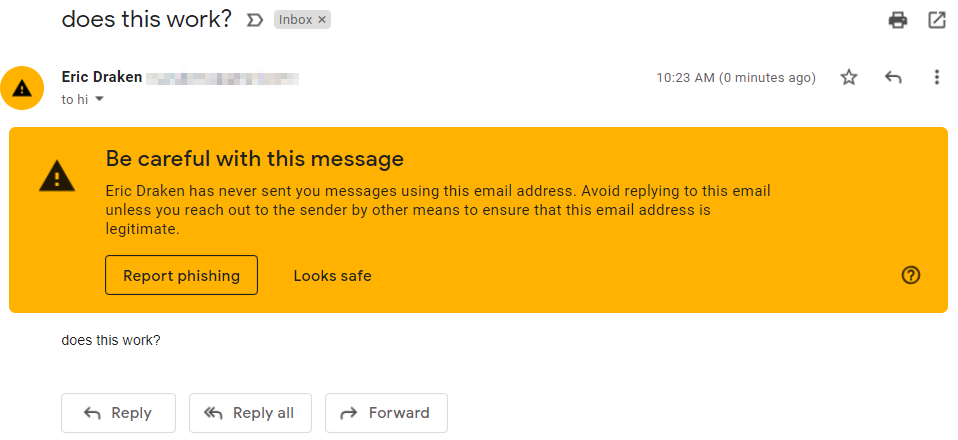
This could be Gmail using heuristics to add value to their service. Let’s look at the security information for DMARC (verification of originating server).
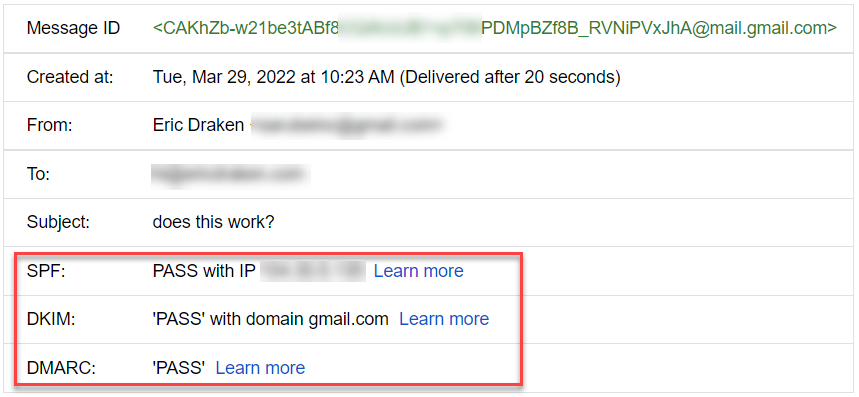
Now, let’s send a test email from the Gmail account that is the recipient of the routed email.

Except for there being no reply-to header, Cloudflare Email Routing works great, and they give me three email server records for redundancy. Very comforting.
me@gmail.com, you can safely give away me+company@gmail.com to get an email tagged with “company” at me@gmail.com to catch the b@stards that sell your email address. This trick does not work with Cloudflare, probably due to DMARC.Subdomains
Does Cloudflare forward email to subdomains?
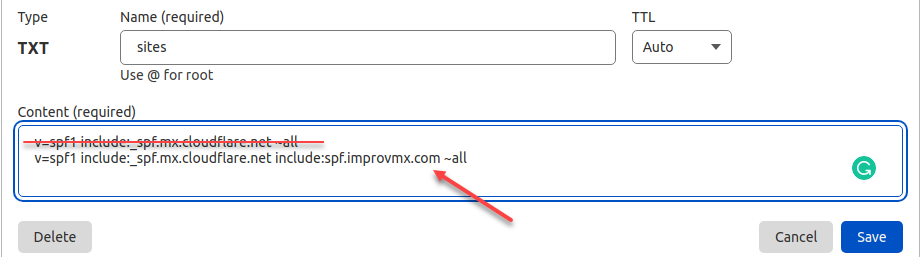
Yes. Cloudflare easily supports email routing for subdomains. Create as many subdomains as you like with MX records. However, you must set a TXT SPF record for each subdomain, but it is just copy-and-paste for each subdomain and the root/apex domain.
So far, Cloudflare is now my email forwarding provider, and GoDaddy’s MX records are still in place (with extremely low priority) as a failsafe while in testing.
Step 4. (Optional) Test a Third-Party Email Forwarder
I’d still like the reply-to headers with emails to one domain I use to catch b@stard email resellers and data breaches. For example, I began to receive phishing emails from my throwaway email address I gave to H&R Block after they suffered a 3rd-party vendor breach.
Email received on Jan 5, 2022:
On December 23, 2021, starting at 4:05 PM EST our account on Amazon’s AWS servers was compromised … After working further with Amazon to understand what happened, we learned a certain set of data, including personal information of some customers was accessed and downloaded including:
- first and last names,
- email addresses, and
- phone numbers.
I used to use the MyFitnessPal app before it was bought by Under Armor. Now, I get emails to my myfitnesspal@****.com catch-all email so I know they were either hacked or those b@stards sold my personal info.
To: myfitnesspal@my-domain.com
Subject: Louis Vuitton Bags Up To 90% Off! Top Quality Low Cost! Shop Online Now!
The point is, no one can be trusted with your email address, so why not make a catch-all email-forwarding domain to Gmail and call out shady companies to the Privacy Commissioner of Canada as I do, or at least delete spam emails to compromised addresses.
Set Up ImprovMX
It’s straightforward to set up your one and only email forwarder with ImprovMX, so please visit their site. Remember to create a password on the Security page, and enable 2FA.
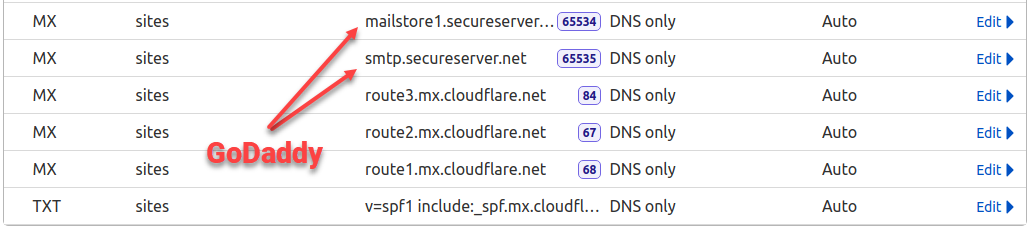
Also, ImprovMX gets grumpy if the priorities don’t match in the DNS records, but the service still works.
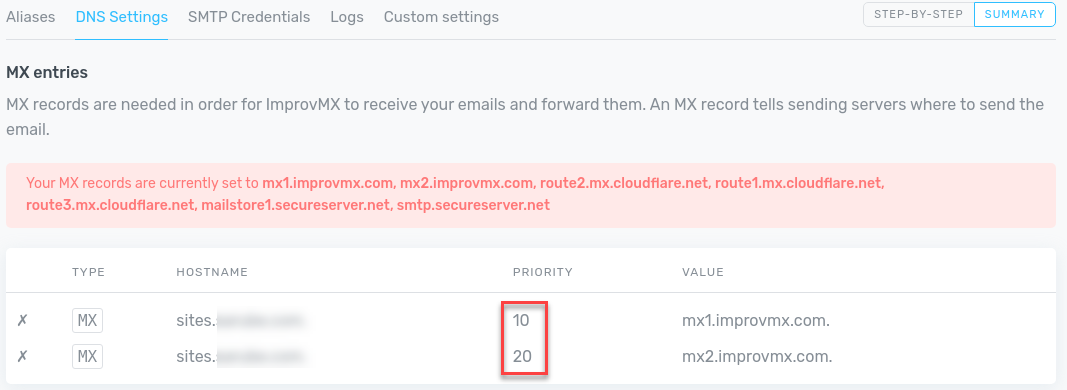
Now, I have a temporary abundance of MX records for one subdomain.
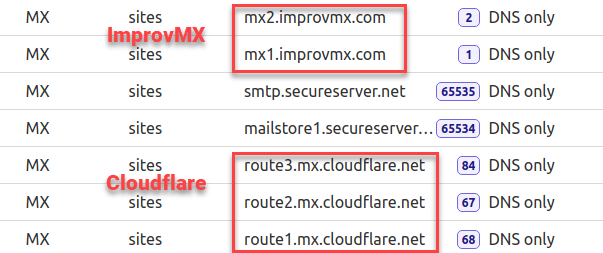
I can confirm the MX priorities work as intended, and ImprovMX supersedes Cloudflare at this moment.
reply-to header nor does replying from Gmail honour the original email address. Emailing a declared alias in ImprovMX similarly has no effect. Bummer.Not knowing this at the time, it seems this is a premium feature.
[Sending emails using Gmail SMTP] feature is a … custom SMTP solution with all our premium plans where you don’t need to rely on Google. (ref)
In lieu of ImprovMX not supporting the reply-to feature on the free plan (and to be fair, it is more complicated than adding a ‘reply-to’ header), for my use case, using only Cloudflare Email Routing is preferred. If you do not have DNS hosted with Cloudflare, then certainly ImprovMX is beneficial.
Step 5. Create a Virtual Machine Running Docker
Let’s extract the tarball backup from step one into an Ubuntu VM. Notice how you cannot restore a full backup in case your sites are hacked – backups with GoDaddy are best for leaving GoDaddy.
Create the VM Ubuntu Cloud-Init Image
Before this exercise, I knew nothing about Cloud-Init because I always have some Ubuntu or Mint image handy. However, this was a fun opportunity to set up an automated install of a VM image for WordPress.
I was thinking about making a graphical Linux VM to hold GIMP (Photoshop for Linux), but really, just a halfway decent minimal Ubuntu install as a base. Actually, let’s borrow one of the Ubuntu cloud images. Here is a useful guide. Let’s try the new Impish release.
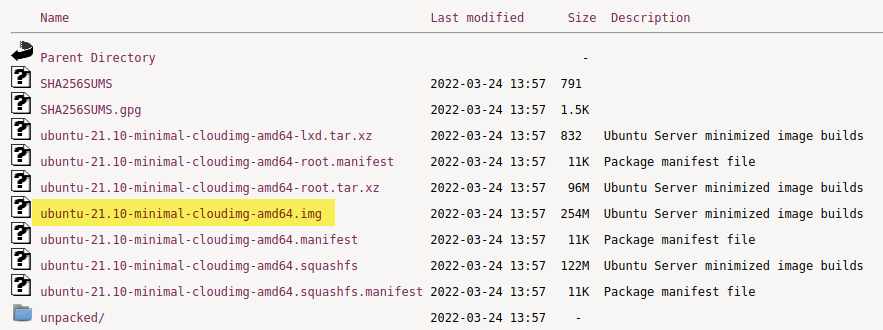
Let’s check out this image.
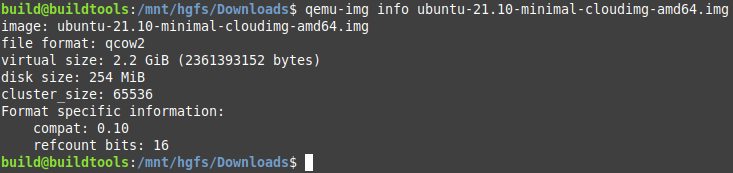
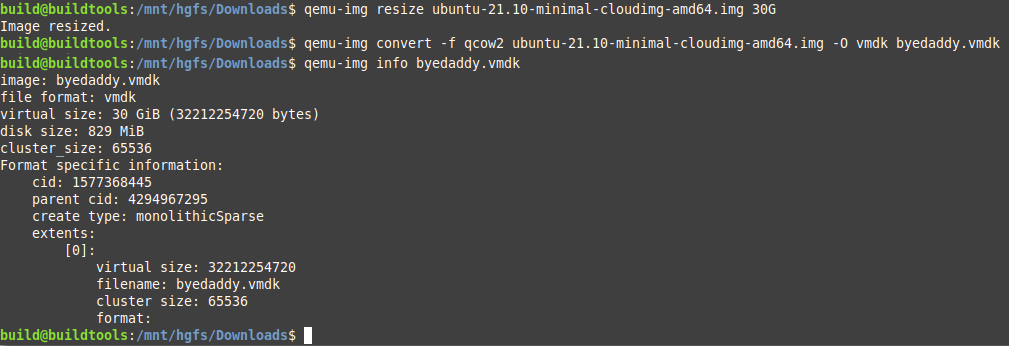
I’ll expand the virtual image size to 30 GB from its current 2.2 GB. That should be enough to hold raw WordPress files and all those images of various sizes.
1 | qemu-img resize ubuntu-21.10-minimal-cloudimg-amd64.img 30G |
Next, we can convert the IMG to a VMDK file for use with VMware Workstation.
1 | qemu-img convert -f qcow2 ubuntu-21.10-minimal-cloudimg-amd64.img -O vmdk byedaddy.vmdk |
Excellent.
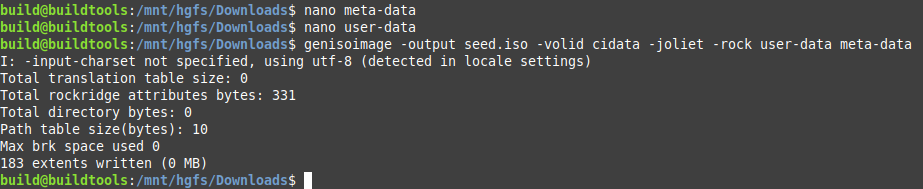
Continuing with this guide, I’ll create an ISO file with initial setup information holding the absolute, bare minimum information of just a plaintext password to get the ball rolling.
1 2 3 4 5 6 7 8 9 10 11 12 | ## REF: https://cloudinit.readthedocs.io/en/latest/topics/datasources/nocloud.html ## Create the user-data and meta-data files that will be used to modify image on first boot { echo "instance-id: iid-local01"; echo "local-hostname: byedaddy"; } > meta-data # Note: that the instance-id provided (iid-local01 above) # is what is used to determine if this is the first boot. ## You will NOT be asked to change the password printf '#cloud-config\npassword: ubuntu\nchpasswd: { expire: False }\nssh_pwauth: True\n' > user-data ## Create a disk to attach with user-data and meta-data genisoimage -output seed.iso -volid cidata -joliet -rock user-data meta-data |
If all goes well…
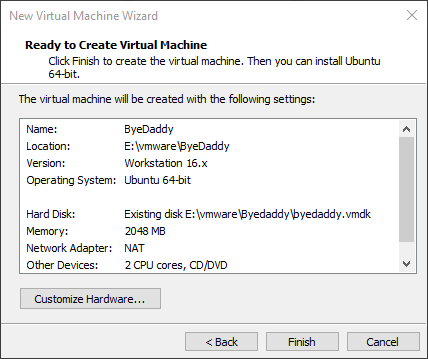
After moving all the files to a dedicated folder, let’s launch a new VM pointing to the VMDK and ISO.
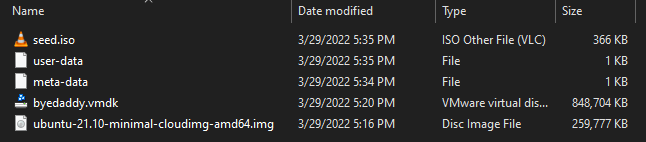
I am so excited to get this working and leave GoDaddy.

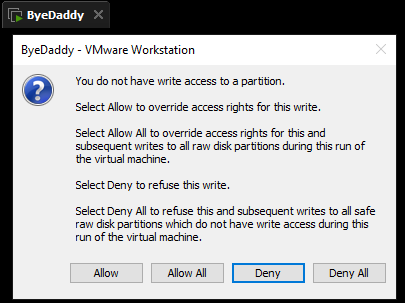
This is anticlimactic.
Whatever. How about downloading a non-minimal VMDK image? That should work, right? No.
Better done than perfect. I’ll download a non-minimal Cloud-Init Ubuntu release of the IMG and run the same conversion steps.
1 2 3 | cp ubuntu-21.10-cloudimg-amd64.img ByeDaddy.img qemu-img resize ByeDaddy.img 30G qemu-img convert -f qcow2 ByeDaddy.img -O vmdk ByeDaddy.vmdk |
Before my first run, I’ll make a backup of the VMDK so I can go back and re-cloud-init the image over and over until it runs perfectly.

After replacing the old ByeDaddy.vmdk with the new one, the VM runs and I’m dropped into the login prompt using the password in the seed.iso.
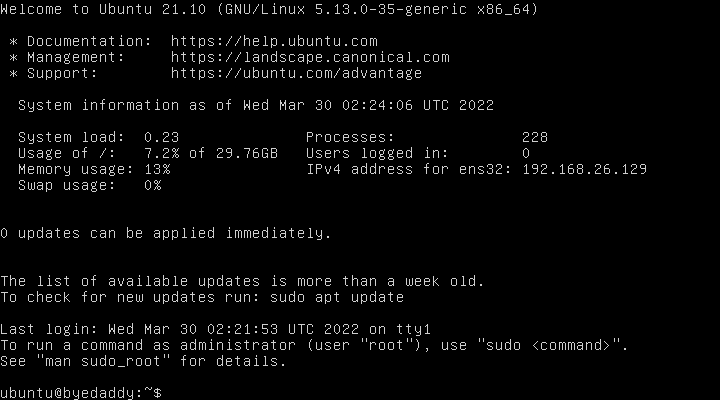
 
Step 6. Install Docker with Cloud-Init
We can configure the Ubuntu server with more options like adding PHP, MariaDB, and Nginx (but let’s just add Docker), and we can disable IPv6 and perform a full update on the first boot. To get Docker installed, recreate the user-data file and then rebuild the seed.iso as in the previous step. We can also take this opportunity to increase the console resolution.
Here is the (WIP) user-data script to install Docker and Compose. Feel free to think to yourself how this can be improved; it works, so let’s step on the gas.
1 2 3 4 5 6 7 8 9 10 11 12 13 14 15 16 17 18 19 20 21 22 23 24 25 26 27 28 29 30 31 32 33 34 35 36 37 38 39 40 41 42 43 44 45 46 47 48 49 50 51 52 53 54 55 56 57 58 59 60 61 62 63 64 65 66 67 68 69 70 71 72 73 74 75 76 77 78 79 80 81 82 83 84 85 86 87 88 | #cloud-config write_files: - path: /etc/sysctl.d/60-disable-ipv6.conf owner: root content: | net.ipv6.conf.all.disable_ipv6=1 net.ipv6.conf.default.disable_ipv6=1 # Add default user to the docker group system_info: default_user: groups: [docker] # No cloud provider, increase the console resolution, save SSD wear bootcmd: - echo 'GRUB_CMDLINE_LINUX_DEFAULT="nomodeset ds=nocloud"' >> /etc/default/grub - echo 'GRUB_GFXPAYLOAD_LINUX=1024x768' >> /etc/default/grub - update-grub - sed -i 's/ errors=remount-ro/ noatime,errors=remount-ro/' /etc/fstab package_upgrade: true packages: - apt-transport-https - ca-certificates - curl - htop - git - gnupg-agent - software-properties-common # Enable ipv4 forwarding write_files: - path: /etc/sysctl.d/enabled_ipv4_forwarding.conf content: | net.ipv4.conf.all.forwarding=1 # Default user system_info: default_user: name: ubuntu lock_passwd: false sudo: ["ALL=(ALL) NOPASSWD:ALL"] # Set default password password: byedaddy! chpasswd: { expire: false } ssh_pwauth: true disable_root: true # create the docker group groups: - docker # Add default auto-created user to the docker group system_info: default_user: groups: [docker] timezone: America/Vancouver # Setup Docker runcmd: - netplan --debug apply - sysctl -w net.ipv6.conf.all.disable_ipv6=1 - sysctl -w net.ipv6.conf.default.disable_ipv6=1 - add-apt-repository universe - apt-get -y update - curl -fsSL https://download.docker.com/linux/ubuntu/gpg | gpg --dearmor -o /usr/share/keyrings/docker-archive-keyring.gpg - echo "deb [arch=$(dpkg --print-architecture) signed-by=/usr/share/keyrings/docker-archive-keyring.gpg] https://download.docker.com/linux/ubuntu $(lsb_release -cs) stable" | tee /etc/apt/sources.list.d/docker.list > /dev/null - apt-get -y update - apt-get install -y docker-ce docker-ce-cli containerd.io - curl -L "https://github.com/docker/compose/releases/download/1.29.2/docker-compose-$(uname -s)-$(uname -m)" -o /usr/local/bin/docker-compose - chmod +x /usr/local/bin/docker-compose - ln -s /usr/local/bin/docker-compose /usr/bin/docker-compose - curl -L https://raw.githubusercontent.com/docker/compose/1.29.2/contrib/completion/bash/docker-compose -o /etc/bash_completion.d/docker-compose - apt-get -y clean - apt-get -y autoremove --purge - systemctl docker start - systemctl enable docker package_reboot_if_required: true power_state: delay: now mode: reboot message: Rebooting the OS condition: if [ -e /var/run/reboot-required ]; then exit 0; else exit 1; fi final_message: "The system is finally up, after $UPTIME seconds." |
Restore the backup of the VMDK you made in step 5 (ByeDaddy.clean.vmdk). You made a clean backup, right? If not, rebuild it from step 5 or else log in and manually clean the cloud-init files. Boot up the new VM.
When you first login under glorious 640×480 resolution, you can use the username ubuntu and password byedaddy!. The VM will automatically restart when the cloud-init scripts have finished, and the resolution in VMWare should jump to 1024×768.

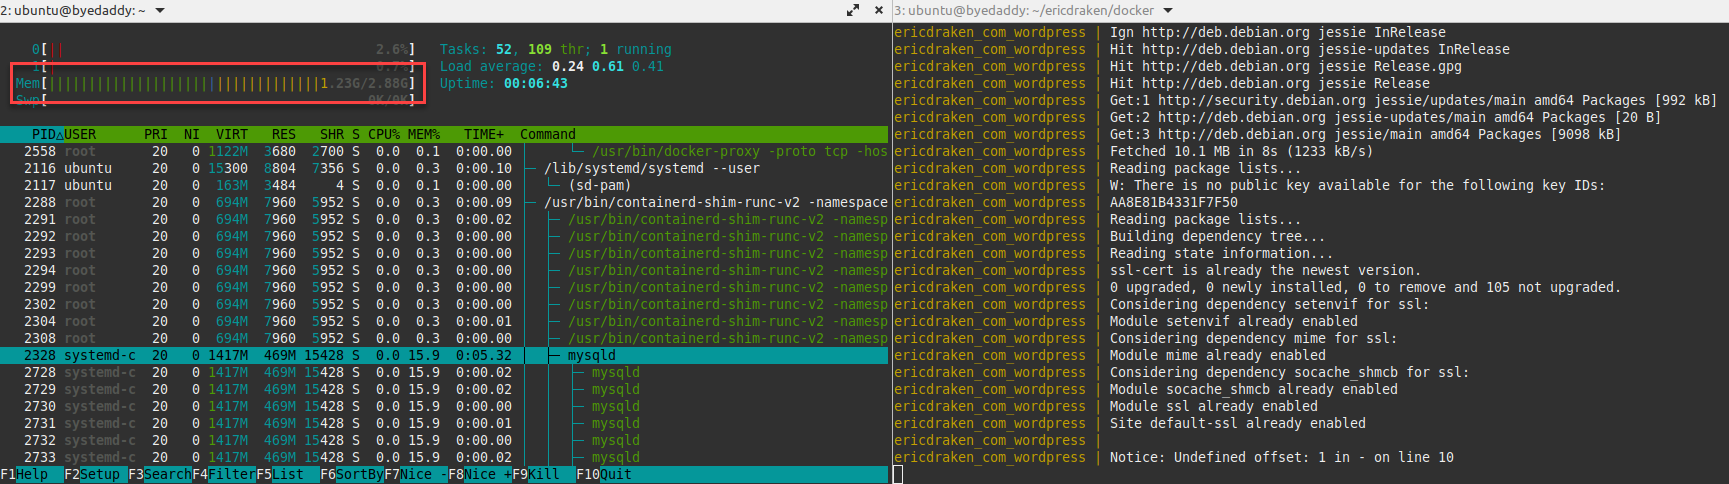
cloud-init analyze show or cloud-init analyze blame to show how long each section took and if there were errors.After running a few commands, we see that Docker and networking are available now.

Step 7. Replicate GoDaddy’s WordPress Environment
This (one?) GoDaddy server is such a mess. There is PHP 5.6, a single php.ini for all sites, custom PHP extensions I may have to go hunting for, .htaccess files all over the place, dozens and dozens of . files – cPanel artifacts from various upgrades they made, and on.
Let’s migrate over a real staging site. One of my ancient sites that is no longer updated is a good candidate. It’s a landing page for a rental property. Inside the VM, I’ll untar the full GoDaddy backup to a known location.
1 2 | tar -xvf /mnt/hgfs/shared/backup-3.29.2022_15-56-43.tar.gz -C /home/ubuntu mv /home/ubuntu/backup-* /home/ubuntu/godaddy |
This could take a long time since I have nearly 200,000 files to uncompress. Next, I’ll recreate the environment used in my GoDaddy shared server in a docker-compose.yml configuration file. Here is a WIP Compose configuration.
1 2 3 4 5 6 7 8 9 10 11 12 13 14 15 16 17 18 19 20 21 22 23 24 25 26 27 28 29 30 31 32 33 34 35 36 37 38 39 40 41 42 43 44 45 46 47 48 49 50 51 52 53 54 55 56 57 58 59 60 61 62 63 64 65 66 67 68 69 70 71 72 73 74 75 76 77 78 79 80 81 82 83 84 85 86 87 88 | version: "3.5" x-common-variables: &common-variables VIRTUAL_HOST: ${VIRTUAL_HOST} WORDPRESS_DB_HOST: ${WORDPRESS_DB_HOST} WORDPRESS_DB_USER: ${WORDPRESS_DB_USER} WORDPRESS_DB_PASSWORD: ${WORDPRESS_DB_PASS} WORDPRESS_DB_NAME: ${WORDPRESS_DB_NAME} APACHE_LOG_DIR: "/var/www/logs" services: wordpress: # The exact version used on GoDaddy image: wordpress:4.6.1-php5.6-apache container_name: ${COMPOSE_SITE_NAME}_wordpress volumes: # e.g. /home/ubuntu/godaddy/homedir/public_html/innisfailapartments_com/staging - ${HTDOCS_PATH}:/var/www/html:rw # e.g. /home/ubuntu/godaddy/homedir - ${HOMEDIR_PATH}:/home/${GODADDY_USER}:rw # e.g. /home/ubuntu/staging_innisfailapartments_com/logs - ${LOGS_PATH}:/var/www/logs:rw # You MUST create these files locally before first run - ${LOGS_PATH}/debug.log:/var/www/html/content/debug.log - ${LOGS_PATH}/apache_errors.log:/var/log/apache/error.log - ${HTDOCS_PATH}/../production:/var/www/production - ./php.ini:/usr/local/etc/php/php.ini networks: - default ports: - 80:80 depends_on: - db environment: <<: *common-variables # && apt-get update && apt-get install -y libzip-dev zip && docker-php-ext-install zip # && a2dismod deflate -f command: >- # Set www-data to the same UID as the ByeDaddy ubuntu user; fix ServerName problem sh -c "/usr/sbin/groupmod -g 1001 www-data && /usr/sbin/usermod -u 1000 www-data && ((grep -vq ServerName /etc/apache2/apache2.conf && echo 'ServerName localhost' >> /etc/apache2/apache2.conf) || yes) && ((grep -vq ${VIRTUAL_HOST} /etc/hosts && echo '127.0.0.1 ${VIRTUAL_HOST}' >> /etc/hosts) || yes) && a2dismod deflate -f && docker-entrypoint.sh apache2-foreground" restart: unless-stopped wpcli: image: wordpress:cli-php5.6 container_name: ${COMPOSE_SITE_NAME}_wpcli volumes: # Path to WordPress wp-config.php - ${HTDOCS_PATH}:/app:rw working_dir: /app user: "33" networks: - default depends_on: - db environment: <<: *common-variables entrypoint: wp command: "--info" db: # The exact version used on GoDaddy image: mysql:5.6 container_name: ${COMPOSE_SITE_NAME}_mysql volumes: - db_files:/var/lib/mysql # Load the initial SQL dump into the DB when it is created # /home/ubuntu/godaddy/sql/innisfailapartments_wp.sql - ${SQL_DUMP_FILE}:/docker-entrypoint-initdb.d/dump.sql networks: - default environment: MYSQL_ROOT_PASSWORD: ${WORDPRESS_DB_PASS} MYSQL_USER: ${WORDPRESS_DB_USER} MYSQL_PASSWORD: ${WORDPRESS_DB_PASS} MYSQL_DATABASE: ${WORDPRESS_DB_NAME} restart: unless-stopped volumes: # Persist the DB data between restarts db_files: networks: default: name: ${COMPOSE_SITE_NAME}_net |
We’ll need a .env file as well.
1 2 3 4 5 6 7 8 9 10 11 12 13 14 | VIRTUAL_HOST=staging.innisfailapartments.com COMPOSE_SITE_NAME=staging_innisfailapartments_com # Taken from wp-config.php WORDPRESS_DB_HOST=db WORDPRESS_DB_USER=innisfail WORDPRESS_DB_PASS=xxxxx WORDPRESS_DB_NAME=innisfailapartments_wp GODADDY_USER=xxxxx HOMEDIR_PATH=/home/ubuntu/godaddy/homedir HTDOCS_PATH=/home/ubuntu/godaddy/homedir/public_html/innisfailapartments_com/staging LOGS_PATH=/home/ubuntu/staging_innisfailapartments_com/logs SQL_DUMP_FILE=/home/ubuntu/godaddy/mysql/innisfailapartments_wp.sql |
Notice that we need a mount point to the hard-coded homedir path that various config files expect. Also, we need to point php.ini in the GoDaddy account folder to the right location in the Docker WordPress image. I’ve modified mine because my time zone and extensions have changed.
Visit the Local Website
wp-settings.php. If there are problems, you can add more allowed hosts below.At worst, you should now only get warnings like:
Warning: The URL //api.wpwave.com/hide_my_wp.json?checking_for_updates=1&installed_version&li=xxxx does not point to a valid plugin metadata file. WP HTTP error: User has blocked requests through HTTP. in /var/www/html/…/plugin-update-checker.php on line 245
1 2 3 4 5 | define('WP_HTTP_BLOCK_EXTERNAL', true); define('WP_ACCESSIBLE_HOSTS', implode(',', [ '*.wordpress.org' ])); |
So far, we have a Docker container with port 80 open in a VM on some machine. I’ve given the VM a static IP (192.168.10.110) and hostname on a LAN, so if I visit http://byedaddy, I will be redirected to the URL of my staging site back on GoDaddy. Not good.
I’ll pick one Linux machine to modify the /etc/hosts file to redirect the website URL back to the VM.
1 2 3 4 5 6 7 8 9 | sudo nano /etc/hosts # Add these lines: # GoDaddy websites for local migration 192.168.10.110 innisfailapartments.com 192.168.10.110 staging.innisfailapartments.com # ctrl+o, ctrl+x ping staging.innisfailapartments.com -c 1 #> PING staging.innisfailapartments.com (192.168.10.110) 56(84) bytes of data. #> 64 bytes from innisfailapartments.com (192.168.10.110): icmp_seq=1 ttl=64 time=0.526 ms |
When I visit http://staging.innisfailapartments.com, it takes a very long time to load, but the page loads, kind of. A compression plugin broke. The page is also glitchy. You have to be passionately in love with WordPress to put up with this. I, on the other hand, will cut losses and remove plugins.
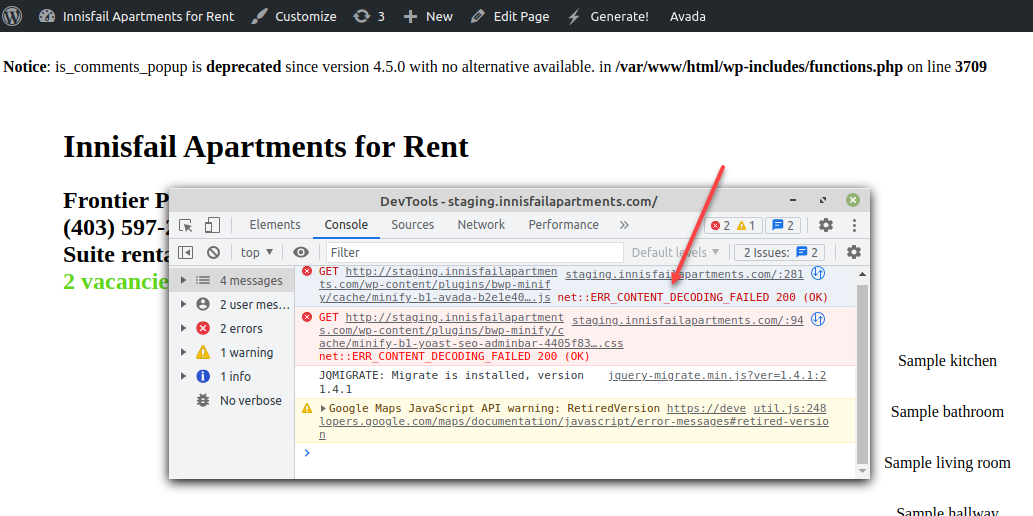
Finally, with warning notices turned off and some plugins disabled, the WordPress site looks good.

HTTP. You cannot edit the SQL dump directly because many strings are serialized with fragile string-length information. I’ve included WP-CLI in the Docker Compose file. Simply run:wp search-replace 'https://...' 'http://...' [-dry-run].
Step 8. Generate Static HTML Offline
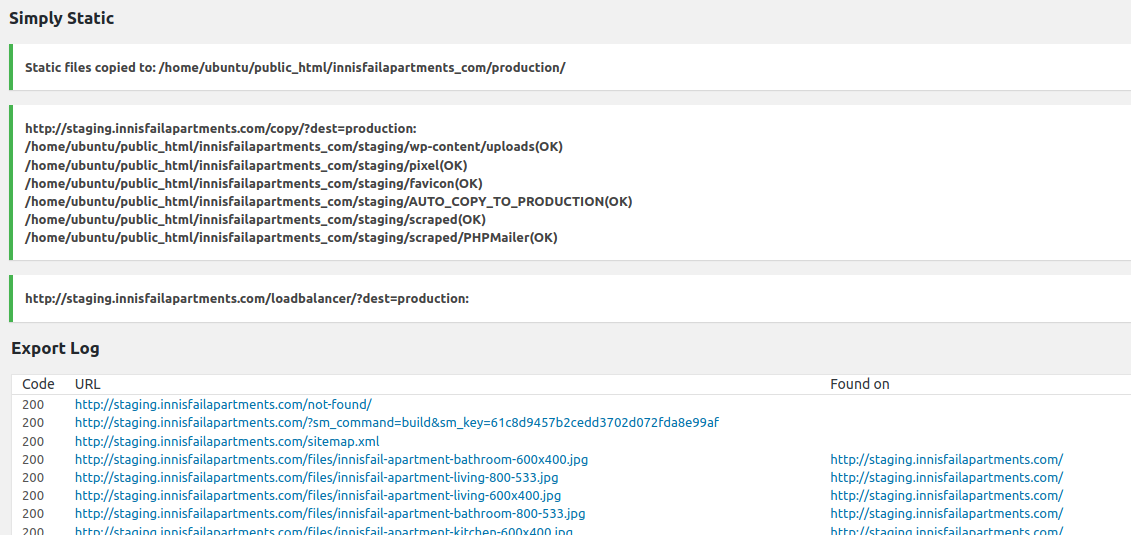
For WordPress, many years ago I modified a plugin called Simply Static that walks the site and generates HTML files and copies the JS, CSS, images, etc. so another folder. I modified this plugin to include asset load balancing (it’s an SEO thing), as well as an automated purge of the Cloudflare cache.

For most people, out of the box, this is good enough. There are many static HTML plugins for WordPress, but a heavily-customized Simply Static plugin works well for me.
Alternative: Wget for Website Mirroring
The GNU Linux program wget is amazing. Most people use it interchangeably with curl, but did you know it can recursively mirror a website and make in-situ changes to links in the HTML pages?
1 2 3 4 5 6 7 8 9 10 11 12 13 | cd production &&\ wget \ --mirror \ --convert-links \ --adjust-extension \ --page-requisites \ --no-parent \ --level inf \ --no-check-certificate \ -e robots=off \ https://staging.innisfailapartments.com/ &&\ mv staging.innisfailapartments.com/* . &&\ rm -rf staging.innisfailapartments.com/ |
--content-on-error flag if you want to capture the 404 page. Even better, make sure there is a /not-found/ path that renders a 404 page, but with status code 200. In that case, you may need to run wget twice, the second time to specify the normally-not-discoverable 404 page URL.Alternative: HTTrack Website Copier
HTTrack Website Copier is old, but it’s free, works in Linux and Windows, and it does the job. I happen to have a copy from 2003, but it is still maintained.
The Static 404 Page: Make it Generic
Be sure to remove any unique information from the static /not-found/index.html such as “Nothin found for foo” and replace it with the generic “Nothing found”. You can either do this manually with grep or sed, or modify your theme’s 404.php beforehand.
Automatically Update the Copyright Year
You can use a script and HTML snippet like these. Simply edit your footer.php and confirm your staging site looks good.
1 2 3 4 5 6 7 8 | <script> ((document) => { document.addEventListener("DOMContentLoaded", function(event) { document.querySelector('#copyright-year').innerText = new Date().getFullYear(); }); })(document); </script> Copyright ©<span id="copyright-year">2022</span> |
Note: If you use my style of IIFE and addEventListener, you can place this script in the header.
Side Note: What is Load Balancing?
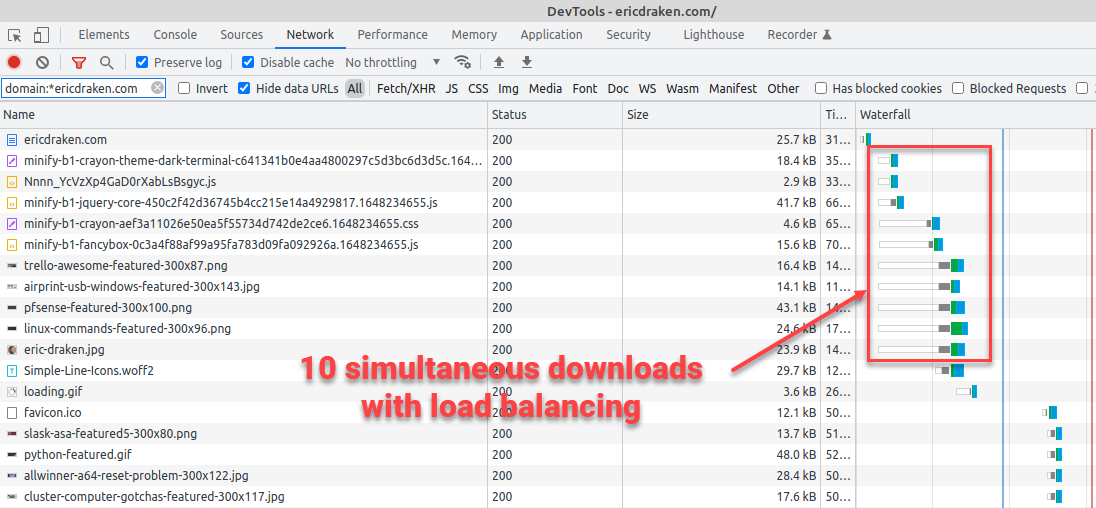
Ever heard of SEO-hurting browser blocking?4 Let’s use Google Chrome as an example of this.
Chrome has a limit of 6 connections per hostname, and a max of 10 connections. This essentially means that it can handle 6 requests at a time coming from the same host, and will handle 4 more coming from another host at the same time. This is important when realizing how many requests are firing off from different hosts on the same page. (ref)
I made a custom algorithm to check the size of each CSS, JS, WOFF, etc. that loads in the header, sort them, and then alternatingly make them load from either ericdraken.com or static.ericdraken.com. This ensures I get my ten downloads, not six, to get the page styling finished faster than other websites would.
All the static HTML and assets should now be under /var/www/production in the Docker container which is mounted inside the ByeDaddy VM.
Step 9. Sync Static Production Files to S3
By all accounts, we should be able to do:
aws s3 sync . s3://mybucket --delete
Let’s see how easy it is to sync my production/ folder. First, we need an S3 bucket.

What should your bucket be named?
Your bucket name must be the same as the CNAME. (ref)
The host header in a request is supposed to match the bucket name for routing reasons. We can create a bucket named innisfailapartments.com with defaults like ACLs disabled, no tags, no versioning, and no locking; however, we must set the bucket to public: uncheck everything and ignore the warnings.
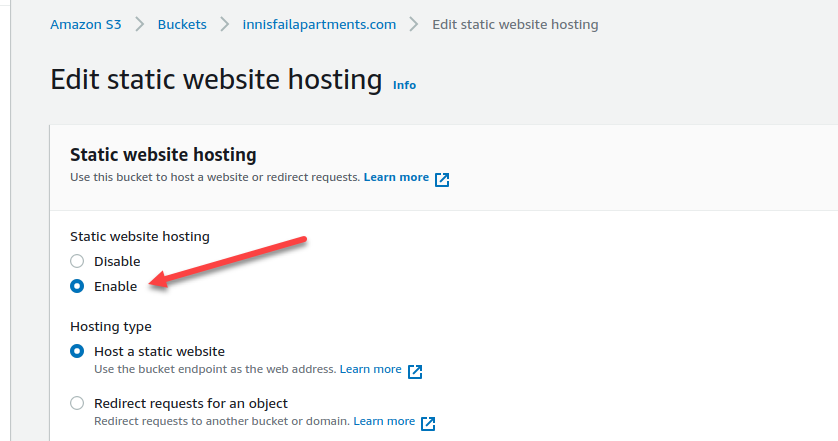
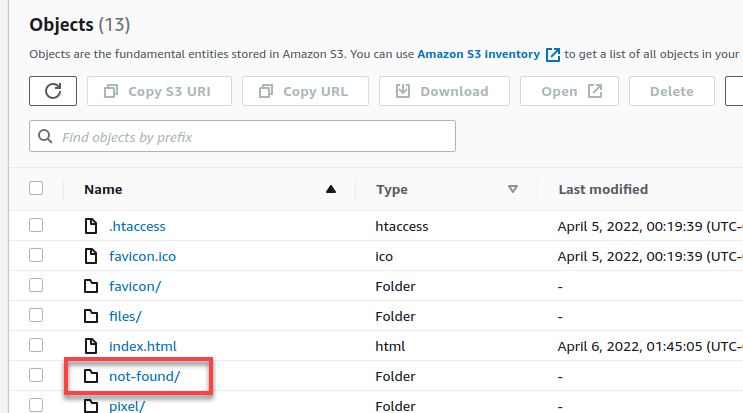
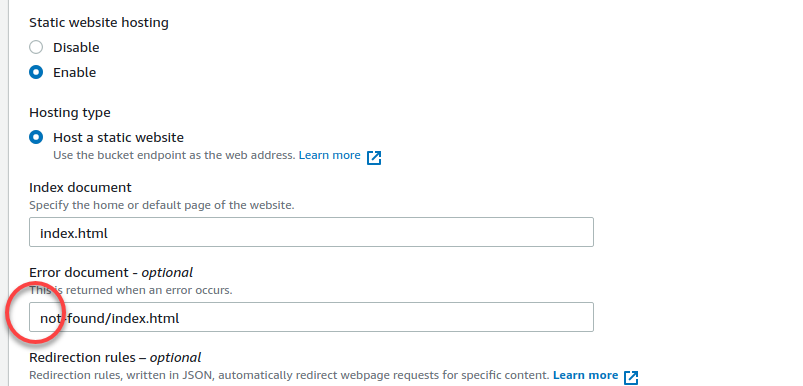
I’ll set the index document to index.html, and the error document to a custom not-found/index.html page. Be sure to not have a leading slash, as tempting as it may be to add one: “paths” in S3 are keys in a map. My empty bucket is now public.
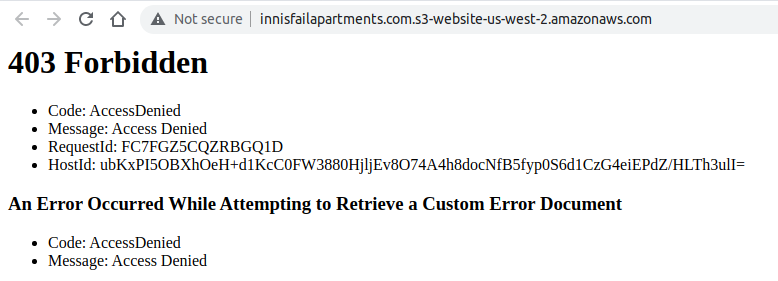
We need to add a JSON policy to actually allow public GET access. My JSON policy looks like this:
1 2 3 4 5 6 7 8 9 10 11 12 13 14 15 16 | { "Version": "2012-10-17", "Statement": [ { "Sid": "PublicReadGetObject", "Effect": "Allow", "Principal": "*", "Action": [ "s3:GetObject" ], "Resource": [ "arn:aws:s3:::innisfailapartments.com/*" ] } ] } |
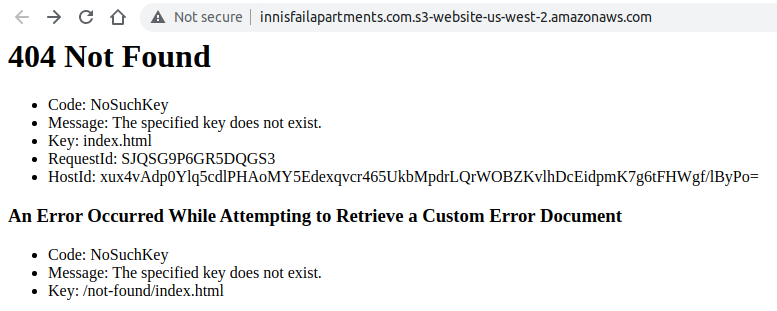
After adding the JSON policy, the error message changes.
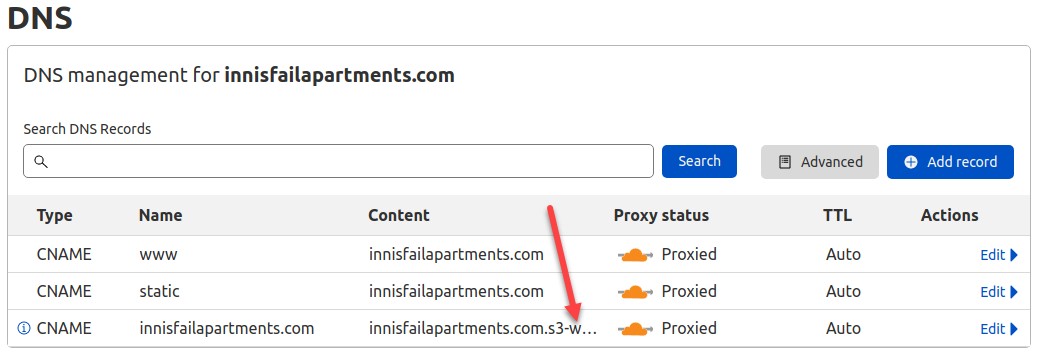
Back in the Cloudflare DNS console, I’ll update the CNAMEs for the domain and some subdomains.
Configure the AWS CLI
We’ll want to use the CLI to work with S3 because the AWS UI makes my head hurt. First, create a new user to partition access between websites and any other AWS projects you have going.
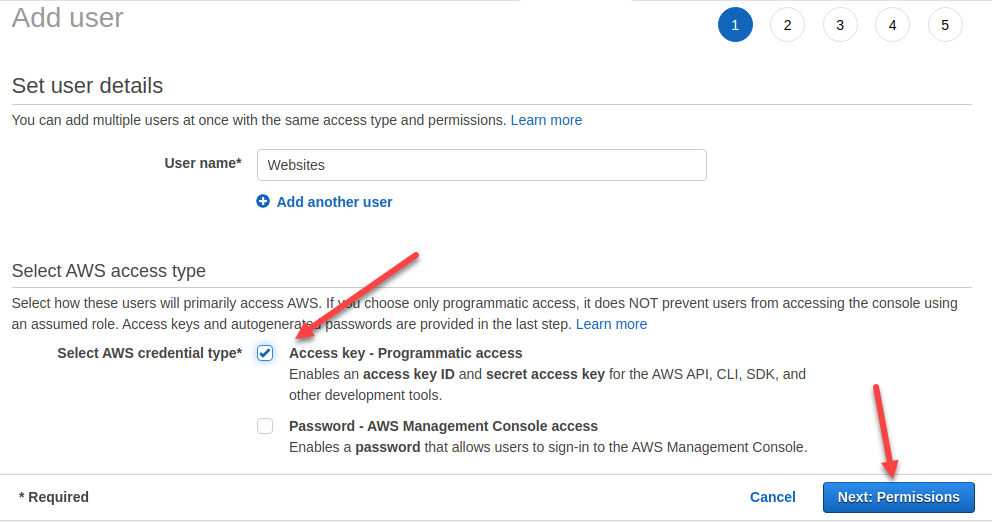
Next, create a key pair, note the secrets, and run aws configure in the ByeDaddy VM:
1 2 3 4 5 | ubuntu@byedaddy:~$ aws configure AWS Access Key ID [None]: HYXESFRXYMNRYLJAQ AWS Secret Access Key [None]: 32Tf6ReAd8h/iGj7K73/otvnQNOHm8gXQ Default region name [None]: us-west-2 Default output format [None]: json |
sed 's/JSON/json/g' -i ~/.aws/config.Sync Local Files to S3
We can now sync a local folder to the S3 bucket.
1 2 | # Sync website files to the bucket aws s3 sync . s3://innisfailapartments.com --delete |
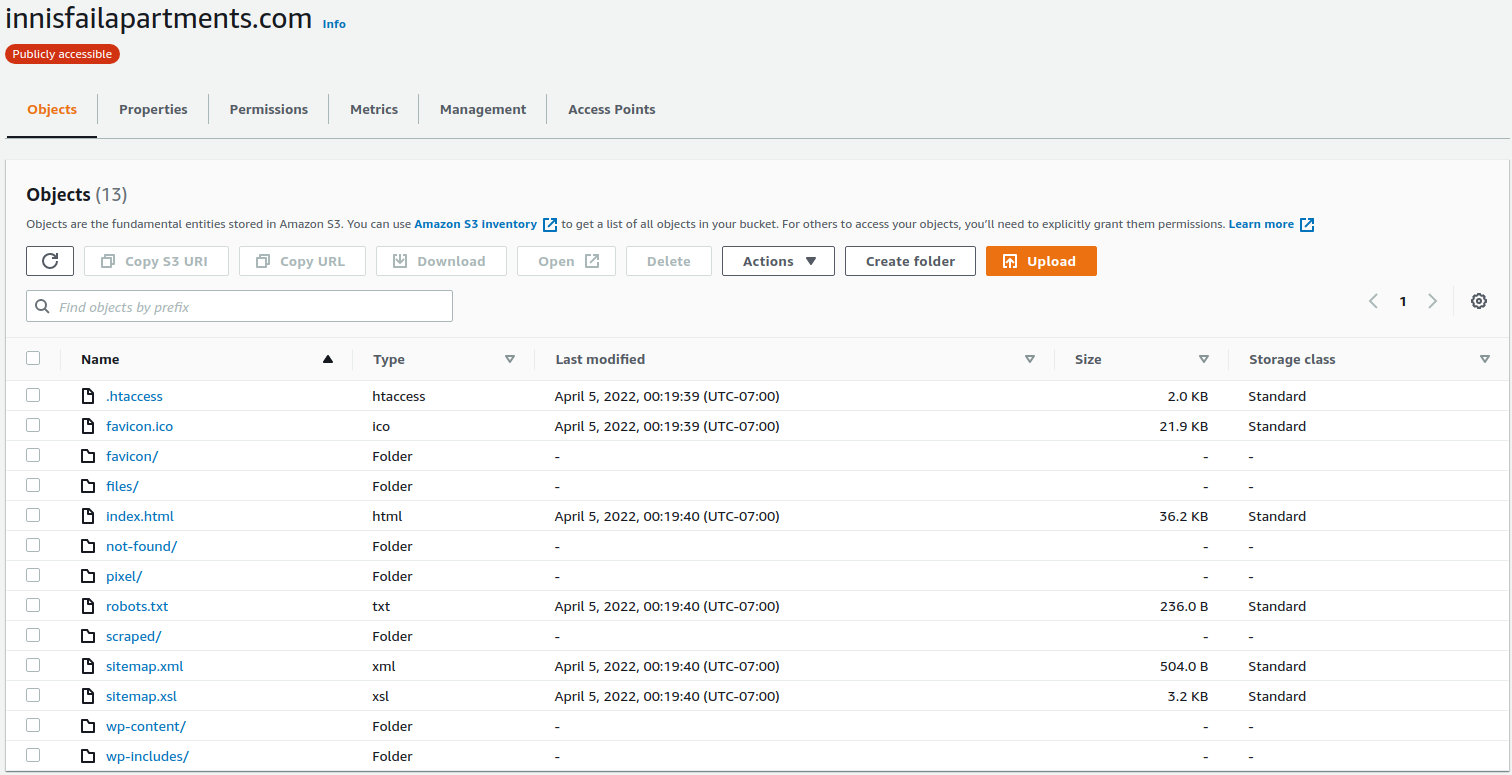
Excellent. The static HTML files have been uploaded to S3.

And, here they are.
Step 10. Verify the 404 Page Works
Let’s check that the 404 page works.
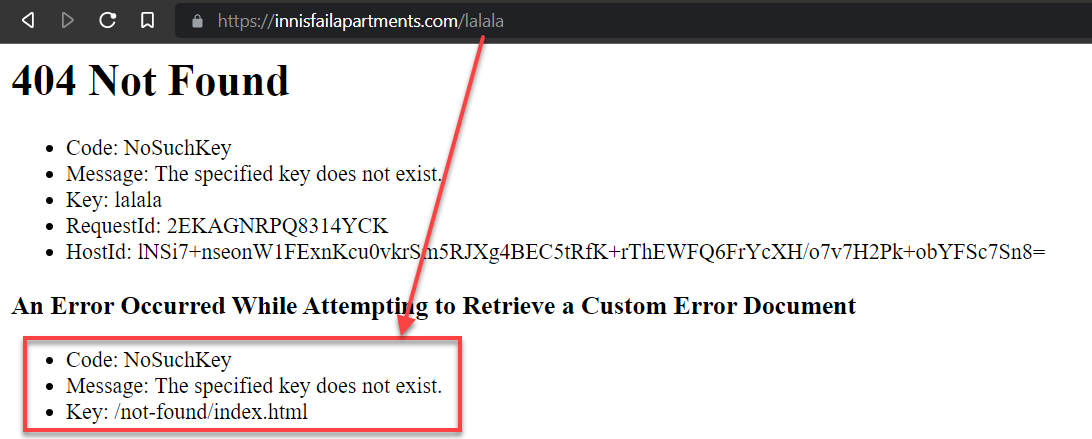
Make sure the index.html and error page do not have leading slashes, as tempting as it may be to add them. “Paths” or keys in S3 do not start with a leading slash.
Step 11. Allow Cross-Origin Resource Sharing (CORS)
Now, in every company I have ever contributed to, inevitably someone would yell out, “Silly, mother-sillying CORS!” (the language here has been toned down).
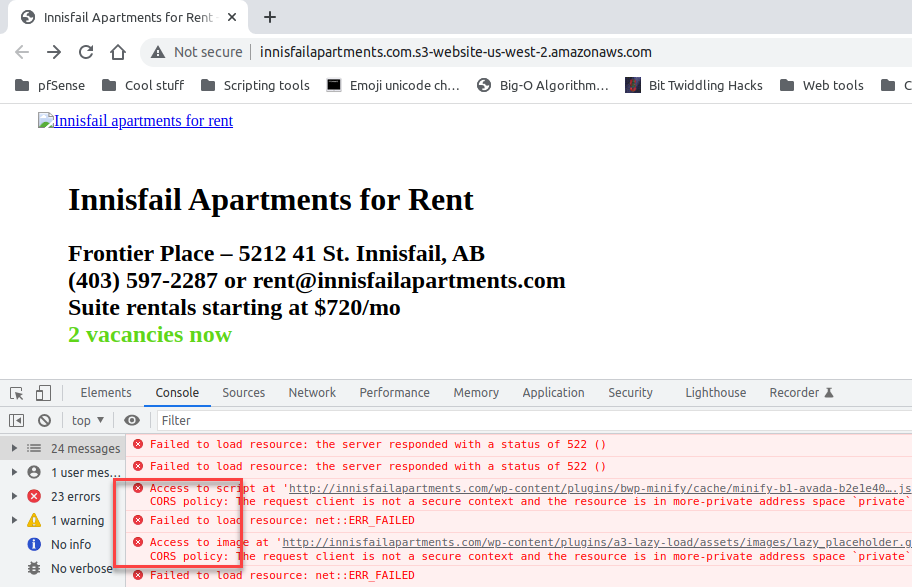
Here is a simple, permissive CORS policy that works well for a static site.
1 2 3 4 5 6 7 8 9 10 11 | { "CORSRules": [ { "AllowedOrigins": ["*"], "AllowedHeaders": ["*"], "AllowedMethods": ["GET", "HEAD"], "MaxAgeSeconds": 3000, "ExposeHeaders": ["*"] } ] } |
We can add the CORS declaration manually through the AWS UI in the S3 CORS section.
Step 12. Allow Subdomain Virtual Hosts with S3
Remember how I said that I have a load-balancing algorithm to rewrite asset URLs to use subdomains to get around Chrome’s simultaneous-download limit? How will subdomains work when the bucket name is also supposed to be the domain name? Duplicate the bucket using the subdomains? That’s one suggestion, but it comes with a cost.
Ninja Solution: Spoof the Host Header
Let’s be ninjas and trick S3 into thinking the hostname is always innisfailapartments.com. Back in Cloudflare, we can set Transform Rules, one of which modifies the headers sent back to the origin. See where I’m going with this?

Looks good, right? Wrong. Any attempt to modify the host header requires a paid subscription ($20/mo at this time). That’s fine—pay Cloudflare—they’re awesome. But, can we get around this limitation? Yes. For one, 302 redirects will work as Page Rules, but that’s ugly.
Fragile Solution: Proxy Subdomain Requests Through a Worker
Piping or proxying the request through a JavaScript Worker is also ugly, but could work (if you figure out timing, memory limits, and lots of edge cases). Here is how it would work, just for completeness.
1 2 3 4 5 6 7 8 9 10 11 12 13 14 15 16 17 18 19 20 21 22 23 24 | # Pseudocode, untested const overrides = { 'static.innisfailapartments.com': 'innisfailapartments.com', 'static2.innisfailapartments.com': 'innisfailapartments.com', // etc. }; function handleRequest(request) { const url = new URL(request.url); // Check if incoming hostname is a key in the overrides object if (url.hostname in overrides) { const target = overrides[url.hostname]; url.hostname = target; // If it is, proxy request to that origin return fetch(url.toString(), request); } // Otherwise, process request as normal return fetch(request); } addEventListener('fetch', event => { event.respondWith(handleRequest(event.request)); }); |
Ugly Solution: S3 Bucket-to-Bucket Redirect
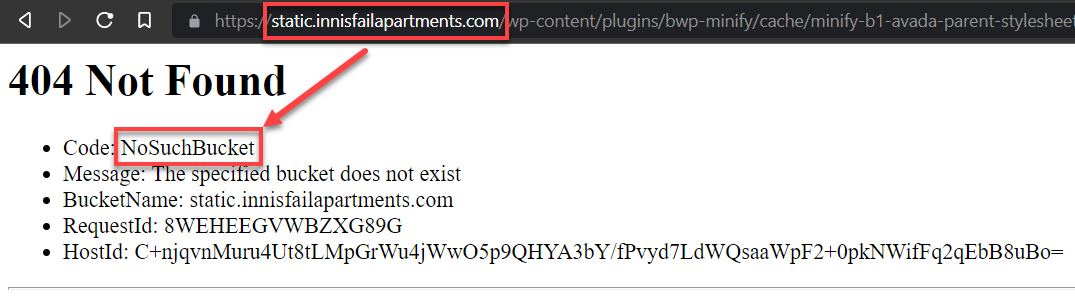
S3 buckets have the option to redirect to another bucket. Let’s explore that.
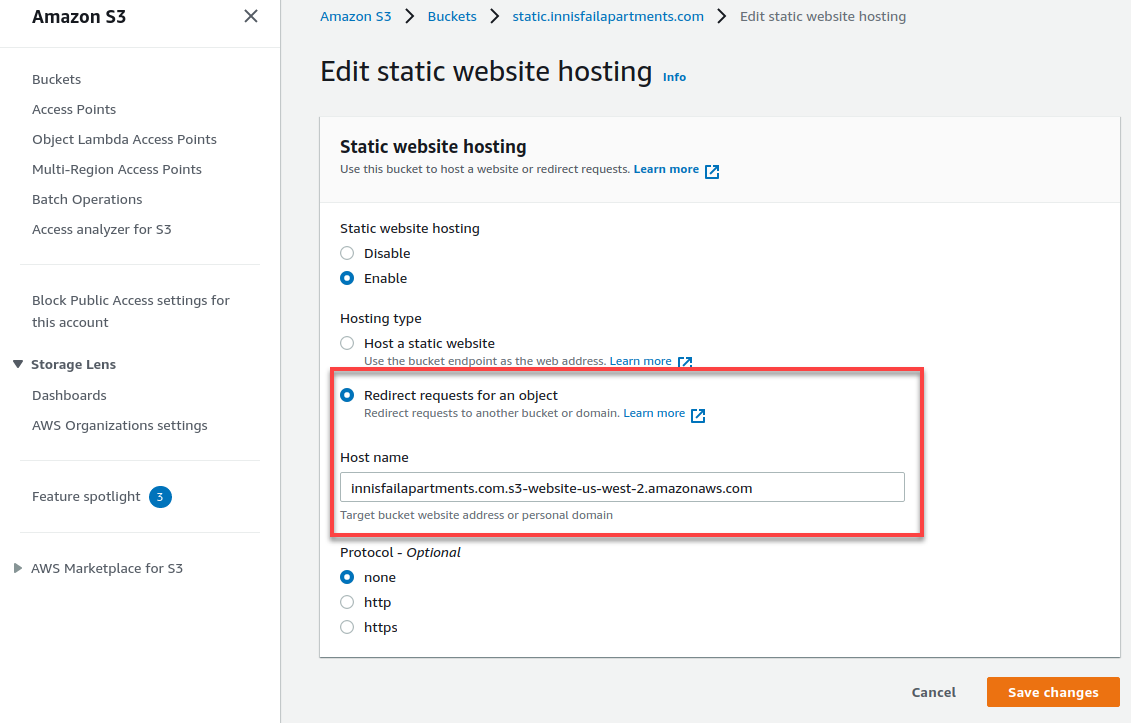
Dang it. An S3 redirect to another bucket is not cloaked from the user.
Crazy, Effective Solution: Duplicate the Bucket5
I really, really don’t want to write a Cloudflare Worker to be an HTTP proxy just to avoid paying Cloudflare $20/mo for a host header rewrite. However, I also really, really don’t want the SEO hit of all the 301-redirects back to my TLD. How much extra is the cost to duplicate an S3 bucket, out of curiosity?
Recall the S3 pricing:
- $0.0004 (per 1000) * 293 = $0.12 for the
GETrequests. - $0.023 (per GB) * 14 GB = $0.32 for S3.
- $0 for the 6.8 GB bandwidth.
The GET requests do not increase. The bandwidth does not increase. Only the storage cost doubles from $0.32 to $0.64. Done! Let’s just duplicate the bucket and call it a day.
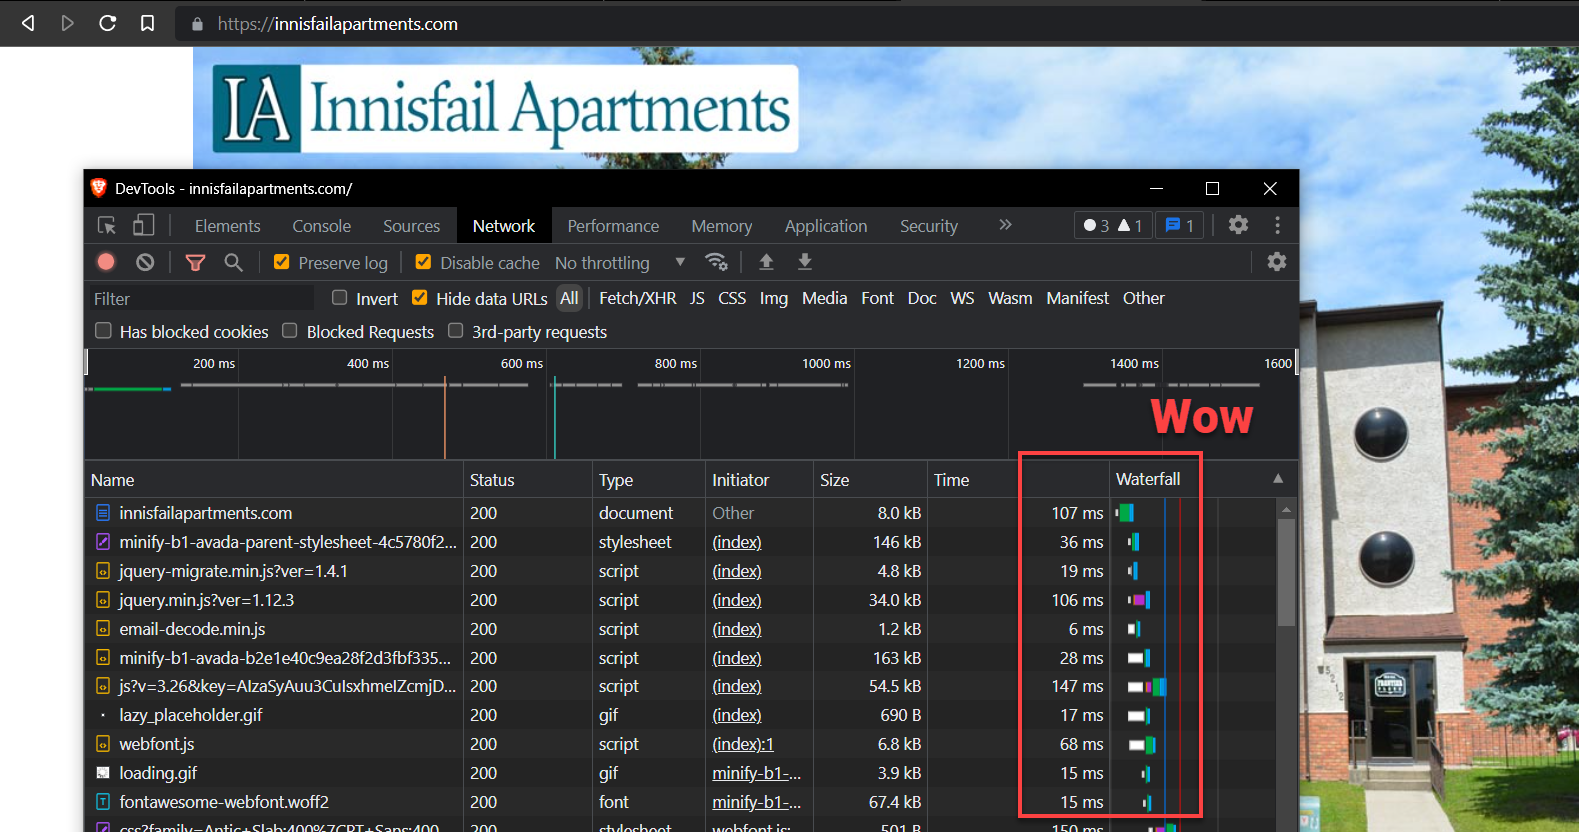
Bucket Replication Results
Are you seeing this page-load speed? Amazing.
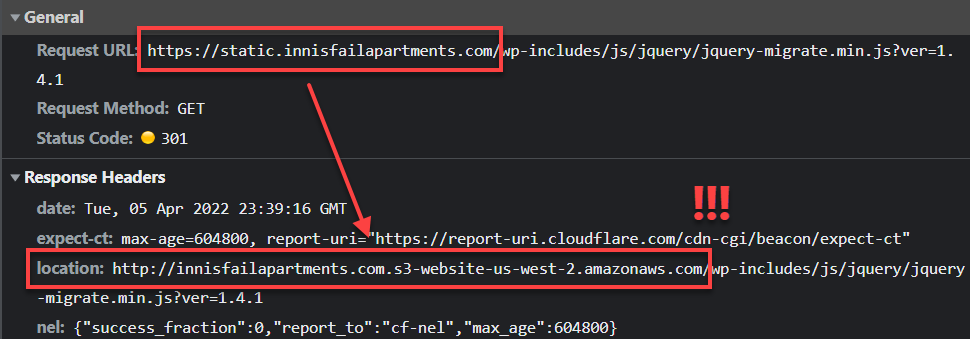
Step 13. Query Strings and S3 Bucket Keys
We’re kicking butt now, but there are some gotchas. One of which is how to deal with query strings (e.g. ?ver=1.4.1) in GET requests for S3 objects. S3 is an object map store, so an exact “pathname” (as a key in the map) is required and is even case sensitive. Apache and NGINX helpfully ignore the case and try to figure out what you are requesting, but S3 is unforgiving. Just add a Cloudflare Request Transform to drop the query string on requests to the origin (S3).
To bust the Cloudflare cache, query strings still do the trick if you set the cache level appropriately.
Step 14. Enable HTTPS for HTTP-Only S3 Websites
S3 doesn’t natively support HTTPS; browsers require HTTPS for websites.
We can use Cloudflare’s Flexible TLS so visitors access the site via HTTPS, and Cloudflare proxies requests to S3 over HTTP.
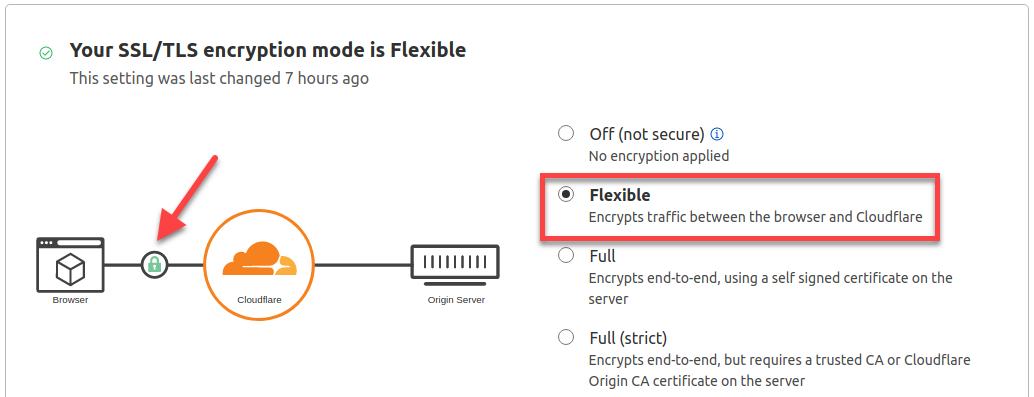
If Flexible TLS is enabled, Cloudflare rewrites requests to S3 over HTTP (i.e., without SSL).
Setting your encryption mode to Flexible makes your site partially secure. Cloudflare allows HTTPS connections between your visitor and Cloudflare, but all connections between Cloudflare and your origin are made through HTTP. (ref)
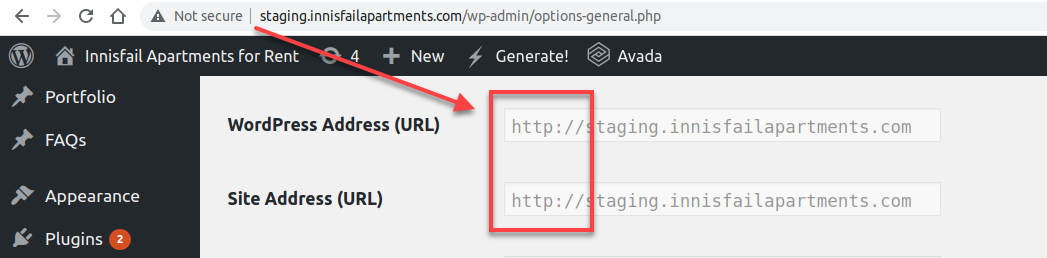
og:url, og:images, and twitter:image will use the protocol of the staging site: HTTP. This can negatively affect SEO.We know the staging site can be either HTTP or HTTPS, so if we simply change the bound WordPress port to 443, change the staging URL protocol, and perform a simple trick, then our static HTML will have all (or mainly) HTTPS URLs.
We could run an NGINX Docker container to forward various local sites to various WordPress staging stacks all essentially vhosted on port 443. I mean, do we want to have the best Docker infrastructure on the block, or break up with GoDaddy and get on with life? But, I digress. Instead, let’s perform a simple trick and make one site respond via HTTPS:
- Bind ports
443:443in the Compose file. - Add a self-signed TLS certificate via apt.
- Run
docker-compose downanddocker-compose up.
Finally, rebuild the static HTML files and sync them to both S3 buckets again.
1 2 3 | cd production/ aws s3 sync . s3://innisfailapartments.com --delete aws s3 sync . s3://static.innisfailapartments.com --delete |
wp-config.php, check on your definitions regarding TLS:1 2 3 4 | define('WP_SITEURL', "https://staging.innisfailapartments.com/"); define('WP_HOME', "https://staging.innisfailapartments.com/"); define('FORCE_SSL_LOGIN', true); define('FORCE_SSL_ADMIN', true); |
wp search-replace 'http://...' 'https://...' [-dry-run].Alternative: Write a Replacement Plugin
You could write a plugin that rewrites the URLs via regex on static HTML creation. However, try not to miss escaped URLs in scripts like: https:\/\/staging..
Alternative: Replace URLs with SED:
You can manually run sed on all the static *.html files to replace http:// with https://. You will have the same problem as above, however.
Alternative: Use Protocol-Relative URLs
You can use protocol-relative // URLs everywhere (except in OpenGraph meta tags) so both HTTP and HTTPS work.
Summary of AWS S3 Bucket CLI commands
1 2 3 4 5 6 7 8 9 10 11 12 13 14 15 16 17 18 | # Configure AWS CLI access aws configure # Create the bucket(s) aws s3 mb s3://innisfailapartments.com --region us-west-2 aws s3 mb s3://static.innisfailapartments.com --region us-west-2 # Set the bucket(s) to serve a static website aws s3 website s3://innisfailapartments.com/ --index-document index.html --error-document not-found/index.html aws s3 website s3://static.innisfailapartments.com/ --index-document index.html --error-document not-found/index.html # Add a public access policy file to each bucket aws s3api put-bucket-policy --bucket innisfailapartments.com --policy file://policy.json # The JSON snippet above aws s3api put-bucket-policy --bucket static.innisfailapartments.com --policy file://static.policy.json # Modify the ARN too # Set the CORS policy aws s3api put-bucket-cors --bucket innisfailapartments.com --cors-configuration file://cors.json # See above aws s3api put-bucket-cors --bucket static.innisfailapartments.com --cors-configuration file://cors.json # Sync website files to the bucket(s) cd production/ aws s3 sync . s3://innisfailapartments.com --delete aws s3 sync . s3://static.innisfailapartments.com --delete |
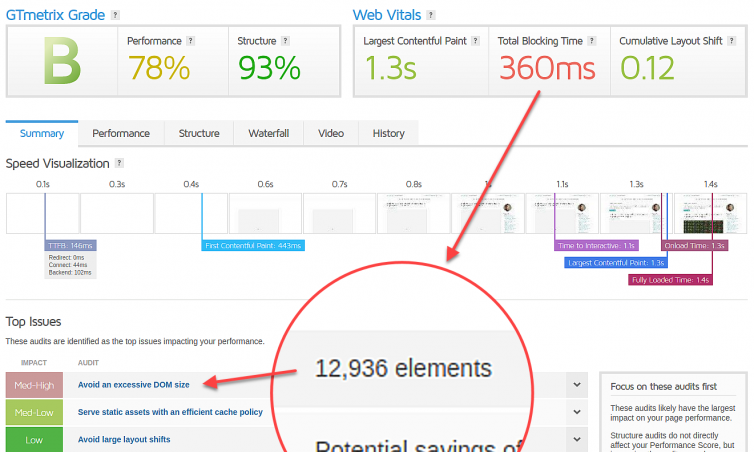
Please see Part Two for the rest of this article; I’m splitting this into two parts because the DOM reached almost thirteen thousand nodes which hurts your browsing experience. Sorry about that.
Next: Part Two
Notes:
- RAM usage fluctuates, but 98% is dreadful at any time. ↩
- GoDaddy uses CageFS so tenants can’t see each other, but I found over 700 domains point to the same server. ↩
- To be fair, this patch level is from Feb 2022, which is only two months out of date. ↩
- SEO is hurt because Google takes into account when the page first paints, and when it first becomes interactive. ↩
- Complain if you want about me using the word ‘crazy’, but according to https://dictionary.cambridge.org/dictionary/english/crazy, the first definition is “stupid or not reasonable” so please don’t be crazy and go out of your way to suggest an alternative word. ↩