Flash the AVR Atmel ATtiny Chips with a Modified CH341A ISP Programmer
The problem is that the CH341A is not designed for ATtiny chips, but for flashing motherboard BIOS chips. I bought one just for the included SOIC test clip, but I wanted to see if I could repurpose it for flashing an ATtiny85 chip. This post is a reference for myself about the commands and hardware hacks I had to do for when I have to do this again in half a year or later.
Hardware requirements:
- An inexpensive CH341A EEPROM/BIOS programmer from AliExpress
- A SOIC 8-pin test clip
- A Linux machine running Debian/Ubuntu
Not having a dedicated AVR SPI programmer, I want to make a permanent AVR programmer rig instead of using the Arduino UNO ISP sketch trick (I have over 30 ATtiny85 chips and growing). Here’s how I accomplished this.
1) Map the CH341A 16 pin-outs to the ATtiny 8 pin-outs
With an ohmmeter, I mapped the pins with side labels to the socket pins. Now I know which socket pins correspond to the ATTiny function pins (e.g. MOSI, MISO, CS, etc.). Here is my sketch.
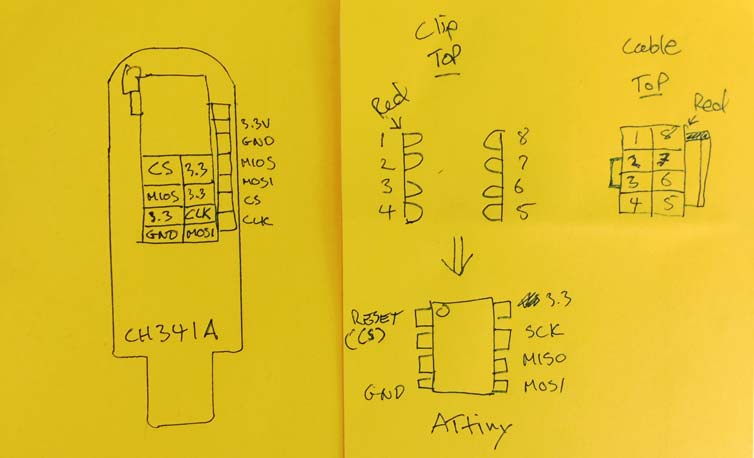
This jibes with the one schematic I found online for this common-yet-obscure ISP BIOS/EEPROM programmer.
2) Install libusb-1.0 (version 1.0.22+)
I’m running Linux Mint Bionic (18.04 LTS) which has only libusb 1.0.21. This is insufficient. The programming tool (next section) requires version 1.0.22+ because the API changed slightly. Disco has this version, so here is how I installed it from the Disco repo but stayed on Bionic (credits to George Shuklin).
1 2 3 4 5 6 7 8 9 10 11 12 13 14 15 16 17 18 19 20 21 22 23 24 25 26 27 28 29 30 31 32 33 34 35 36 | # Edit the sources file sudo nano /etc/apt/sources.list.d/official-package-repositories.list # Add this line to the repo, save, and exit deb http://archive.ubuntu.com/ubuntu disco main restricted universe # Edit a repo preferences file sudo nano /etc/apt/preferences.d/official-package-repositories.pref # Add these lines to the top of the repo preferences file, save, and exit # This is to prevent installing any other libraries from Disco Package: * Pin: release n=disco Pin-priority: -10 Package: libusb-1.0-0 Pin: release n=disco Pin-Priority: 750 Package: libusb-1.0-0-dev Pin: release n=disco Pin-Priority: 750 # Update the cache sudo apt-get update # Confirm the repo preferences # Make sure the candidate version is the same as the installed version! apt-cache policy libc-bin # The output should read somewhere "Candidate: 2:1.0.22-2" apt-cache policy libusb-1.0-0 # If the above looks good, then install libusb 1.0 and headers sudo apt-get install libusb-1.0-0 libusb-1.0-0-dev |
3) Build the CH341A programmer tool
Trel725 wrote a small programming tool to make the CH341A flash ATtiny chips of all varieties. The only requirement is that libusb 1.0.22+ is installed. Simply clone the repo and run make in Linux. There will be a new file called chavrprog. Make sure it has execute permissions with chmod +x chavrprog. What it does is send bytes to the ATtiny and reads the responses in a way that enables flashing ATtiny chips. I’m so glad he made this tool.
Those steps again are:
1 2 3 | git clone https://github.com/Trel1725/chavrprog.git make chmod +x chavrprog |
4) Connect the CH341A connector pins to the SOIC test clip
I just used a breadboard and come colored wires to map the CH341A socket to the SOIC8 test clip given my sketch from above.
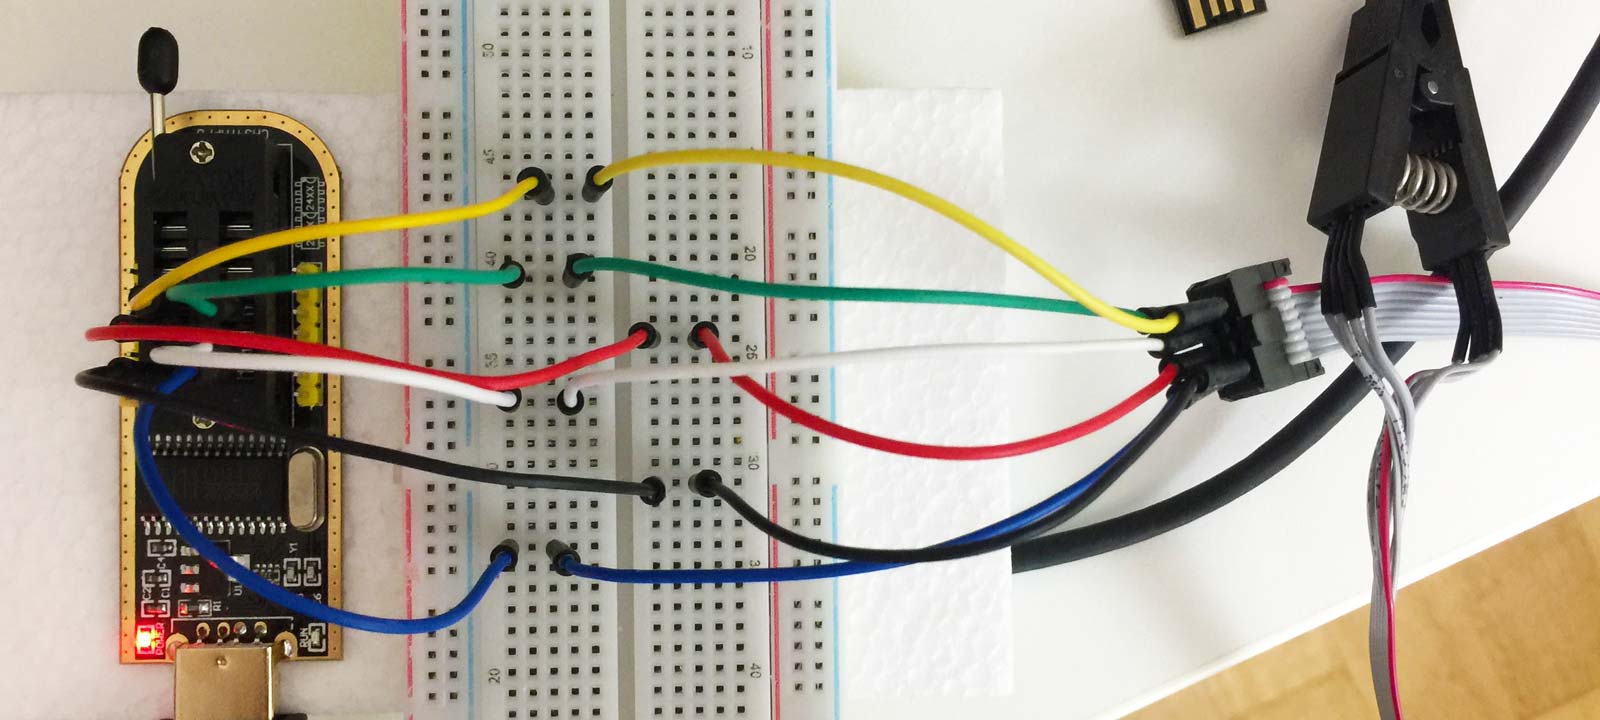

The colors are mapped to the CH341A as follows:
1 2 3 4 | Yellow ---- CS 3.3 --- Green Red ----- MIOS X X CLK --- White Black ---- Gnd MOSI -- Blue |
Notice the notch on the ribbon cable when inserting the colored wires into the ribbon cable connector.
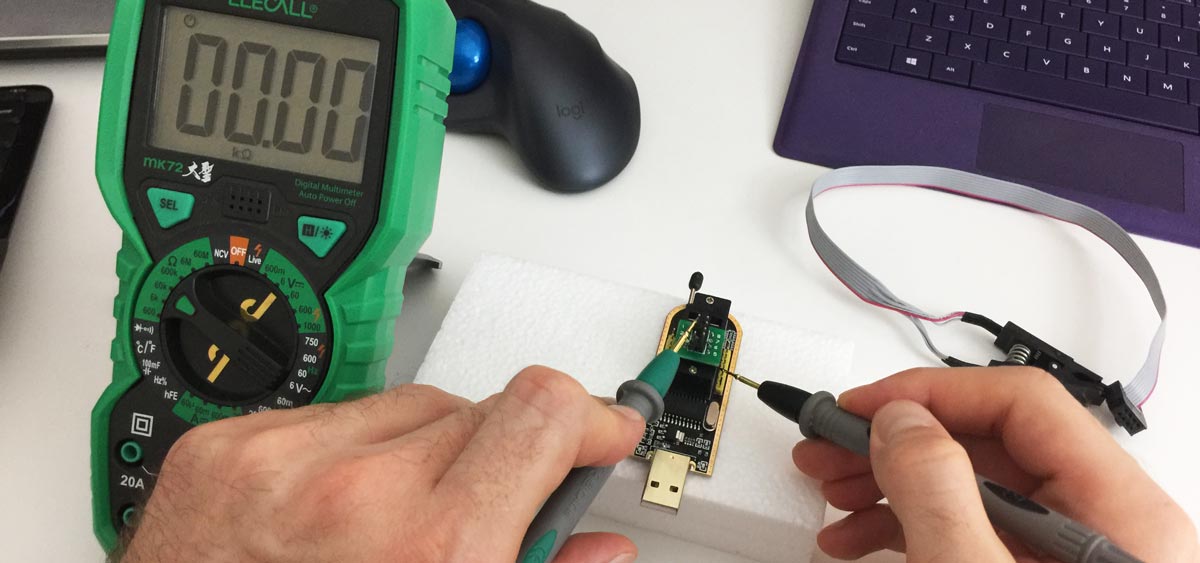
5) Flash the ATtiny85 Digistump board
The red wire of test clip should line up with the little circle of the ATtiny chip – both denote pin 1. I tried a few times to get the clip to attach perfectly because the pins are so small. Notice the orientation of the Digistump in relation to the red wire of the SOIC8 test clip.
I could now flash the t85_default.hex from the micronucleus firmware repo located in https://github.com/micronucleus/micronucleus/tree/master/firmware/releases. I’ve actually forked this repo and made a special bootloader for the APA106 RGB LED. Either way, to flash the micronucleus bootloader all that is required is:
1 2 3 4 | # Attach the SOIC test clip to the ATtiny85 chip directly # Plug the CH341A to the USB port of a Linux machine # Run the following command (s = strict verification) sudo chavrprog -d tiny85 -a s /path/to/t85_default.hex |
It worked great from the very first flash attempt. The on-board run light on the Digistump is lit awaiting a program for the bootloader. The Digistump is now unbricked.
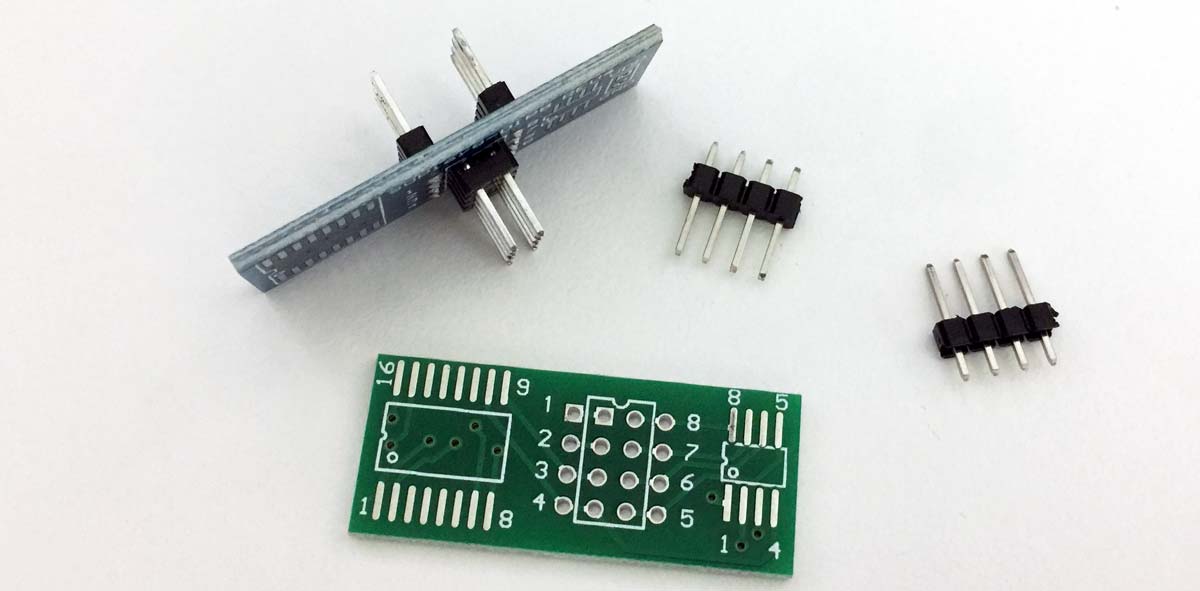
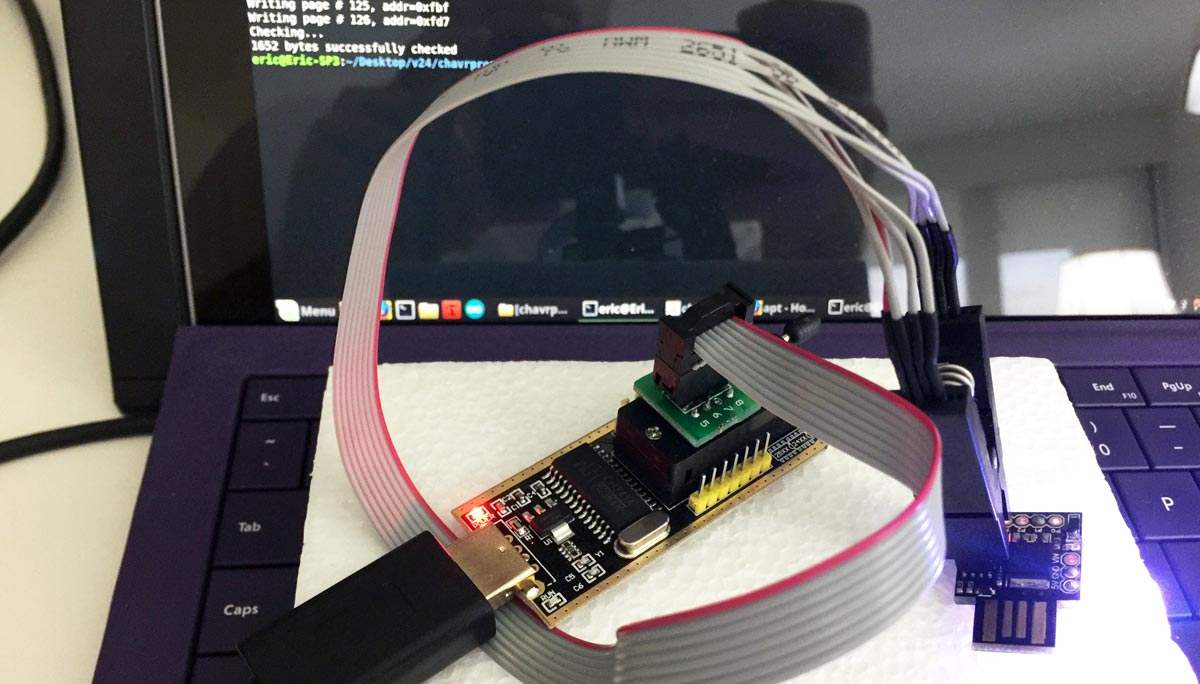
6) Make a permanent AVR PCI programmer rig
The ISP programmer came with a little PCB to make custom expansion projects I suppose. I use that to permanently map the CH341A pins to the SOIC8 ribbon cable for use with ATtiny chips.
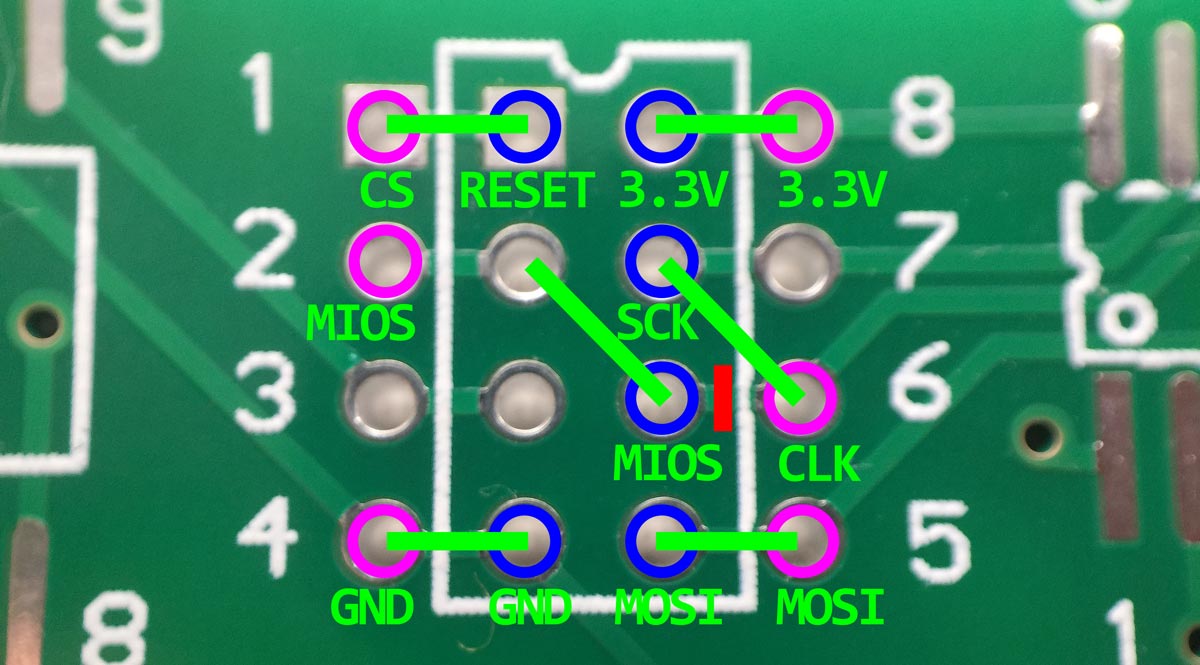
The plan is to use the empty PCB and create a hardware pin map between the CH341A socket and the ribbon cable connecting the SOIC8 test clip to the ATtiny chips. Only one cut needs to be made at pin 6 to isolate those two holes. The rest is straightforward soldering. The purple circles denote pins going down. The blue circles denote pins going up. I’ll only add a total of 12 pins, not 16 pins, to this PCB board.
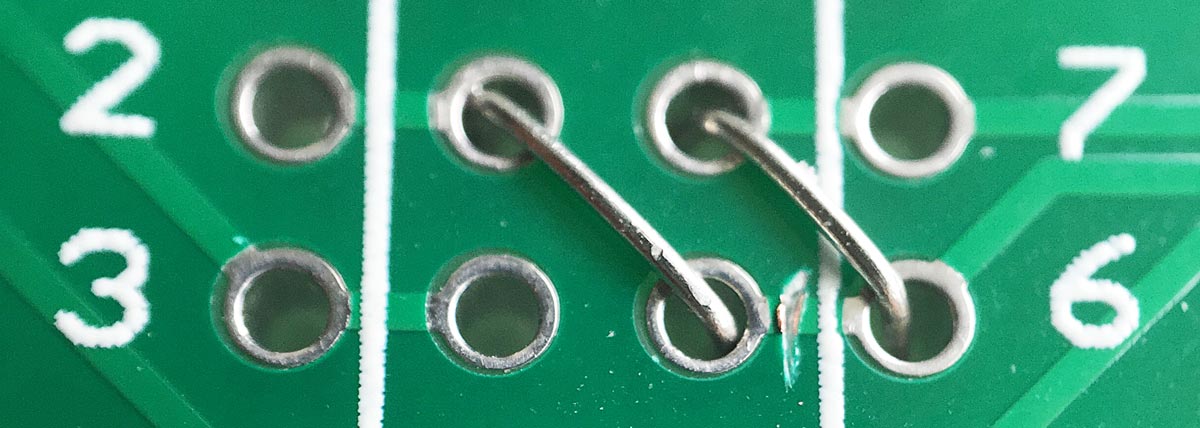
Here I cut the connection between the holes at location 6 with an X-acto knife and added the wire jumpers like in the diagram above. I used the legs from a spare resistor I had lying around. They are thin so they leave enough room for the through-hole pins to fit.
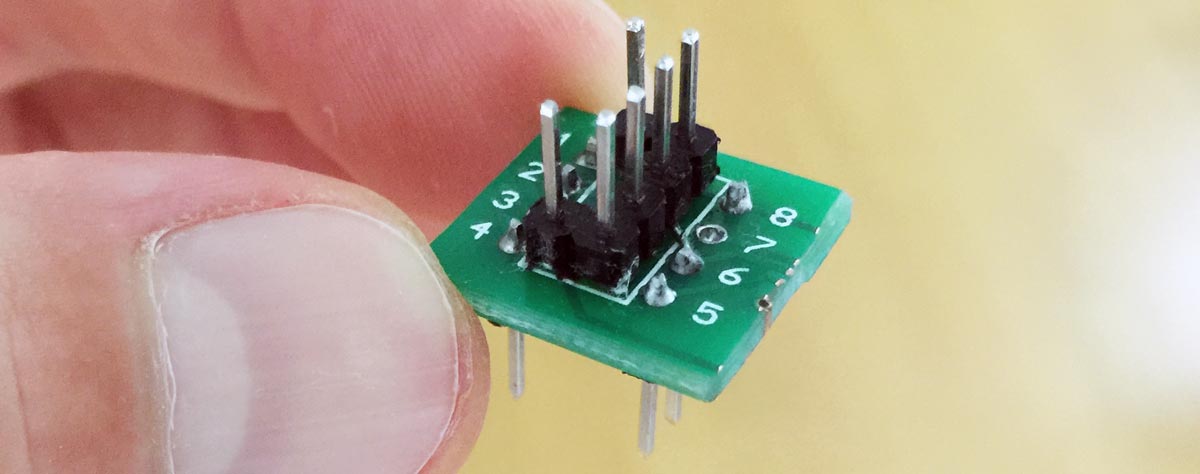
The finished jumper board looks like this. Please forgive that there is still flux on the terminal base.

When the PCB is trimmed and clean, it looks like this.
7) Test the PCB rig
It’s good to test the wiring one more time to check for shorts. All the top pins should map to the top pins of the ATtiny chip and match the function pins on the side of the CH341A.
8) Flash an ATtiny85 Digistump using the new PCB
In the moment of truth, everything works fine. The new PCB is doing its job well and the first ATtiny85 was flashed successfully.
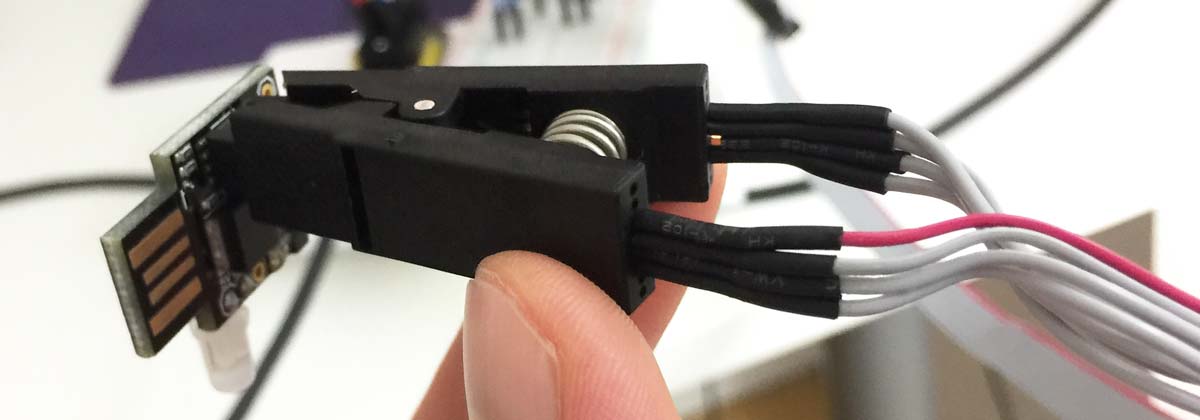
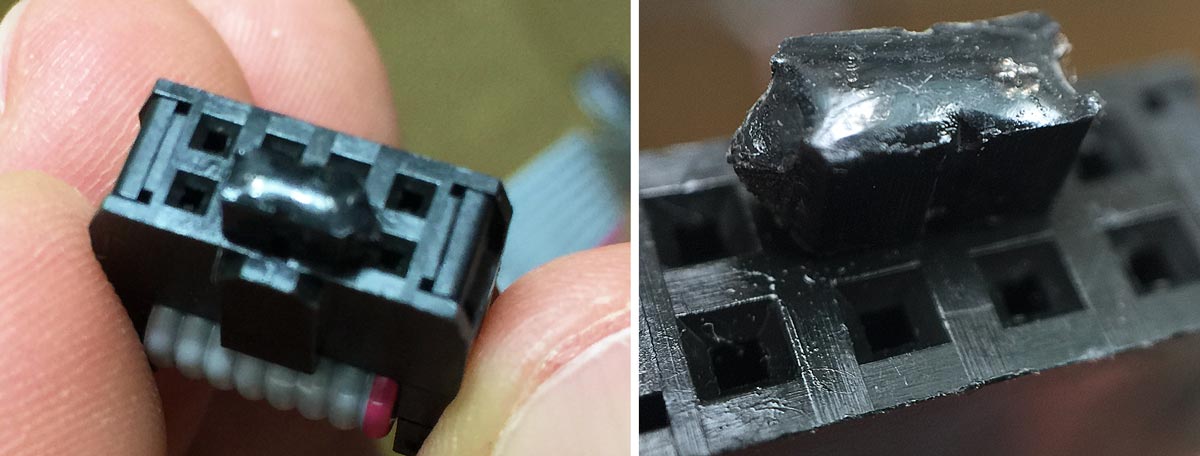
9) Make a unique connector
I know me and one day I’ll put the ribbon connector in the wrong way and burnout a chip. I took a pair of pins and trimmed down the leads. Then I put epoxy on the top, let it harden, and inserted it into the empty contacts of the ribbon connector. They are removable, but now the connector has only one way to connect to the modified PCB board for safety.
10) Tips and troubleshooting
If the ATtiny starts malfunctioning, the EEPROM may have been corrupted. I’ve noticed this happens sometimes when cycling the power supply if there is a power ripple. I run this command to compare the EEPROM contents with the original hex file used to flash the bootloader:
1 | sudo chavrprog -d tiny85 -c /path/to/t85_default.hex |
If there is corruption then the tool will display the address at the first discrepancy, or else it will state the signature is correct.
Another trick is to flash the bootloader, then upload the user program via micronucleus, then dump the combined contents of the EEPROM to disk. Then I can flash both the bootloader and user program in one step. Here is how I do it for an ATtiny85 Digistump:
1 2 3 4 5 6 7 8 9 10 11 12 13 14 15 16 17 18 19 20 | # Plug in the CH341A and connect the test clip to the ATtiny chavrprog -d tiny85 -a s /path/to/bootloader.hex # Remove the test clip freeing the ATtiny and # upload the user program (to a Digispark device here) micronucleus -cdigispark --timeout 60 main.hex # Plug in the ATtiny-attached USB connector # The program should be uploaded successfully # Dump the entire EEPROM contents to a binary file chavrprog -d tiny85 -r f dump.bin # Convert the binary dump to an Intel hex file format objcopy -I binary dump.bin -O ihex full-eeprom.hex # Optional - set the ATtiny high fuse to enable the brownout-detect circuit (BOD) chavrprog -d tiny85 -H 0xDD # chavrprog -d tiny85 -l 0xC1 # chavrprog -d tiny85 -x 0xFF |
From now on the full-eeprom.hex can be flashed directly to new chips, and be compared to malfunctioning chips if the need arises.
I hope this is useful to anyone else trying something similar. There is very little information on the web about customizing this programmer to work with Atmel chips.
