Build a Secure MFA Web-Browser-Based Remote Desktop Gateway on a Raspberry Pi
Let’s say I’m in a Starbucks or the airport (or both) and I want to connect to my Windows (or OSX or Linux) machine to check on things. Maybe I don’t want to take my primary computer with me on vacation or wait for hours when Customs randomly selects me (again); maybe I’ll just take a fresh Chromebook. Behind a restrictive firewall all we have is port 80 and port 443 (no VNC or RDP allowed), so let’s make remote desktop magic happen with zero spend on software.
Enter Apache Guacamole: a clientless remote desktop gateway that can be accessed in a browser.
Requirements
- A target machine (running RDP or VNC)
- A Raspberry Pi 3+
- Apache Guacamole
- Docker
- Cloudflare
- A modern web browser
The rest of the software is open-source.
Part 1: Setup the basic infrastructure
I’ll remotely connect to a Windows 10 machine running in a VMWare on my LAN. The VM is bridged to the physical network (no NAT forwarding required). There is a gateway router acting as DHCP, and there is a fresh Raspberry Pi 3+ on the LAN. The plan is to set static local IPs for the VMWare instance and RPi, install Docker, install Apache Guacamole, setup Cloudflare, and install Let’s Encrypt on the RPi.
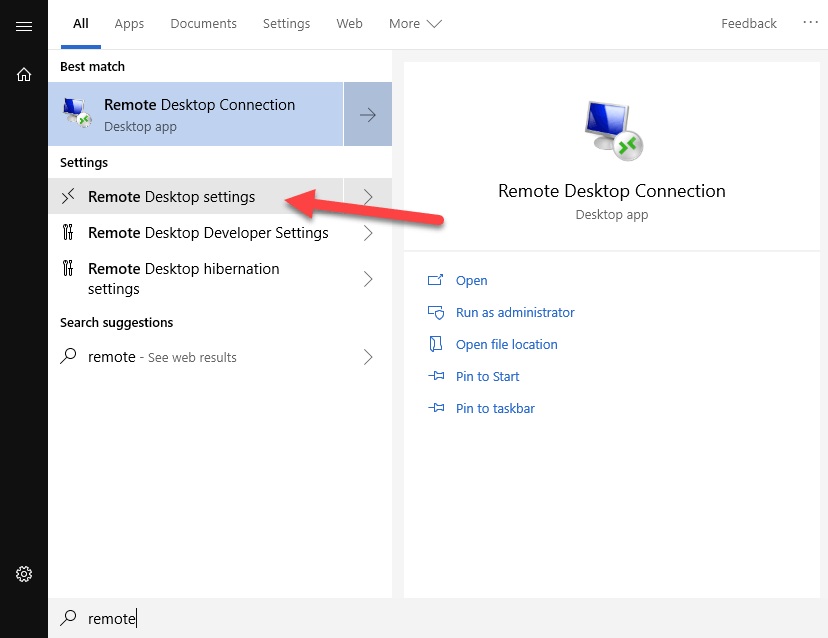
1. Enable RDP on Windows 10
I’ve connected with both VNC and RDP, and RDP is much faster and smoother. On Windows 10 enable Remote Desktop like so. First, open the Remote Desktop Settings.
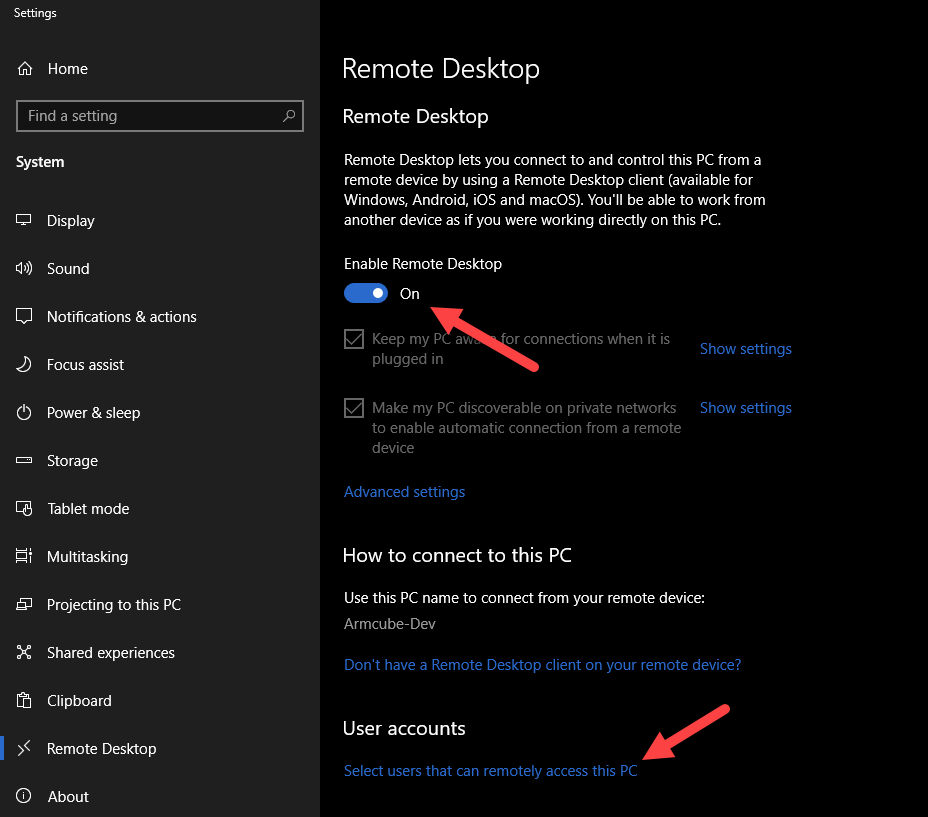
Select “Enable Remote Desktop”. Then click “Select users than can remotely access this PC”.
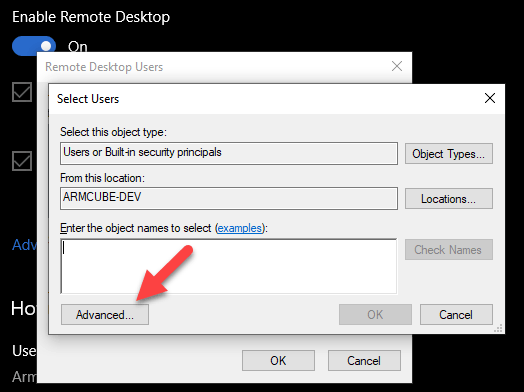
Administrators can remotely connect. If you want to specify an ordinary user, you can search for a user in “Advanced”.
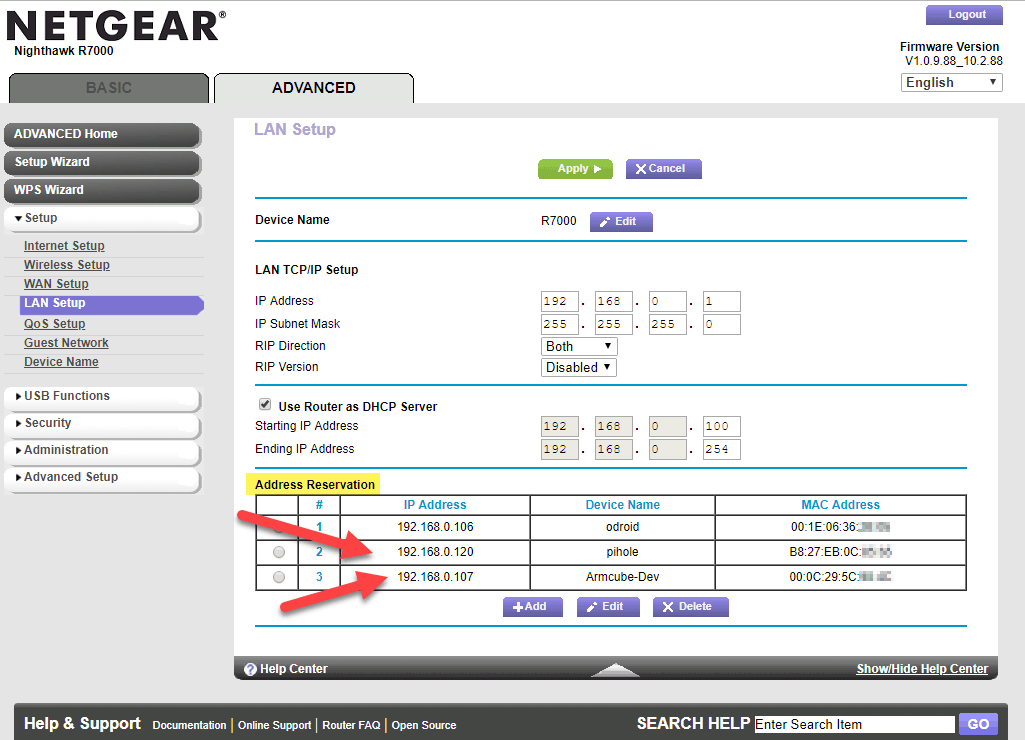
2. Set static IPs
Power on the Raspberry Pi and we can set two static IPs at once. Using the stock Netgear router firmware as an example, find the address reservation screen in advanced settings. Assign an IP on the local subnet to the target machine. Assign another one to the RPi. I just used whatever the DHCP assigned them, and from now on they will not change.
3. Test the RDP connection
One a different machine on the same LAN, let’s test the RDP connection to the target machine. This is a good step to confirm what your username is when connecting. Is the user name capitalized? Is the machine name required as whoami suggests is the username? Experiment here. Use the static IP set in the previous step. If successful, then you will be logged out of the target machine and a new window will open showing the open desktop.

4. Install Docker on the Raspberry Pi 3
Wanting to physically isolate my externally-facing services, and then isolate them from each other, I like putting services in Docker containers on Raspberry Pis. For instance, I put Pi-hole on an RPi. Here is a quick start to installing Docker.
1 2 3 4 5 6 7 8 | # Visit https://get.docker.com yourself in a browser so inspect the script curl -fsSL https://get.docker.com -o get-docker.sh # The script will prepend 'sudo' to most of the commands for you sh get-docker.sh # Execute Docker commands without sudo sudo usermod -aG docker "$USER" |
5. Install Apache Guacamole in Docker
The official Apache Guacamole Docker image doesn’t work on the Raspberry Pi. It’s also cumbersome to set up normally. Fortunately, I found a custom Docker image that is self-contained and works on ARM processors. Here is the Docker command. This will name the container guacamole and cause it to restart on boot and failure. It will persist configuration files to /var/guacamole on the RPi as well as bind port 8080, but you can set any port like -p 9000:8080.
1 2 3 4 5 6 7 | docker run -d \ --name guacamole \ --restart=unless-stopped \ -e TZ="America/Vancouver" \ -p 8080:8080 \ -v /var/guacamole/config:/config \ oznu/guacamole:armhf |
Wait about three minutes as the internal Postgres DB is built and Tomcat starts up. Verify the container is running with docker ps.
6. Configure Guacamole for RDP
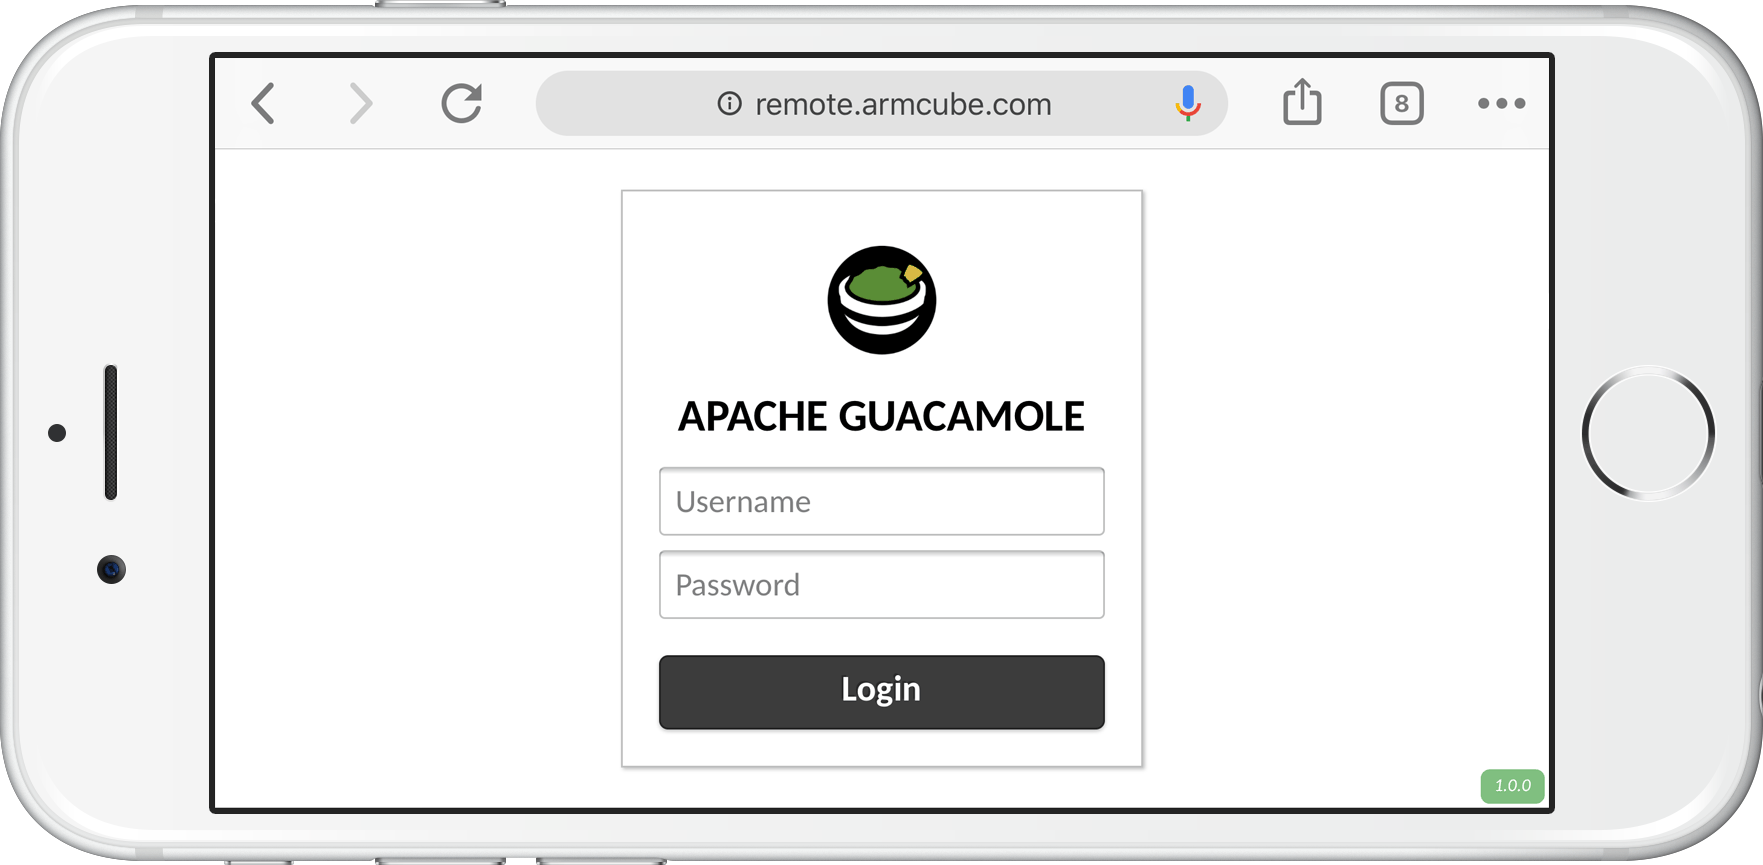
Login to Guacamole at the static IP you assigned it and port 8080 with the default username guacadmin and password guacadmin.
docker container restart guacamole.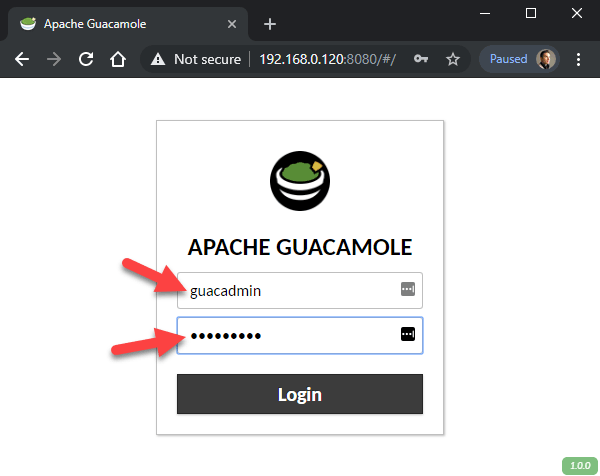
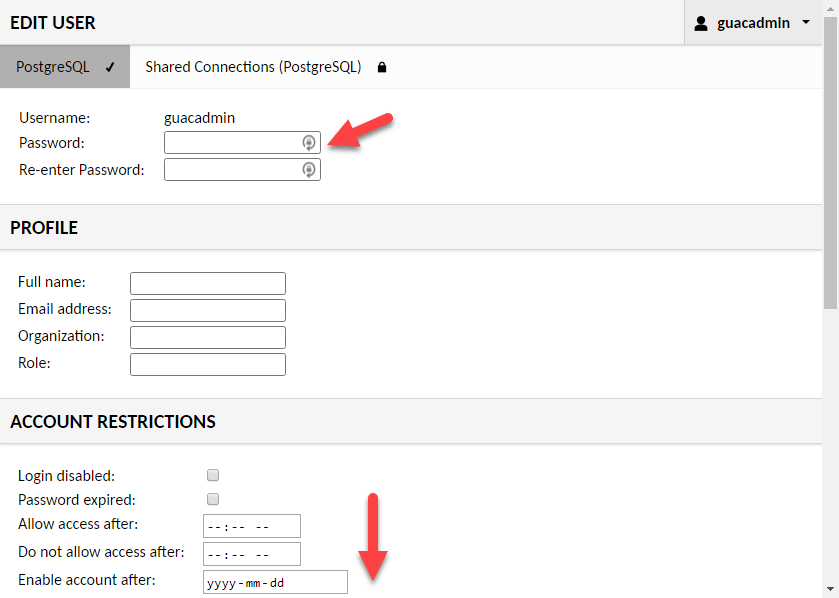
It’s a good idea to change your default password and enact some account restrictions. It’s even better to make another account that is not an admin and use that for remote desktop purposes.
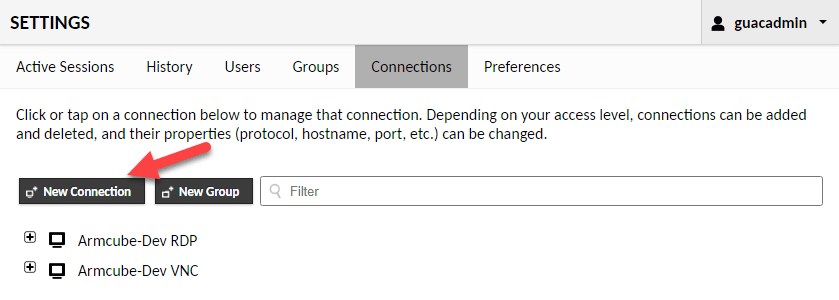
Under Settings > Connections create a new connection.
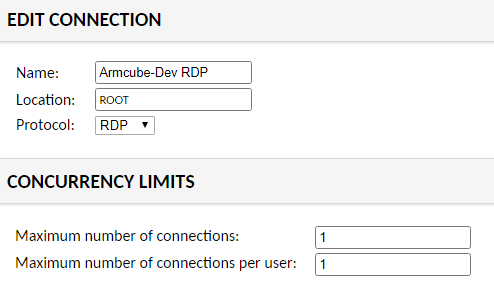
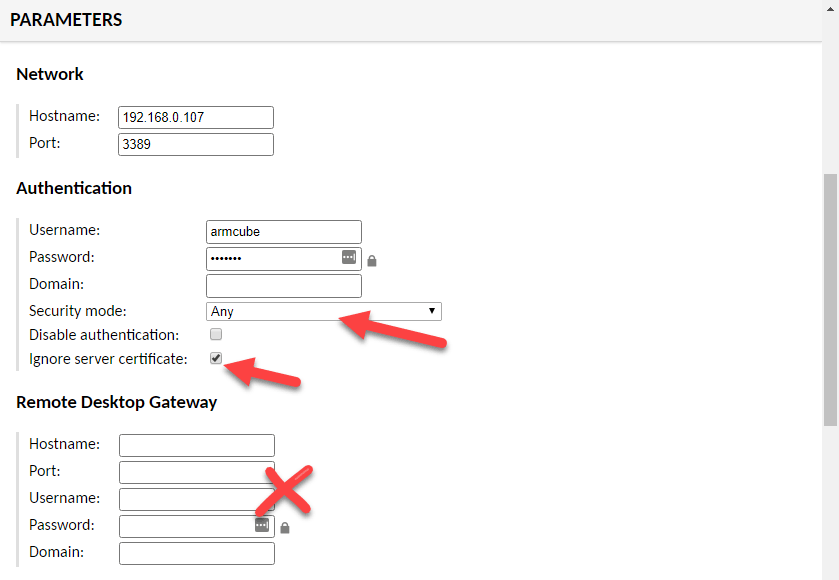
Set the name of the connection and the protocol. In this case, it is RDP. You can also set connection limits for security.
Set the “Network” to the static IP of the target Windows machine. The RDP port is 3389. Set the username and password you used when testing the RDP connection previously. The security mode can either be “Any” or NLA. TLS and RDP are not working at this time. Be sure to select “Ignore server certificate” because it is a self-signed cert that cannot be verified. Finally, make sure all the fields in Remote Desktop Gateway are empty. There are many, many options that can be set to customize your remote desktop interaction. For now, I’ve left them all off.
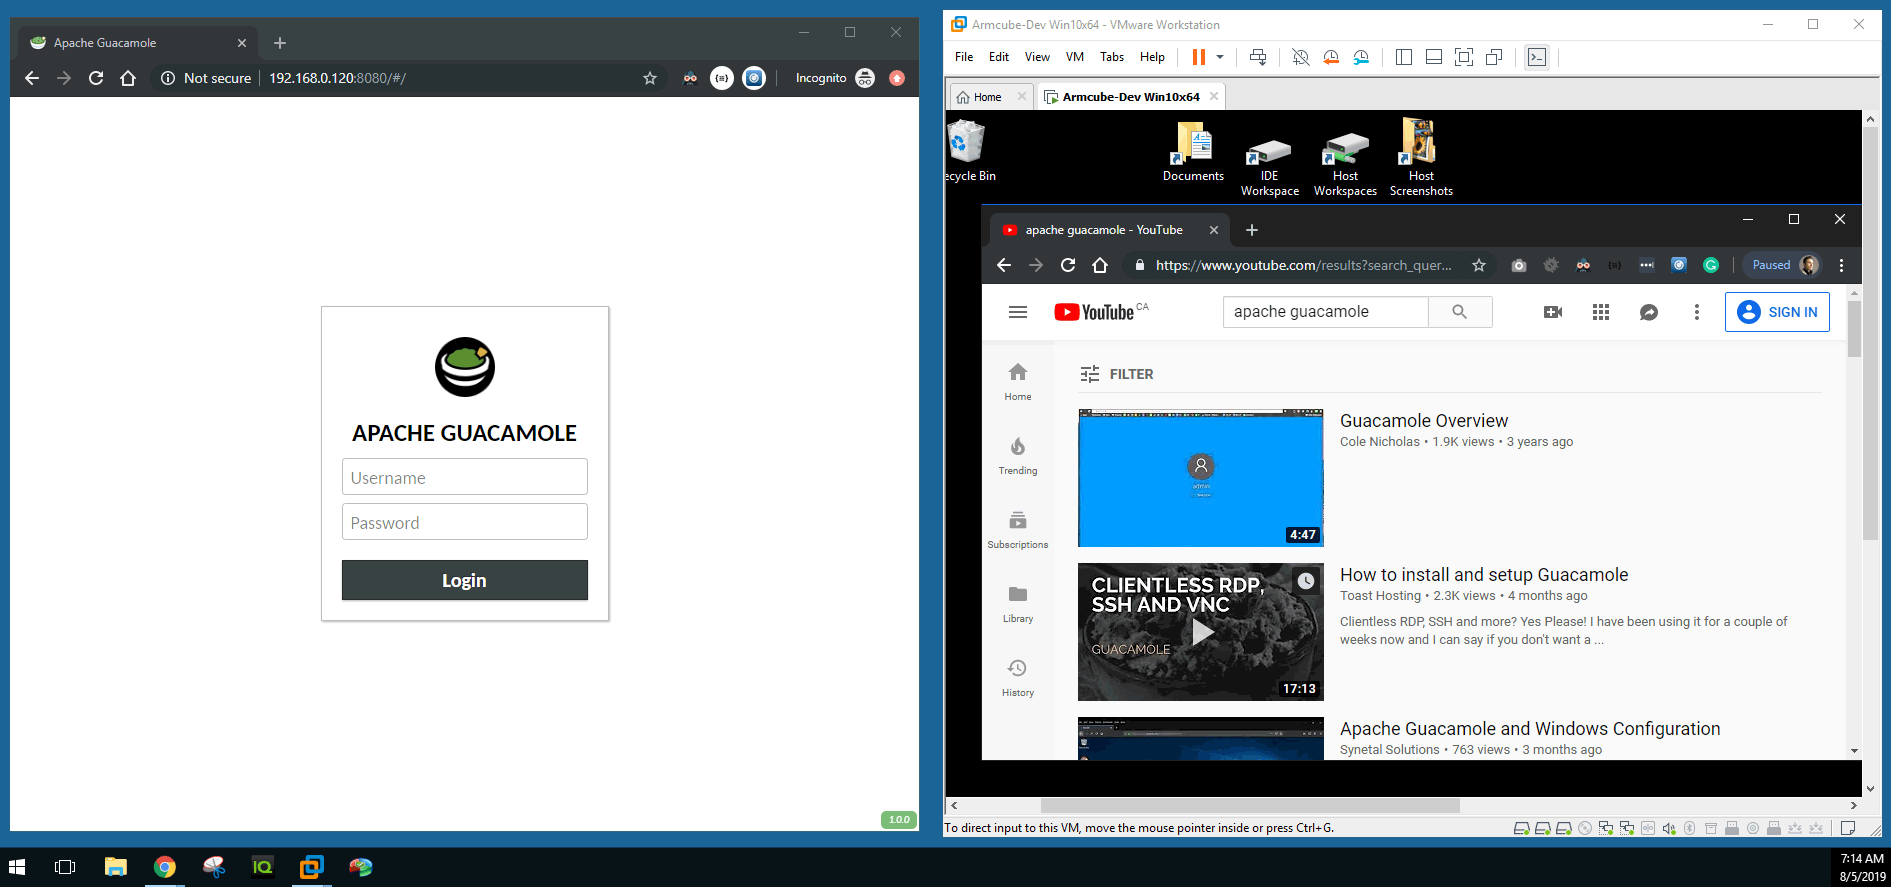
7. Test Guacamole
Let’s open a browser on the host machine and connect through Guacamole to the target Win 10 machine in a VMWare instance. If successful, you will be logged out of the target machine and be presented with an open desktop in the web browser.

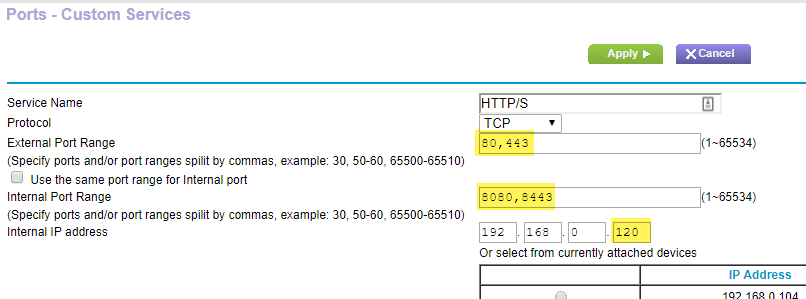
8.Forward ports 80 and 443 to the Raspberry Pi
First, let’s expose Guacamole (for now) on standard web ports 80 and 443. Both are required for Let’s Encrypt to automatically renew the certificates every 90 days anyway. This is also an opportunity to connect to the remote desktop from outside the network. I know what you’re thinking: won’t exposing port 80 stop the router’s admin screen from being accessible? No. Devices on the LAN can still see the web admin1. Devices on the WAN will be port-forwarded.
9. Add a DNS subdomain to Cloudflare
Let’s add a DNS entry to Cloudflare so we can connect to the remote desktop by typing a domain in the browser, not your ISP’s dynamic IP address (I’ll address this issue shortly). I’ll be using remote.armcube.com to connect to my VM running my development tools.
There is no need to bypass Cloudflare’s servers; we can take full advantage of the WAF2 and protecting our private IP. Set the IP (for now) to your ISP address. Set the TTL to automatic.
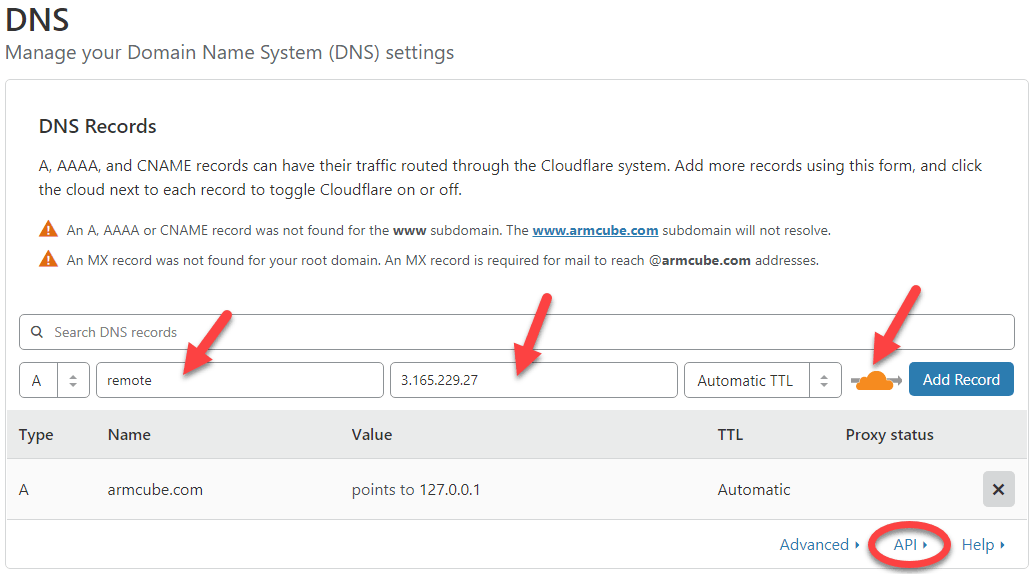
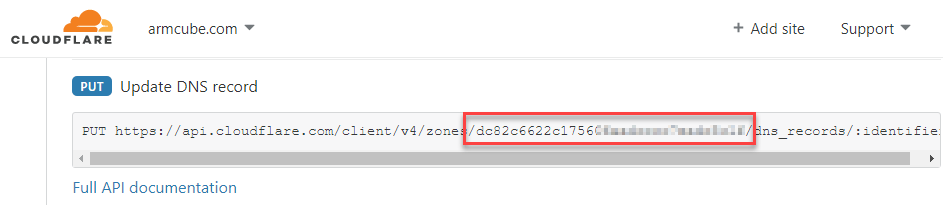
Also, click on “API” at the bottom and make note of the zone id.
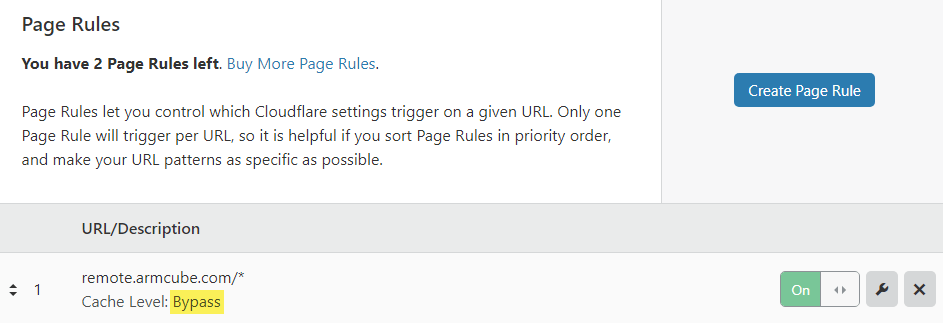
For good measure, I’ve disabled cache for the remote desktop endpoint in Page Rules.
10. Turn Cloudflare into a Dynamic DNS provider
I use Cloudflare because I can dynamically update the DNS entry when my ISP IP changes with a script and a cron job (no need to pay noip.com or dyndns.com dynamic DNS services!).
You can write your own cron job, but the same author that gave us a self-contained Guacamole Docker image put a lot of effort into an image to update Cloudflare’s DNS entry automatically. However, with this Docker image you need to surrender your global API key and Cloudflare email address.
I’ve inspected the source code and this is safe to do, but I would rather use a scoped API token. There is a fork3 that accomplishes this here. Make sure git is installed on the RPi with sudo apt install git. Get the Dockerfile and support files.
1 | git clone https://github.com/ericdraken/docker-cloudflare-ddns ~/cloudflare-ddns |
Then make the image.
1 | docker build -t cloudflare_ddns ~/cloudflare-ddns |
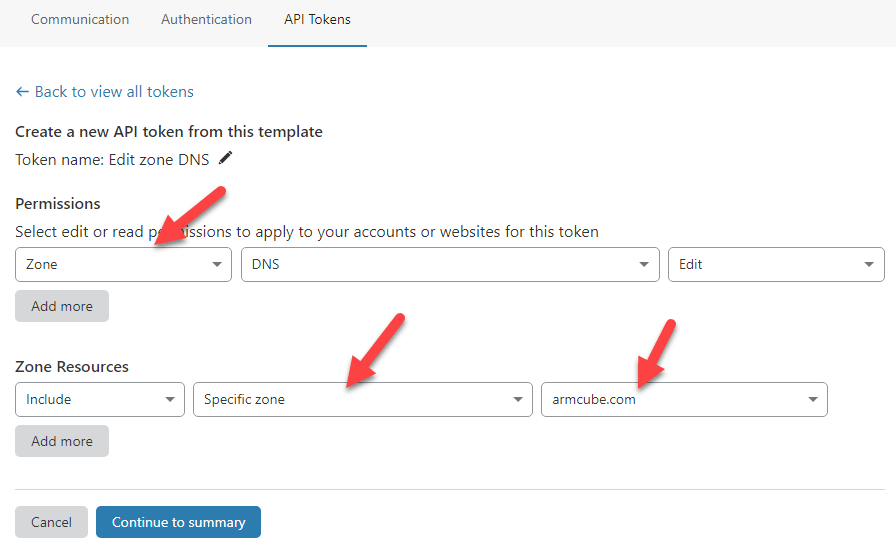
You will need a scoped API token so you don’t have to surrender your global API key. Create a new API token using the DNS template.
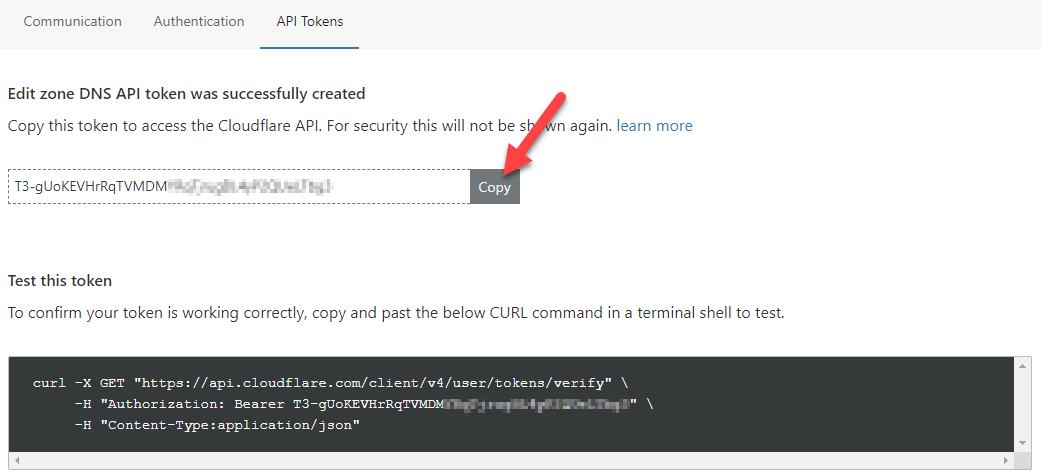
Click “Continue to summary” and then “Create Token”. Copy the API token. Be sure to paste this somewhere safe because you will never see this token again. If you lose it, you will have to “roll” the token, get a new one, and delete then recreate the DDNS container.
Start the container making sure to set the API token as API_KEY, the ZONE to your top-level domain, and the SUBDOMAIN you want. With this safer fork, you must also set the ZONEID for your domain that you obtained in the previous step. You can proxy the requests as well to take advantage of Cloudflare’s security. Start the container like so.
1 2 3 4 5 6 7 8 9 10 11 12 13 | # This container runs with limited Cloudflare permissions # so the zone id is required. docker run \ --name cloudflare-ddns \ --restart=unless-stopped \ -e API_KEY=xxxxxx \ -e ZONE=armcube.com \ -e ZONEID=xxxxxx \ -e SUBDOMAIN=remote \ -e PROXIED=true \ -e RRTYPE=A \ -e DELETE_ON_STOP=true \ cloudflare_ddns:latest |
Run the above script without the -d flag so we can see the container’s logs in the console. This way we can discover any errors or permission problems. Successful output will look like the following. Press ctrl+c to exit the container. Start it again in “detached” mode with docker container start cloudflare-ddns.

11. Test that your remote desktop is reachable
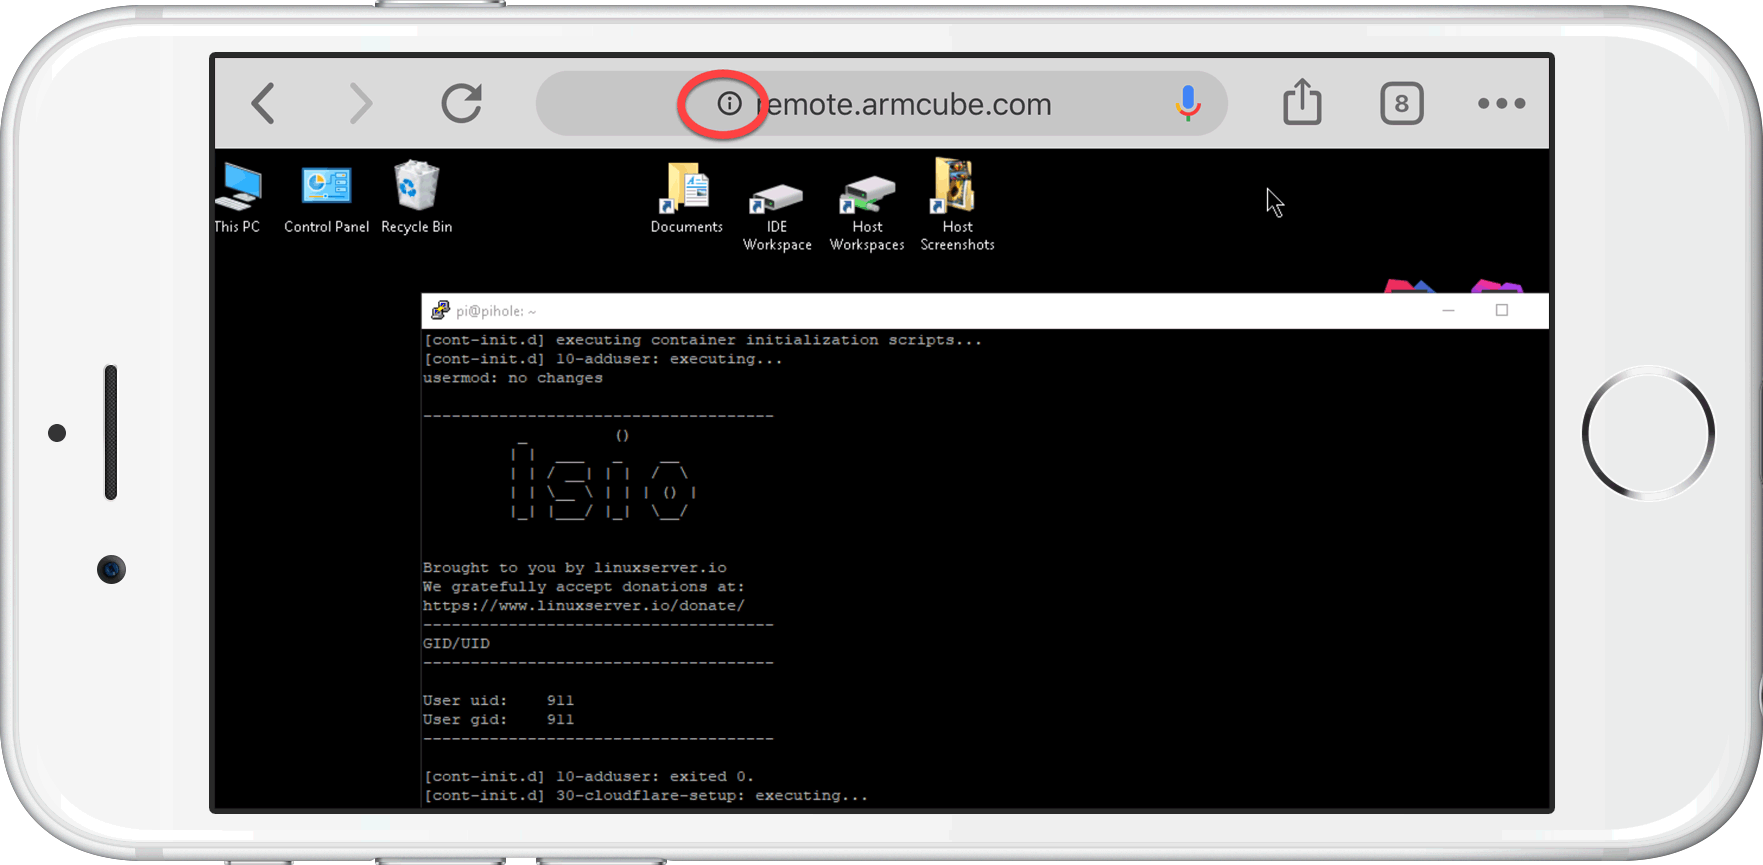
Try to connect to your remote desktop on your phone with 4G or LTE enabled.
Notice however that the connection is not yet secure.
Part 2: Secure the remote web desktop connection
Many of the Guacamole guides I’ve found end here with unsecured connections. Let’s go a step further and securely connect to the remote web desktop over HTTPS (and secure web sockets) with Let’s Encrypt. Haven’t heard of Let’s Encrypt? You really should check them out if you’re manually setting up personal TLS certificates (to achieve HTTPS connections).
The plan is to use a reverse proxy called Traefik with Let’s Encrypt to achieve an end-to-end secured session.
12. Install Docker Compose for Raspberry Pi
To make life easier, let’s use Docker Compose on the Raspberry Pi using Python pip. Run the following commands4:
1 2 3 4 5 6 7 8 9 | # Install required packages sudo apt update sudo apt install -y python python-pip libffi-dev python-backports.ssl-match-hostname # Install Docker Compose from pip. This may take several minutes on an RPi sudo pip install docker-compose # Confirm a successful install docker-compose --version |
13. Set up Traefik for a secured end-to-end connection
Let’s use a popular reverse proxy called Traefik in conjunction with Let’s Encrypt to serve as a TLS termination point into our network. I follow the official setup guide closely.
First, create a shared network for Docker containers.
1 | docker network create web |
Next, create a folder to hold configuration files on the RPi and add three empty files.
1 2 3 4 5 | sudo mkdir -p /var/traefik cd /var/traefik sudo touch docker-compose.yml sudo touch acme.json && sudo chmod 600 acme.json sudo touch traefik.toml |
Edit the traefik.toml file with the following contents making sure to use your domain and email:
1 2 3 4 5 6 7 8 9 10 11 12 13 14 15 16 17 18 19 20 21 22 23 24 25 26 27 28 29 30 | # Version 1.7 debug = false logLevel = "ERROR" defaultEntryPoints = ["https","http"] [entryPoints] [entryPoints.http] address = ":80" [entryPoints.http.redirect] entryPoint = "https" [entryPoints.https] address = ":443" [entryPoints.https.tls] [retry] [docker] endpoint = "unix:///var/run/docker.sock" domain = "armcube.com" watch = true exposedByDefault = false [acme] email = "letsencrypt-alerts@example.com" storage = "acme.json" onHostRule = true entryPoint = "https" [acme.httpChallenge] entryPoint = "http" |
Let’s add contents to the Traefik docker-compose.yaml file next.
1 2 3 4 5 6 7 8 9 10 11 12 13 14 15 16 17 18 19 20 | version: '2' services: traefik: image: traefik:1.7 container_name: traefik restart: unless-stopped ports: - 8080:80 - 8443:443 networks: - web volumes: - /var/run/docker.sock:/var/run/docker.sock - /var/traefik/traefik.toml:/traefik.toml - /var/traefik/acme.json:/acme.json networks: web: external: true |
Let’s stop the Guacamole container. This is to ensure port 8080 is not bound any longer.
1 2 3 | # Stop and remove the container docker container stop guacamole docker container rm guacamole |
Start the Traefik container with the following Docker Compose command.
1 | docker-compose -f /var/traefik/docker-compose.yml up -d |
As the second to last step, let’s make a Guacamole docker-compose.yaml file and use that from now on. Edit /var/guacamole/docker-compose.yaml with this content again making sure to use your full domain including subdomain:
1 2 3 4 5 6 7 8 9 10 11 12 13 14 15 16 17 18 19 20 21 22 23 24 25 | version: "2.1" services: app: image: oznu/guacamole:armhf container_name: guacamole restart: unless-stopped networks: - web - default ports: - 8081:8080 environment: - "TZ=America/Vancouver" volumes: - /var/guacamole:/config labels: - "traefik.port=8080" - "traefik.docker.network=web" - "traefik.frontend.rule=Host:remote.armcube.com" - "traefik.enable=true" networks: web: external: true |
14. Enable WebSockets for a smoother desktop experience
We’ll want to enable WebSockets in Guacamole for better responsiveness. Since we specified a volume in the docker-compose.yaml file above, let’s edit guacamole.properties to add the line enable-websocket: true. See below.
1 2 3 4 5 6 7 8 9 10 11 12 13 14 | # Edit with sudo because the file is owned by root in the container # sudo nano /var/guacamole/guacamole/guacamole.properties # The following lines should be auto-generated postgresql-hostname: localhost postgresql-port: 5432 postgresql-database: guacamole_db postgresql-username: guacamole postgresql-password: null ... enable-clipboard-integration: true # Add this line to enable WebSockets enable-websocket: true |
Finally, let’s restart Guacamole to take advantage of the above reverse proxy. Remember to wait about two or three minutes for Tomcat in Guacamole to start up. Don’t visit your remote desktop URL yet, however.
1 | docker-compose -f /var/guacamole/docker-compose.yaml up -d |
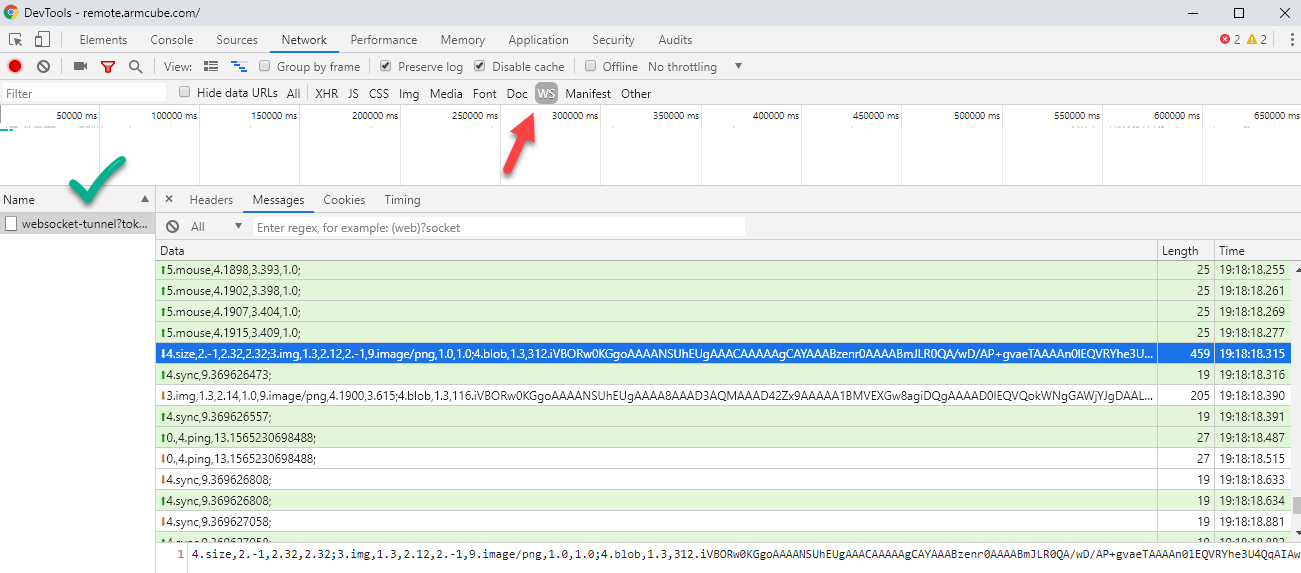
When all the steps have been completed, you can verify the WebSockets are functioning by inspecting the Network panel of DevTools in Chrome or an equivalent browser. Click on the “WS” button to verify you have a similar screen to the one below.
15. Enable strict TLS communication in Cloudflare
You may encounter a problem with infinite redirects. Cloudflare by default uses “flexible” SSL communication (which should be called TLS). What this does is allows an HTTPS (port 443) connection to a Cloudflare proxy using their free universal SSL certificate (e.g. https://remote.armcube.com/). Then, that proxy makes an HTTP (port 80) connection to the destination (e.g. http://3.165.229.27/). Traefik will redirect those insecure HTTP requests to the HTTPS version and the loop continues forever.
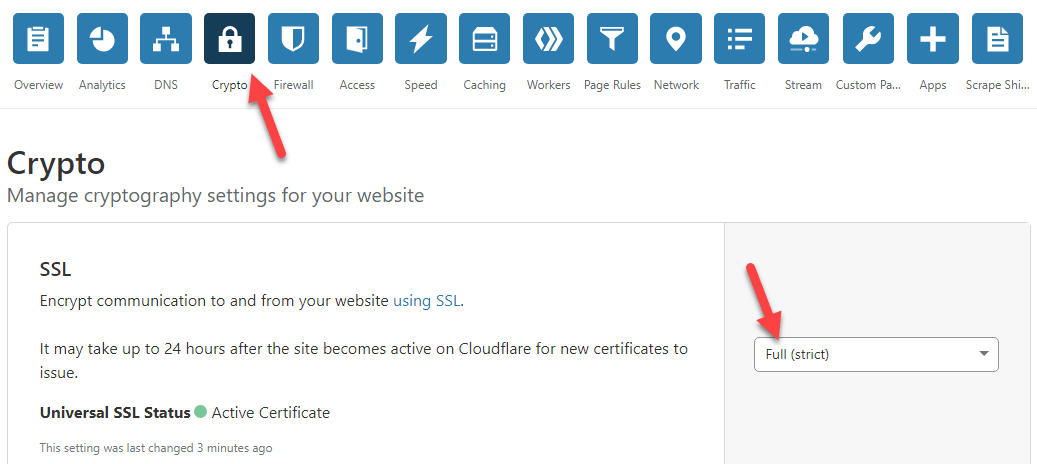
To solve this, we must enable “full (strict)” SSL communication in Cloudflare. Full and strict SSL communication secures the connection end-to-end using the certificate on the Raspberry Pi (from Let’s Encrypt) from Cloudflare to our remote desktop. This causes requests to https://remote.armcube.com/ to be proxied securely to https://3.165.229.27/.
This is enough to enable remote desktop. However, to be even more secure, I like to enable a few more settings:
- Enable HSTS
- Minimum TLS Version: 1.3
- TLS 1.3: Enabled
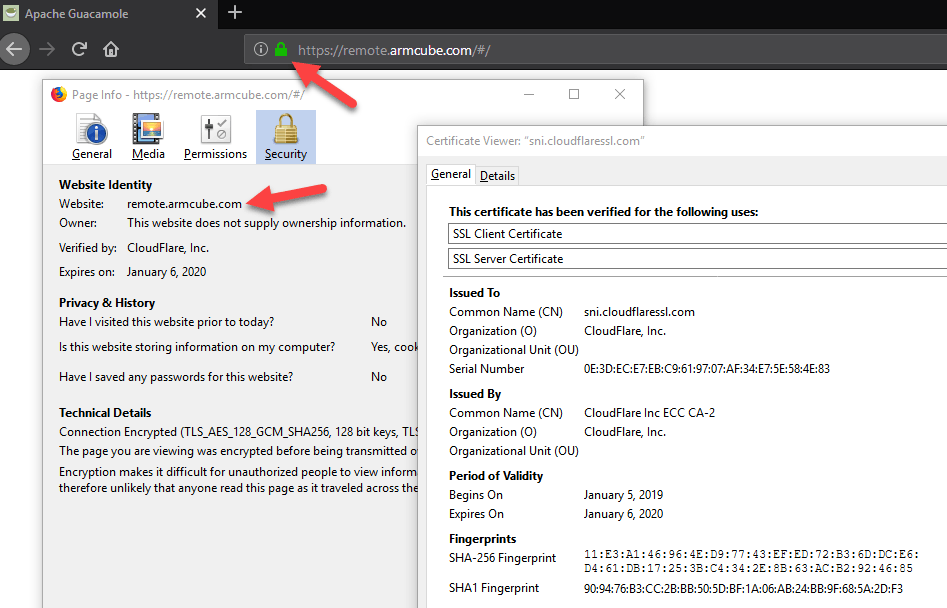
Visit your remote desktop URL and verify the SSL Client Certificate. Here is mine.
16. Add basic authentication to thwart bots
This step is optional. If you want to frustrate bots, let’s add some basic authentication. This is quite easy to do with Traefik. First, create a hashed password with OpenSSL.
1 2 3 4 5 | # Type your desired username in place of USERNAME # You will be asked for your password twice # The hashed password will have $ escaped with $ to form $$ # Copy the string afterward echo "USERNAME:`openssl passwd -apr1`\n" | sed -e s/\\$/\\$\\$/g |

Next, stop guacamole.
1 | docker-compose -f /var/guacamole/docker-compose.yaml down |
We’ll have to slightly edit the Guacamole docker-compose.yaml file by adding the following two labels. Use the openssl output above as the string after traefik.frontend.auth.basic=.
1 2 3 4 5 6 | ... labels: ... - "traefik.frontend.auth.basic=test:$$apr1$$.lP7KUhX$$RrdC5rtgH7mKoUCr5hAuL" - "traefik.frontend.auth.basic.removeHeader=true" ... |

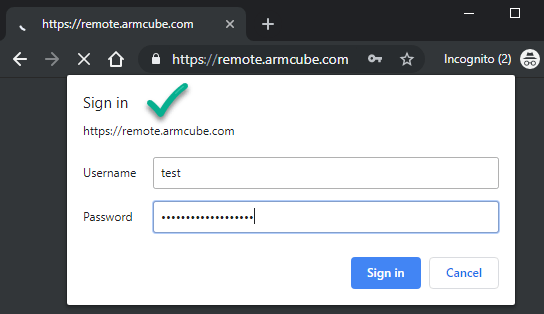
Finally, start up Guacamole again. After a couple of minutes visit your URL and you should be presented with the basic authorization challenge.
1 | docker-compose -f /var/guacamole/docker-compose.yaml up -d |
17. Set up two-factor authentication with Duo
This step is optional. I like to enable MFA whenever I can, and Guacamole supports Duo for two-factor authentication. The steps are outlined in detail at https://guacamole.apache.org/doc/gug/duo-auth.html. The way I set mine up is as follows:
1 2 3 4 5 | # Create a Duo account first, then add these properties to guacamole.properties. duo-api-hostname: xxxx duo-integration-key: xxxx duo-secret-key: xxxx duo-application-key: xxxx |
Edit the docker-compose.yaml next to add the following line to enable Duo:
1 2 | environment: - "EXTENSIONS=auth-duo" |
Restart Guacamole.
1 2 | # Restart Guacamole docker-compose -f /var/guacamole/docker-compose.yaml restart |
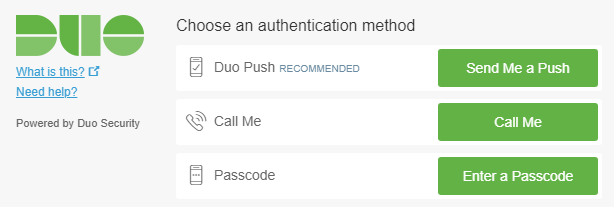
After you set up your Duo login the first time you visit the Guacamole gateway, you should be presented with a similar prompt each time you log in. This should thwart keyloggers if your machine is public, suspect, or compromised.
The final results of our efforts should be:
Notes:
- Remote web management should be disabled under normal operation, but it enabled, you will have to select a port other than port 80. ↩
- Web Application Firewall ↩
- Source: https://github.com/drewis/docker-cloudflare-ddns ↩
- Original instructions: https://withblue.ink/2019/07/13/yes-you-can-run-docker-on-raspbian.html ↩