Set up an ODROID XU4 RAID Server with Cross-Compiled Docker Images for ARM
ODROID XU4s are awesome. They are 8-core, 2GHz ARM SBCs2 with Gigabit Ethernet and USB 3.0 connections. They only have 2GB of DDR3 RAM, but when paired with a CloudShell2 case and a couple of HDDs (or SSDs), they become an impressive NAS, or better, specialty network activity drivers for other projects. For example, I use a couple for my automated data-collection work across several VPNs.

Requirements:
- ODROID XU4[Q] ($50)
- CloudShell2 case ($40)
- CloudShell2 power adapter: 15V at 4A (5.5mm, 2.15mm DC jack) ($10)
- 2x1TB HDD3 ($50 each)
- 64GB microSD A14 card ($15)
- MicroSD card reader
- Rufus v3.3 (download)
- Ubuntu tuned for XU4 (download)
Step 1 – Download Ubuntu, Flash a MicroSD Card
Download the ~370MB image and flash it directly to the microSD card with Rufus 3.3. Do check for bad blocks to avoid any surprises later. The latest image with Kernel LTS over 4.14 will automatically resize the root filesystem without a reboot. Any size card will do as you’ll move the root filesystem to disk later.
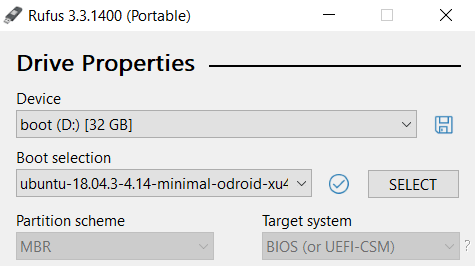
.xz file into the ~2.7GB .img file and flash that instead.Step 2 – Assemble the CloudShell2, Set the RAID Level
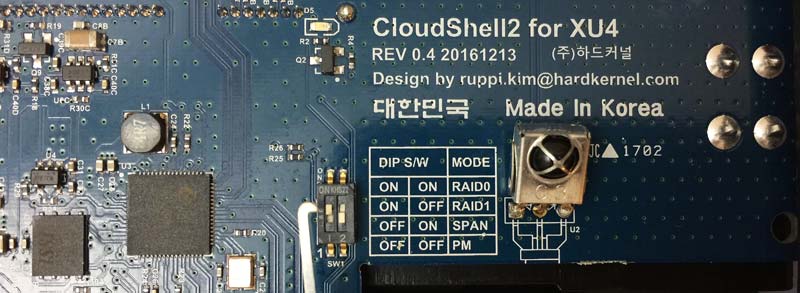
You can find several YouTube videos on assembling these cases. Set the RAID level to RAID1 by sliding the tiny LCD-board DIP switches as follows: left up, right down. Also, set the ORDROID DIP switch to boot from microSD (default setting). Plug in your LAN cable. Hold the RAID-set button on the bottom left of the LCD board down and plug in the power cord. The red lights should blink and the drives should spin. Release the button after about 10s. It may reboot once to resize the root filesystem on the microSD.
Step 3 – SSH into the ODROID, Move RootFS to Disk
Power on the Cloudshell 2 by plugging in the 15V/4A power supply.
.iso, not the .xz image (this is for me because I always forget). This works. I’m not kidding. Alternatively, the random number generator waits for mouse or keyboard input so you plug in a keyboard and press a key.Find the IP of the ORDOID with either Angry IP scanner, nmap -sn 192.168.1.0/24, or log into the gateway router and find the IP. Set a static DHCP entry as well.

When you have the IP, SSH into the device with the default username: root and password: odroid.
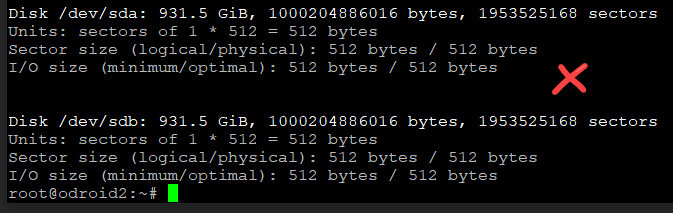
Before going any further, confirm the RAID setting is as intended. I prefer RAID1. See below.

Change your password next.
1 | passwd |
Change the hostname in a few places:
1 2 3 | hostname odroid2 vi /etc/hostname vi /etc/hosts |
Upgrade the distribution:
1 2 3 | apt-get -y update && \ apt-get -y upgrade && \ apt-get -y dist-upgrade |
Now you have the microSD card as a backup OS. Create a new boot partition (I’ll use 20GB):
1 2 3 4 5 6 7 8 | fdisk /dev/sda n # New partition p # Primary 1 # First partition [enter] # Accept the default starting sector (2048) +20G # 20GB a # Set the bootable flag on this partition p # Display the partition layout so far |
I like to create another partition for data to hold everything under the sun, but separated from the root filesystem. To do that with the remaining space:
1 2 3 4 5 6 7 | n # New partition p # Primary 2 # Second partition [enter] # Accept the default starting sector [enter] # Accept a span until the end of the disk p # Display the partition layout so far w # Write changes to disk! |
With two 1TB drives my RAID1 partition table looks like this:
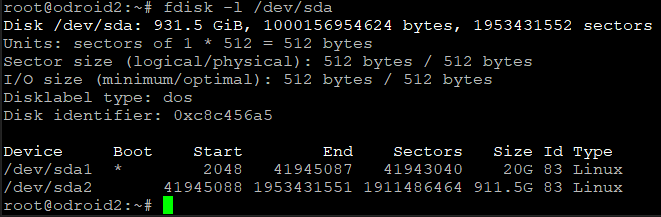
Format the partitions with ext4 and mount them:
1 2 | mkfs.ext4 /dev/sda1 && mkdir /mnt/boot && mount /dev/sda1 /mnt/boot mkfs.ext4 /dev/sda2 && mkdir /mnt/data && mount /dev/sda2 /mnt/data |
Sync the boot partition on the microSD card to /dev/sda1:
1 2 3 | apt-get install rsync # Run the next command a few times until nothing more is synced rsync -aAXv --exclude={"/dev/*","/proc/*","/sys/*","/tmp/*","/run/*","/mnt/*","/media/*","/lost+found"} / /mnt/boot |
Prepare to change the boot partition:
1 2 | cp /media/boot/boot.ini /media/boot/boot.ini.bak # Backup this file lsblk -f # Get the UUID of the new boot partition |
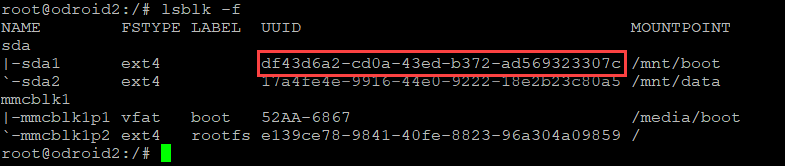
Then make these changes:
1 2 | vi /media/boot/boot.ini # Change the setenv bootrootfs UUID to the found UUID vi /mnt/boot/etc/fstab # Set the entries on the HDD boot section like the image below |

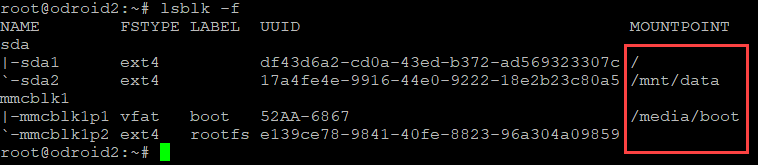
Restart your system with shutdown -r now.
boot.ini file is still read from it.Your filesystem will now look like this if you run lsblk -f or df -h --output=source,target:
Step 4 – Turn on the Fan and LCD
By now the ODROID is getting hot with the fan off. Turn on the fan and the LCD:
1 2 3 4 5 6 7 8 9 | # Install the PPA with the fan control add-apt-repository ppa:kyle1117/ppa && \ apt-get update && \ apt-get -y install \ odroid-cloudshell \ cloudshell2-fan \ smartmontools \ sysstat \ cloudshell-lcd |
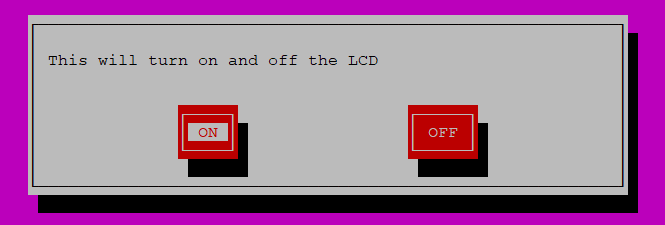
I prefer to use my own LCD and fan scripts on Github:
1 2 3 4 5 6 7 8 9 | apt-get install git && \ cd ~ && \ git clone https://github.com/ericdraken/xu4-cloudshell2-fancontrol.git && \ mv /bin/cloudshell-lcd /bin/cloudshell-lcd.old && \ cd xu4-cloudshell2-fancontrol && \ chmod +x * && \ cp cloudshell-lcd2.sh /bin/cloudshell-lcd && \ cp lcd-onoff.sh /bin/lcd && \ systemctl restart cloudshell-lcd |
To turn the LCD on and off with my LCD script, you can run lcd.
Step 5 – Install Docker and Compose
Install Docker by adding the stable ARM repo and installing the latest version:
apt-get install docker will likely install an older version of Docker on Bionic. Follow the steps below instead.1 2 3 4 5 6 7 8 9 10 11 12 13 14 15 16 17 18 19 20 21 | # Install support packages apt-get -y install \ apt-transport-https \ ca-certificates \ software-properties-common # Add Docker's GPG key and verify curl -fsSL https://download.docker.com/linux/ubuntu/gpg | sudo apt-key add - apt-key fingerprint 0EBFCD88 # Add the Ubuntu repo for ARM hosts add-apt-repository "deb [arch=armhf] https://download.docker.com/linux/ubuntu $(lsb_release -cs) stable" apt-get update # List available Docker versions then install the latest version apt-cache madison docker-ce apt-get install -y docker-ce docker --version # Enable Docker daemon on startup systemctl enable docker |
Create a docker user to pilot the server from. It’s part of the docker group so no sudo is required to operate Docker.
1 2 3 4 5 6 7 8 | # Add user 'docker' to the existing docker group adduser --ingroup docker docker cut -d: -f1 /etc/passwd # List all users on the system # Test your setup with a 'Hello, World" container su docker docker run hello-world exit # Back to root |
Install Docker Compose for ARM architectures with Python’s PIP. Be sure not to be root when installing docker-compose to limit what user scripts can do with your system (ref):
1 2 3 4 5 6 7 8 9 10 11 12 | apt-get install -y \ libffi-dev \ libssl-dev \ python \ python-pip # Drop into the docker user (note the -l) su -l docker # Install docker-compose only for the docker user (safety) # This will take a few minutes pip install docker-compose docker-compose --version |
su docker), add PATH="$HOME/.local/bin:$PATH" to your ~/.bashrc file. If you login to the shell as ‘docker’, the ~/.local/bin is automatically added to the path.1 2 | # Run docker-compose from a non-login shell for the 'docker' user echo 'PATH="$HOME/.local/bin:$PATH"' >> /home/docker/.bashrc |
Step 6 – Cross-Compile Docker Images for ARM with BuildKit
Many great Docker images are built for x64 architectures. For example, one of my favorite images is browserless/chrome but it is only supported on x64.

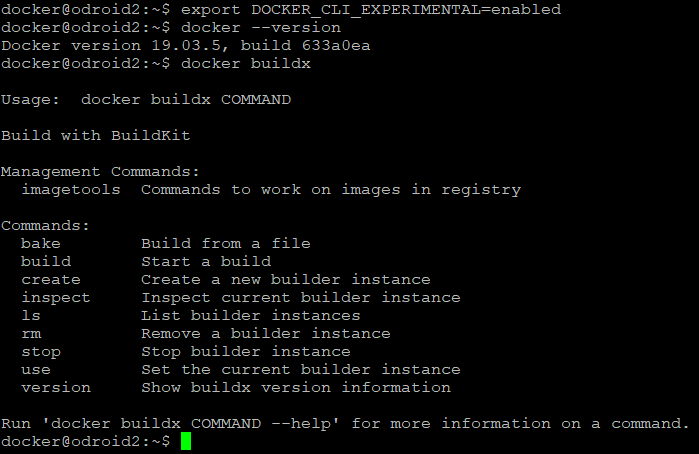
Wonderfully, with a stable Docker CE version over 19.03, new BuildKit functionality (with buildx) is included. Simply enable a flag:
1 2 | export DOCKER_CLI_EXPERIMENTAL=enabled docker buildx # Verify it works |
Architecture emulators need to be installed, but this is as easy as running the following commands on an x64 machine:
1 2 3 4 5 6 7 8 9 10 | # Set up binfmt_misc with QEMU # For the latest tag, see: https://hub.docker.com/r/docker/binfmt/tags?page=1&ordering=last_updated docker run --rm --privileged docker/binfmt:66f9012c56a8316f9244ffd7622d7c21c1f6f28d sudo apt-get install qemu-user-static # Verify QEMU files are present (qemu-arm should be present) ls -al /proc/sys/fs/binfmt_misc/ # Verify multi-architecture support on an x64 machine, # so both ARM containers should run on an x64 machine docker run --rm arm64v8/alpine uname -a docker run --rm arm32v7/alpine uname -a |
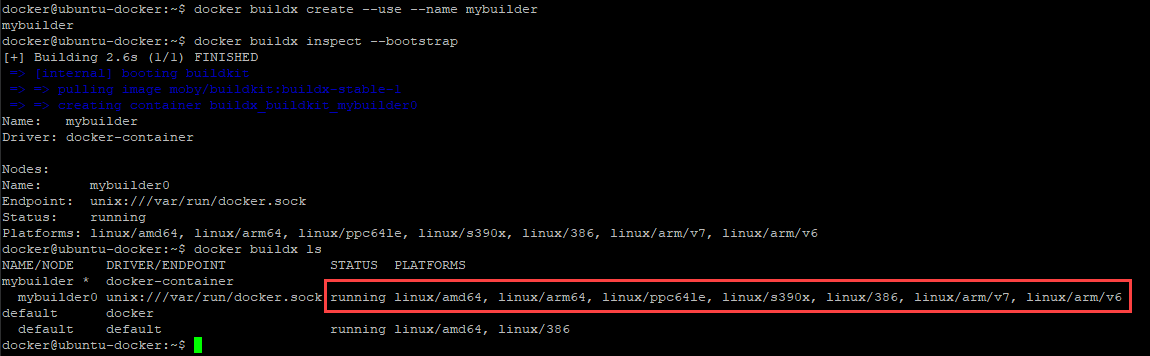
The ODROID XU4 is an ARMv7 (32-bit) processor, so the above test result is fortuitous. Next, still on an x64 system, set a multi-architecture build instance like so:
1 2 3 | docker buildx create --use --name mybuilder docker buildx inspect --bootstrap docker buildx ls |
Build the images you want for ARMv7 processors. For instance, in my Chrome-VPN project I build ARMv7 images like so and then I can pull those images to my ODROID machine.
1 2 | docker login -u <username> # Then enter your password for Docker Hub docker buildx build --platform=linux/amd64,linux/arm/v7 -t ericdraken/chrome-vpn --push . |
TCO Analysis
Taking a trip to the AWS Monthly Cost Calculator I note that an unreserved T3a.small (newest at this time) and, say, 800 GB of S3 storage in the US-WEST-2 cost over US$30/mo, not to mention data-in and data-out costs, as well as the cost-per-PUT (e.g. 1,000,000 writes or copies cost US$5) with S3. My use case requires several CPU cores for concurrent-but-low-bandwidth network requests, heavy writing, and modest RAM, so this on-prem solution is well-suited.
The TCO is either US$215 once (plus negligible electricity), or ~US$37/mo forever.
Results
High-end machines and cloud instances have their place, but not all use cases require them; sometimes a simple low-power machine with reliable spinning-platter hard drives is ideal.
Notes: