Block Malicious and Obnoxious Ads and Scripts at the DNS Level with Docker
Ads are getting more and more aggressive. Tracking scripts are bloated, pervasive, and slow down browsing.
Some ads are malicious (see: Malvertizing). Some sites even load CPU-intensive crypto-currency mining scripts in the background (e.g. CoinHive). Users discovered that a good percentage of traffic is advertisement or tracking related. This is putting a damaging strain on our mobile device data plans and batteries, and it is slowing down the internet experience in general. Not to mention how unsettling it is that the same ads follow you around the net.
Real-world example: Visitor tracking bloat
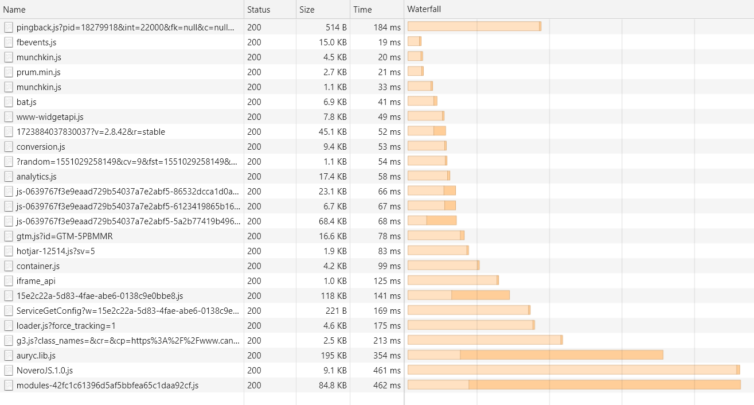
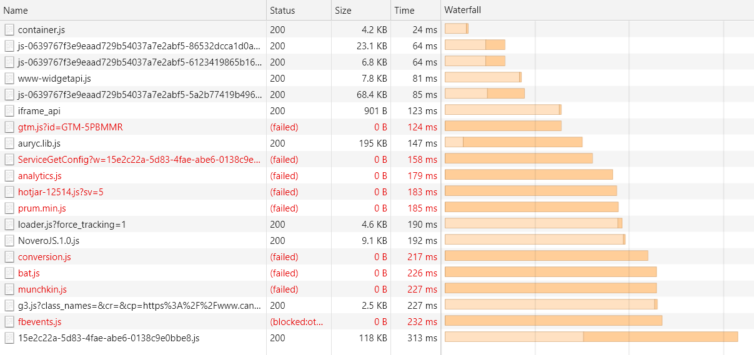
As a real example of tracking-script bloat, tracking scripts from Hotjar, Facebook, Google Ads, Google Analytics, Marketo, Bing, Pingdom, Auryc, and SnapEngage are all on each page of the sample site below1. The total tracking-script bandwidth incurred is an astounding 528KB. Let that sink in. With a responsive web design2, this website makes no distinction between desktop and mobile browsing, so you incur all that extra data use on your mobile device as well.
Philosophy
Advertisements
My philosophy is that a website should have valuable content that will be referable to for years (e.g. StackOverflow), and smart operations managers will monetize their visitors with affiliate marketing, add-on services (e.g. job recruiting), plugs for other products or services, freemium content upgrades (e.g. YouTube premium), donations, product placements, an online store, and the like. Having ads constantly flashing or auto-playing (e.g. CNET) is like living with the neon signs in dystopian cyberpunk movies. If a site makes its money from obnoxious ads, then it should engage a different business model.

Please note that I’m not endorsing blocking, say, pre-roll ads on YouTube videos, and this technique will not block those. Those ads are usually not obnoxious, and are the single way content creators are paid for their works. I’m endorsing blocking pervasive, flashing, and annoying ads that make it hard to find the content you came for.
User-tracking scripts
Tracking the user journey across a site is important for measuring site performance and gauging ROI on content. As for bloated user-tracking scripts, I suspect that when a company doesn’t know what it doesn’t know about their visitors, they inject as many tracking scripts as they can.
It is very possible to create a light-weight, in-house tracking script that can feed other tracking services on the backend via APIs in aggregate. If a company doesn’t track users responsibly then it is fair game to protect our bandwidth.
Browser ad-blockers vs DNS-level ad-blockers
Browser extension ad-blockers are quick and easy, but there are several caveats. Here are some reasons against browser ad-blockers, and reasons for DNS-level ad-blockers.

Browser ad-blockers
- They manipulate the web page in the user context (possible XSS, CSRF, or MITM exploits)
- Some have an advertiser-paid whitelist which lets selective ads through
- Web page manipulation takes up system memory and CPU time to filter HTML elements
- Most ad-block extensions are closed-source (are they safe?)
- Mobile browsers prohibit extensions at this time
- Anti-ad-blocker scripts can detect removed ad HTML elements
DNS-level ad-blockers
- Ads fail to load or timeout (looks like network trouble)
- Anti-ad-blocker scripts cannot reliably detect blocked ads
- No extra end-user system CPU or memory required
- No introduction of XSS, CSRF, and MITM attack vectors3
- Can block TLS (HTTPS) traffic unlike proxy-based blockers
- Central location of ad-blocking rules for an entire LAN
- Pi-hole is open-source
This isn’t new, but I’ve embraced an open-source project called Pi-hole to block ads and tracking code on the DNS level. I’ll explain how I run Pi-hole on a small Linux device in Docker, and it works like a charm.

Step 1. Install Docker on an Ubuntu device
There are many install guides for Docker. On my ARM Bionic Ubuntu ODROID device I use How To Install and Use Docker on Ubuntu 18.04.
For a very quick install, you can run:
1 2 3 4 5 6 7 | # Visit https://get.docker.com yourself in a browser so inspect the script curl -fsSL https://get.docker.com -o get-docker.sh # The script will prepend 'sudo' to most of the commands for you sh get-docker.sh # Execute Docker commands without sudo sudo usermod -aG docker "$USER" |
Manually, the steps are essentially:
1 2 3 4 5 6 7 8 9 10 11 12 13 14 15 16 17 18 19 20 21 22 23 24 25 26 | # Initial updates sudo apt update # Install apt packages over HTTPS sudo apt install apt-transport-https ca-certificates curl software-properties-common # Add the GPG Docker key sudo curl -fsSL https://download.docker.com/linux/ubuntu/gpg | sudo apt-key add - # Add the Docker repo (change bionic to buster or what your release is) sudo add-apt-repository "deb https://download.docker.com/linux/ubuntu bionic stable" # Update sudo apt update # (Optional) Confirm that a docker-ce candidate is available sudo apt-cache policy docker-ce # Install the Docker CE sudo apt install docker-ce # Confirm Docker is running sudo systemctl status docker # Execute Docker commands without sudo sudo usermod -aG docker "$USER" |
Unfortunately, there is no ARM build of Docker Compose, so we cannot use YAML configurations for the next part (unless we build docker-compose). We won’t need Docker Compose for this project, actually.
Step 2. Create a startup Pi-hole script
The Pi-hole project has a bash script to run the Docker container. I’ve modified it somewhat to the script below. For instance, I removed the DNS address 127.0.0.1 and changed the timezone. Please modify to your needs. I’ve called my script ~/pihole.sh. Don’t forget to chmod +x the script. Also, mkdir /var/pihole to hold persistent data.
1 2 3 4 5 6 7 8 9 10 11 12 13 14 15 16 17 18 19 20 21 22 23 24 25 26 27 28 29 30 31 32 33 34 35 36 37 38 39 40 41 42 | #!/bin/bash # File: pihole.sh # First: mkdir /var/pihole # https://github.com/pi-hole/docker-pi-hole/blob/master/README.md # Updated by Eric Draken, 2019 # Clean up dangling containers docker system prune -f docker run -d \ --name pihole \ -p 53:53/tcp -p 53:53/udp \ -p 80:80 \ -e TZ="America/Vancouver" \ -e WEBPASSWORD="" \ -v "/var/pihole:/etc/pihole" \ --privileged=false \ --dns=1.1.1.1 \ --dns=8.8.8.8 \ --restart=always \ pihole/pihole:latest # Get the eth0 IP this way because I'm using a VPN tunnel # REF: https://askubuntu.com/questions/560412/displaying-ip-address-on-eth0-interface/ IP=$(ip a show eth0 | grep -Eo 'inet (addr:)?([0-9]*\.){3}[0-9]*' | grep -Eo '([0-9]*\.){3}[0-9]*' | head -n1) printf 'Starting up Pi-hole container ' for i in $(seq 1 20); do if [[ "$(docker inspect -f "{{.State.Health.Status}}" pihole)" == "healthy" ]] ; then printf ' OK' echo -e "\nPi-hole admin: http://${IP}/admin/" exit 0 else sleep 3 printf '.' fi if [[ $i -eq 20 ]] ; then echo -e "\nTimed out waiting for Pi-hole start, consult check your container logs for more info run: docker logs pihole" exit 1 fi done; |
Step 3. Open the firewall ports
First, see what is already open with ufw status.
If you are confident in your firewall-fu, open port 53 and 80. I restrict the ports to the local /16 subnet and eth0 because I have a VPN set up and would like to prevent traffic from tun0.
1 2 3 4 5 | # Open DNS port 53 to the subnet on eth0 sudo ufw allow in on eth0 from 192.168.0.0/16 to any port 53 # Open HTTP port 80 to the subnet on eth0 sudo ufw allow in on eth0 proto tcp from 192.168.0.0/16 to any port 80 |
sudo ss -tulpn), then you may have to disable the systemd-resolved service. See here.Step 4. Start Pi-hole and set the admin password
Change directory to the home folder of the new user (cd ~) and run ./pihole.sh. After a few moments, the Docker container should be up and running.

Set a permanent password with an interactive shell into the running Pi-hole container:
1 2 3 4 5 6 7 8 | # Log into the bash shell of the running Pi-hole container docker exec -it pihole /bin/bash # Create a web interface password pihole -a -p <your web password> # Exit the shell exit |
The Docker container should automatically restart on errors and a system reboot. If you need to stop it explicitly, run docker stop pihole.
Step 5. Log in to the Pi-hole web interface
I’ve statically set my ODROID device IP to 192.168.0.106, so I can log in from my LAN at http://192.168.0.106/admin. Click “login” and enter the password you set in step 4. You should see a dashboard similar to the one below.
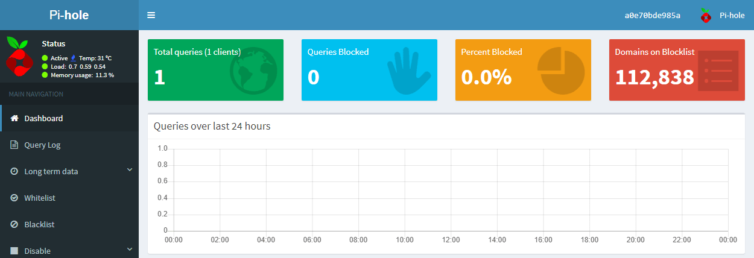
For all the settings, tools, and features please see the Pi-hole docs page.
Step 6. Set cron jobs to update ad lists and rotate logs
Test that you can update Gravity manually first with docker exec pihole pihole updateGravity.
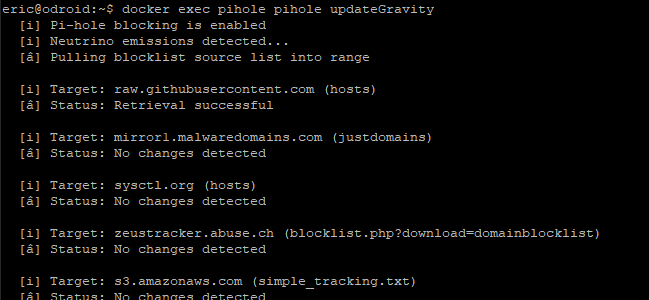
Next, if you wish to flush the logs and statistics, you can run docker exec pihole pihole flsuh.

Run sudo crontab -e and add these rules. Change the settings to suit your time schedule. You can experiment with timings here.
1 2 3 4 5 | # Pi-hole: Update the ad sources once a week on Saturday at 02:00 0 2 * * SAT docker exec pihole pihole updateGravity > /dev/null # Pi-hole: Flush the logs and stats once a day to save memory 0 0 * * * docker exec pihole pihole flush > /dev/null |
The cron scheduler should be immediately updated.
Step 7. Set DNS server entries
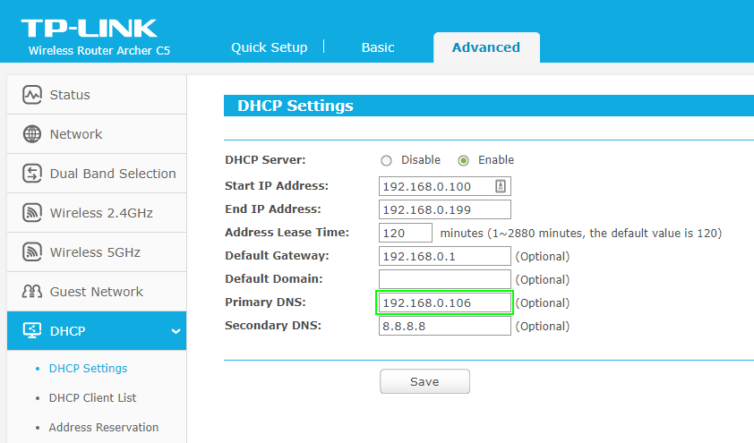
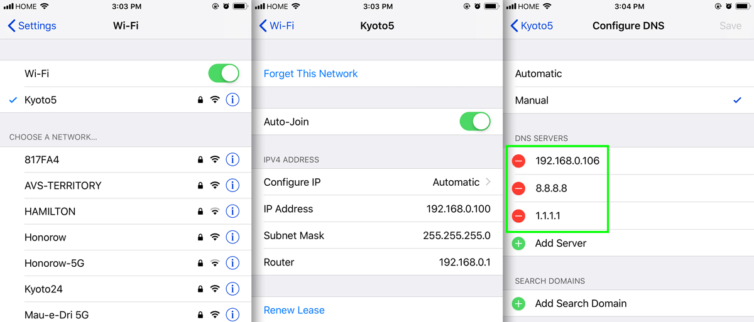
In order to start blocking ads and tracking scripts, you’ll need to update the DHCP settings in your LAN router. If you set the primary DNS to the Pi-hole device, then all the devices on your LAN that are assigned a local IP will automatically use the Pi-hole device. You won’t need to make manual DNS changes on your smartphone, for example.
An iPhone, for instance, will pick up the new DNS servers automatically with zero configuration.
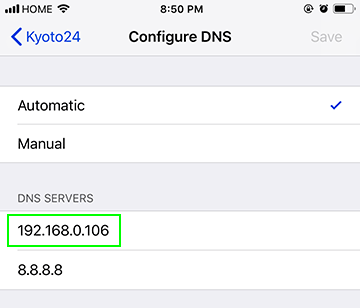
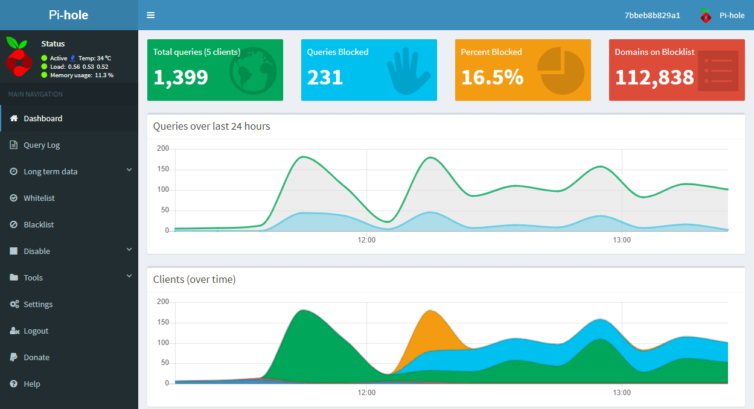
With the above configuration, LAN devices will use the new DNS server at 192.168.0.106 and your Pi-hole dashboard will start looking like the one below.
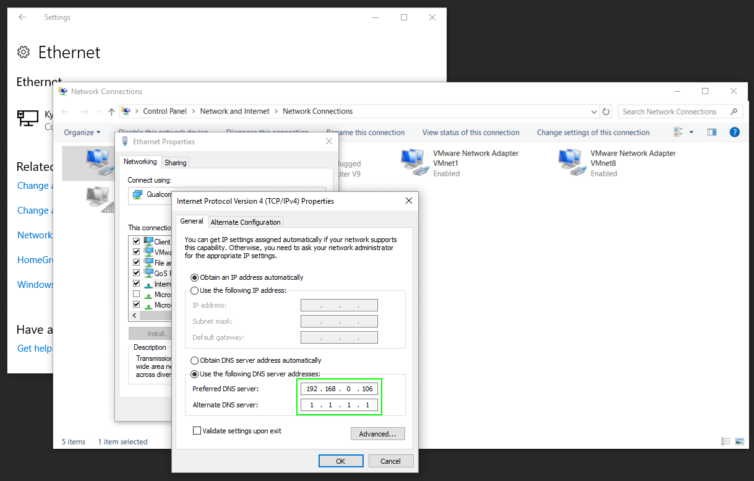
In case you are unable to change your router settings, for example you are in a corporate environment, then you can manually adjust your device DNS settings. Here are the most common devices:
Windows
For each IPv4 connection on each adapter you wish to manually configure, set the primary DNS address to your Pi-hole machine, and the secondary DNS address to Google’s (8.8.8.8) or Cloudflare’s (1.1.1.1) in case the Pi-hole device goes down.
OSX
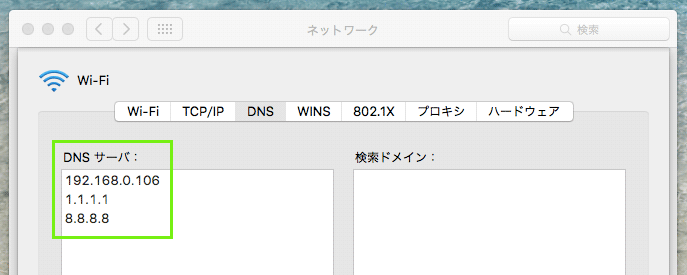
You can set the system-wide DNS server IPs here in Settings.
IPhone
IPhone can be configured to use custom DNS settings as well. You will be amazed by how much faster your mobile browsing experience is after this setup.
Linux
There are too many Linux flavors and variations to go over, but the steps revolve around editing /etc/network/interfaces or /etc/network/interfaces.d/* to add dns-nameservers 192.168.0.106.
For Ubuntu/Debian you can perform these edits (ref):
1 2 3 4 5 6 7 8 9 10 11 | # In /etc/resolvconf/resolv.conf.d/head or # in /etc/dnsmasq.conf add these lines: nameserver 192.168.0.106 nameserver 1.1.1.1 nameserver 8.8.8.8 # Restart networking sudo service network-manager restart # Verify the nameservers are in effect sudo tail -n 200 /var/log/syslog | grep nameserver |
Step 8. (Optional) Flush your DNS caches
Flush your browser DNS cache for Pi-hole to take immediate effect. For Chrome, navigate to chrome://net-internals/#dns and clear your DNS cache. On Windows, run the command ipconfig /flushdns. This varies from system to system. Here is a guide to clearing the DNS cache of many systems.
Alternatively, since the TTL (time to live) for most DNS records is between thirty minutes and one day, you can wait out the expiration of your DNS cache. Many sites behind Cloudflare, for example, have a TTL of just thirty minutes by default.
Results
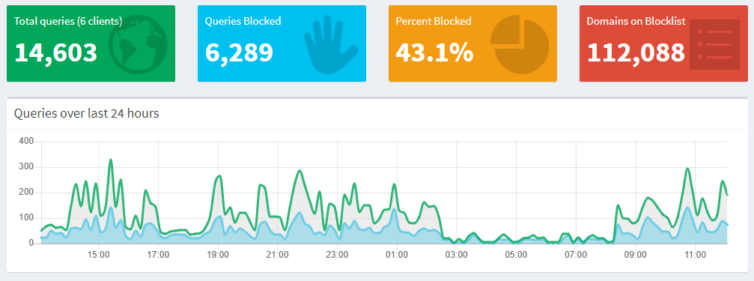
You now have a hardware Linux device running Docker running Pi-hole to resolve DNS requests for devices on the LAN, and block DNS requests of known tracking scripts, obnoxious ads, and other unwanted traffic that could harm your computers, increase your data costs, and drain your mobile batteries quickly. The device is auto-updating, and logs are flushed once a week on Monday. If the device goes down, then the secondary Google or Cloudflare DNS resolvers will be used safely.
In the above graph can you see when I sleep?
^.{10,}\.cnet\.com$There are deeper setting in Pi-hole. If you wish to whitelist advertisements or tracking scripts to patronize your favorite sites, you have that ability.
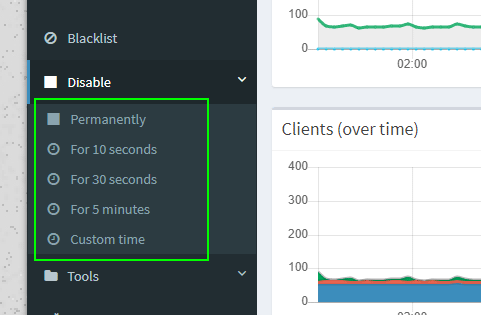
Also, if you need to turn off Pi-hole temporarily, you can do so from the admin panel (e.g. http://192.168.0.106/admin).
Back to that real-world example, this network waterfall is much more satisfying.
Bonus: Block Microsoft Updates
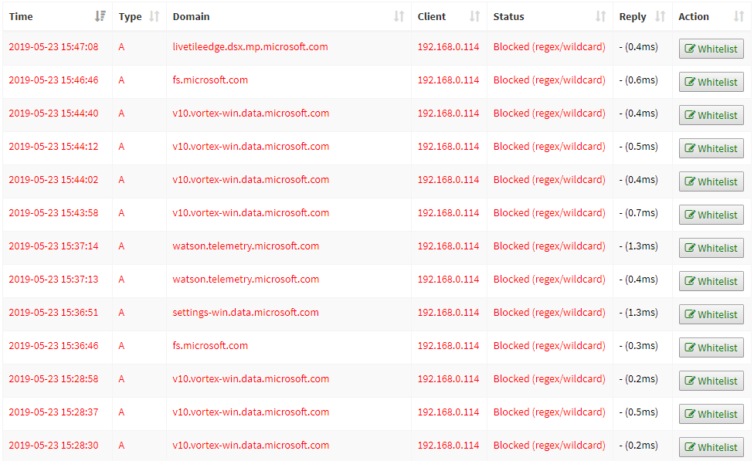
Microsoft phones home dozens of times a minute! Can you imagine that? Would you like to prevent your Windows 10 computer from restarting itself on Tuesday and losing all your open work? Would you like to control when Windows updates itself and not until you are good and ready? Me too. I’ve added these to my blacklist:
1 2 3 | (^|\.)microsoft\.com$ (^|\.)azureedge\.net$ (^|\.)windowsupdate\.com$ |
When I feel like updating Windows, which is Sunday each week, I temporarily disable Pi-hole and within seconds Windows dives into update mode with all its notifications and reminders glory. It’s as simple as that. And, it feels good to be in control of Windows.
References
- GitHub: pi-hole/docker-pi-hole
- How To Install and Use Docker on Ubuntu 18.04
- How to run pi-hole in a Docker container
- Ghost in the Shell image by Ash Thorp (source)
Notes:
- I’m protecting the site’s identity, but it is a popular site. ↩
- The same website codebase can be used on mobile and desktop and can handle browser window resizing gracefully. ↩
- A competing DNS ad-blocker could perform something called DNS poisoning whereby legitimate ads are replaced with ads by the software author for profit, but then we’d see ads. Pi-hole is open-source and community maintained. ↩